Introduction
This document contains an step-by-step (hands-on)process that can be used to get a better understanding of TIBCO BusinessWorks Container Edition on Docker.
This document contains instructions for the following exercises:
- Exercise 1: Install BWCE
- Exercise 2: Create a Hello World application
- Exercise 3: Using environment variables with a BWCE application
Preperation steps:
Preparation Step A) Have available a docker VM.
A1) In this document it is assumed BWCE is installed on CentOS. If you don’t have a CentOS VM available download it from open osboxes.org.
A2) Install docker using the following documentation: https://docs.docker.com/engine/installation/linux/centos/
Preparation step B) Create a directory ‘~/mydocker’.
B1) Login to the Docker Linux server (created in step A).
B2) Type ‘cd ~’
B3) Type ‘mkdir mydocker’.
Preparation step C) Upload the following file courseFiles.zip to your home directory and unzip it in ~/courseFiles.
The zip file contains all files needed in this exercise.
courseFiles.zip: courseFiles.zip
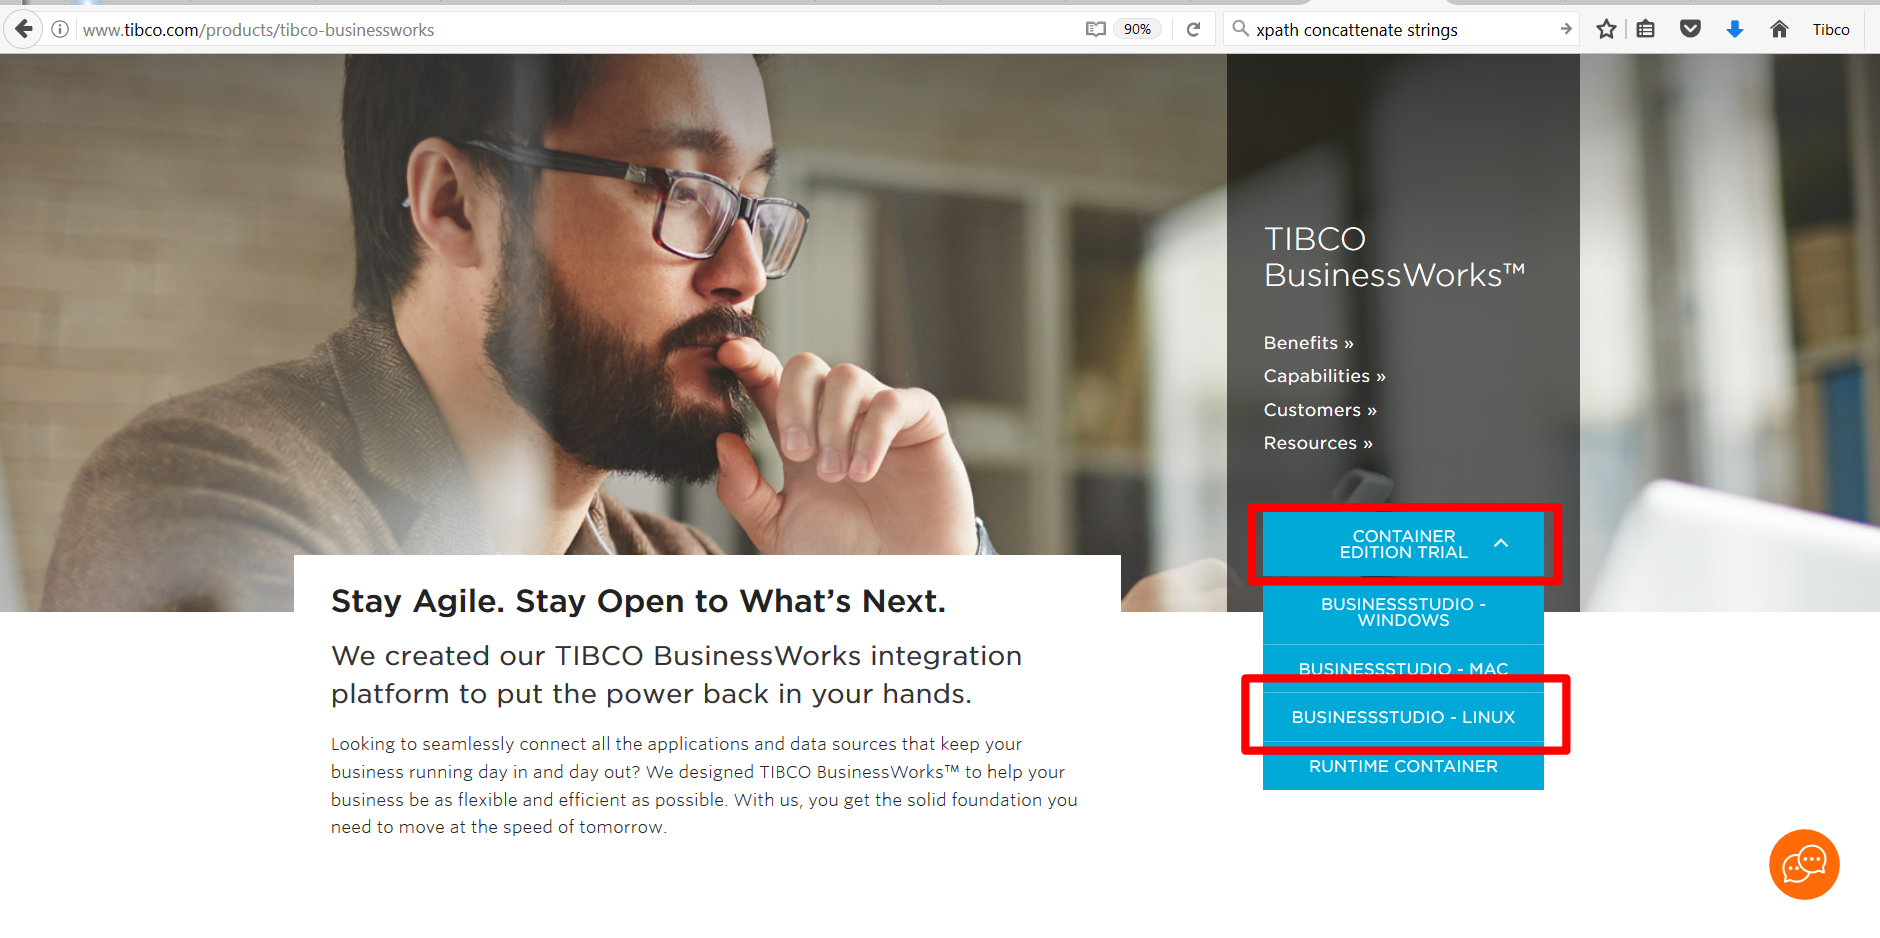
Preparation step D) Download BusinessWorks Container Edition – Studio for Linux from TIBCO edelivery (TIBCO Customers only) or get an evaluation version from here. This document is based on BWCE 2.2.1 and 2.3.2
Unzip the files in ~/software/bwce/studio.
For the trial version use the button ‘Container edition trial’ and select BusinessStudio Linux
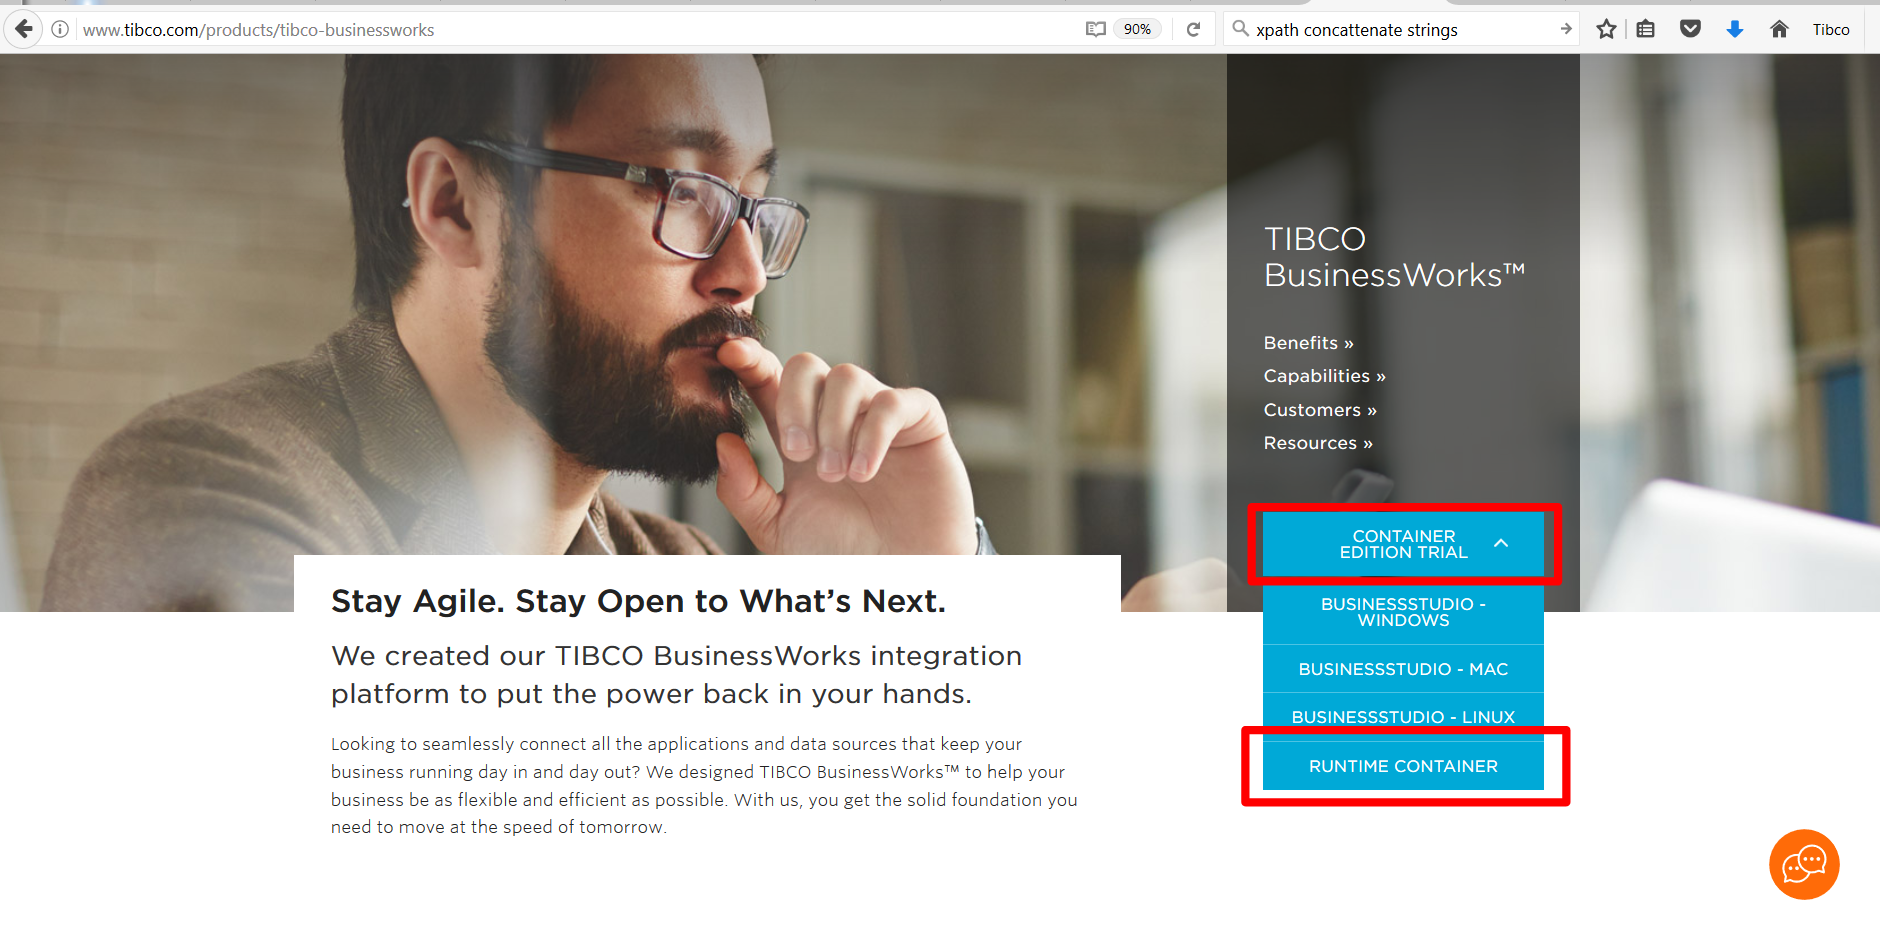
Preparation step E) Download BWCE – runtime container (bwce_cf.zip) from TIBCO edelivery (TIBCO Customers only). Please mind: it must be downloaded seperately. It is included in the BWCE package. Make sure you select ‘container’ as the category. If you don’t have BW license you may download a trial version from: [http://www.tibco.com/products/businessworks-ce].
For BWCE 2.2.1: Store the file bwce_cf.zip in the directory ~/software/bwce/runtimecontainer
For BWCE 2.3.2: Store bwce-runtime-2.3.2.zip in the directory ~/software/bwce/runtimecontainer
For the trial version use the button ‘Container edition trial’ and select Runtime Container:
Exercise 1: Install BWCE
Step 1) Install TIBCO BWCE Studio
a1) Login to your VM using a graphical interface.
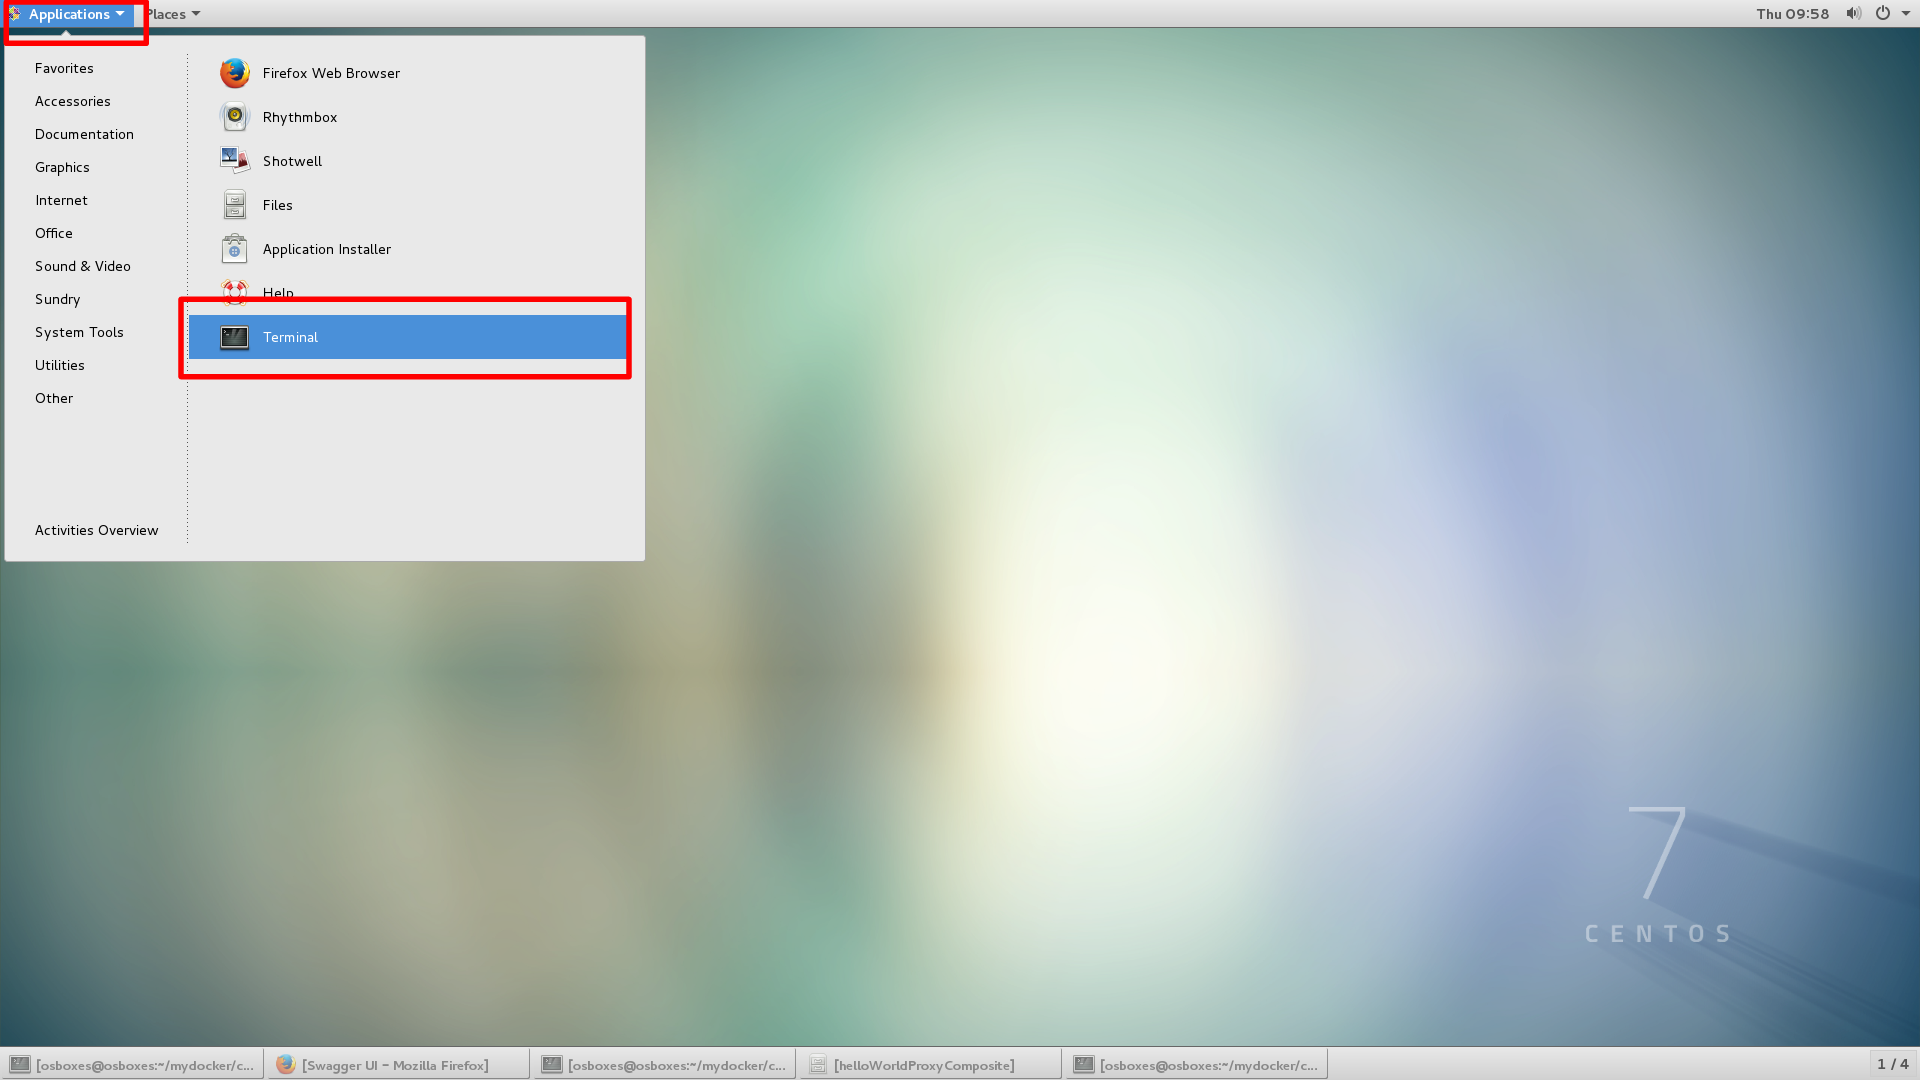
a2) Open a terminal. Do so by clicking ‘Applications –> Terminal’
b1) in the terminal window go to the directory ~/software/bwce/studio (cd ~/software/bwce/studio)
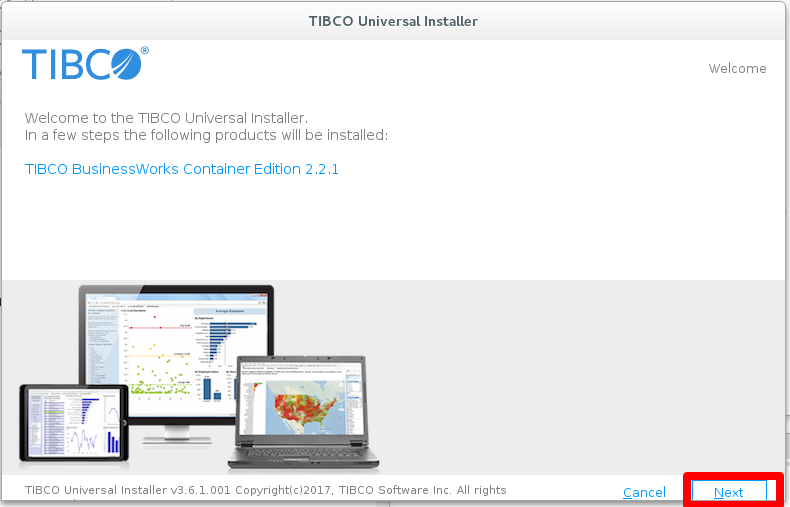
b2) Start the universal installer with sudo rights (sudo ./TIBCOUniversalInstaller-lnx-x86-64.bin)
c) Click next on the welcome screen
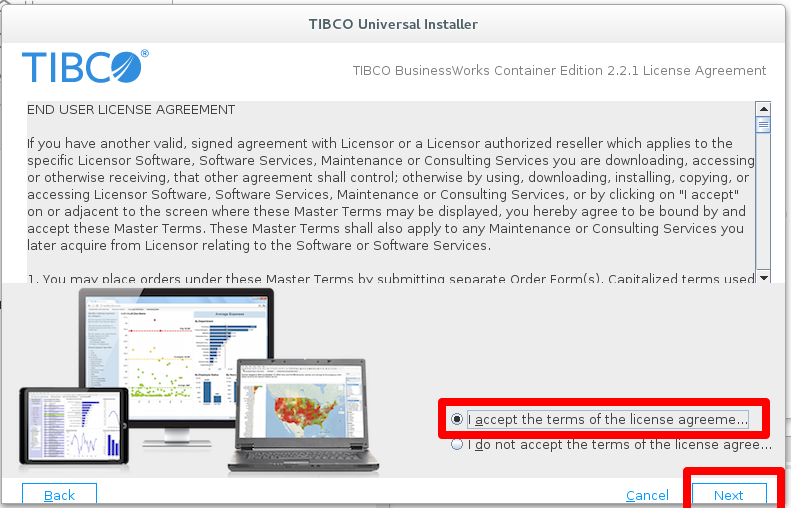
d) Review the Terms and Condition, if these are acceptable click ‘I accept’ and click next.
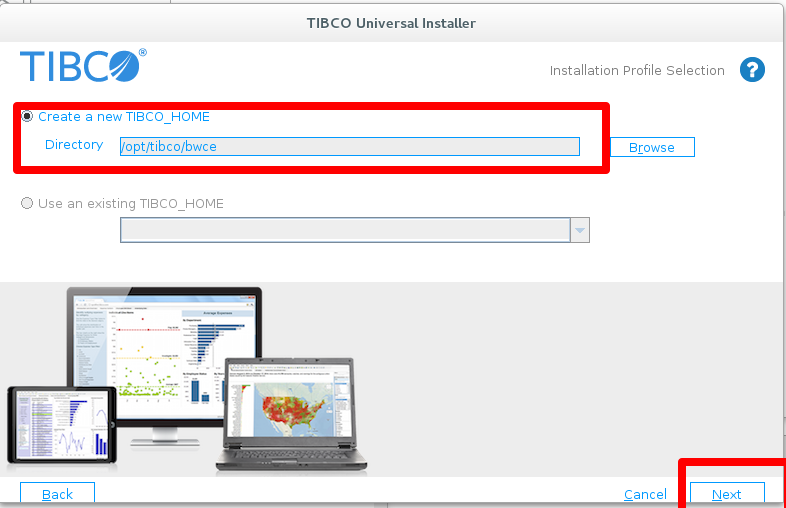
e) Install studio in the default directory (/opt/tibco/bwce) and click next
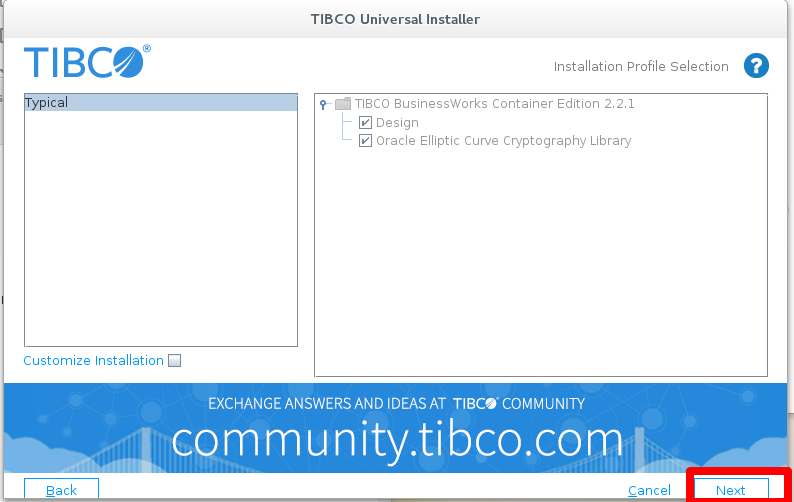
f) Accept the typical profile and click next
g) Review the Terms and Condition, if these are acceptable click ‘I accept’ and click next.
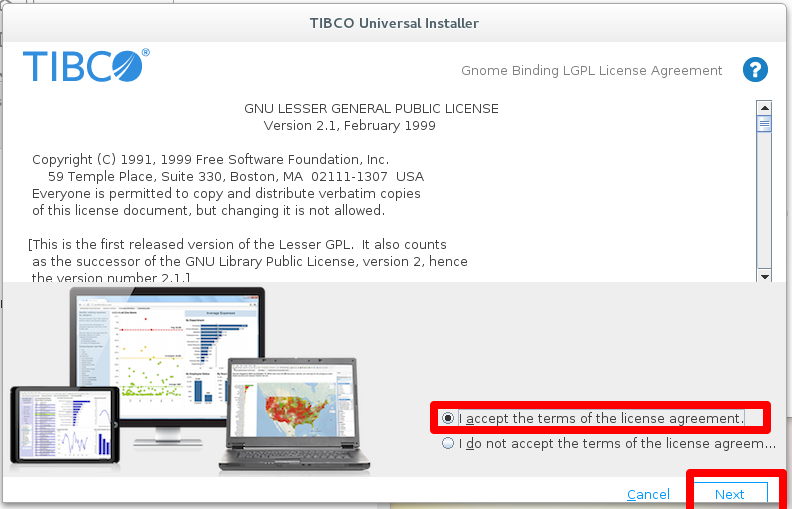
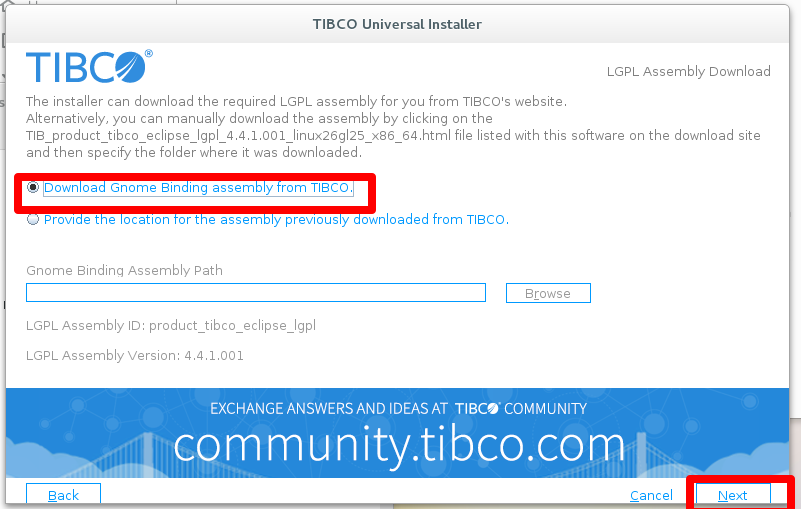
h) Accept to download the Gnome binding assembly from TIBCO and click next
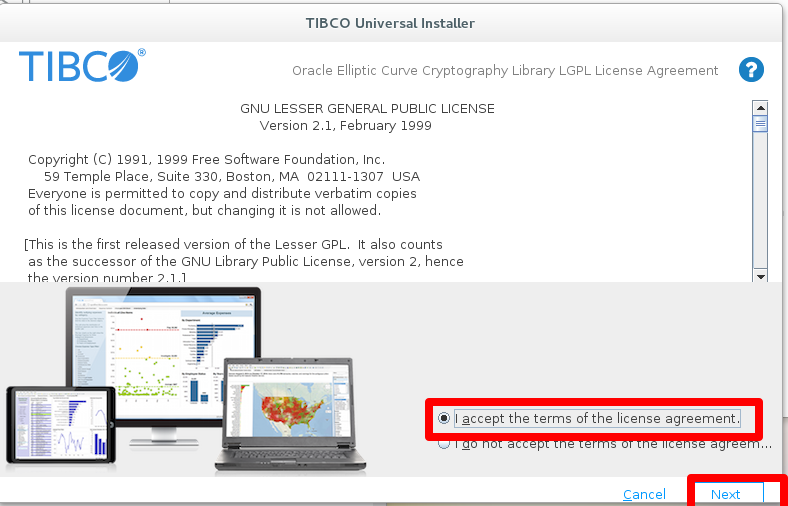
i) Review the Terms and Condition, if these are acceptable click ‘I accept’ and click next.
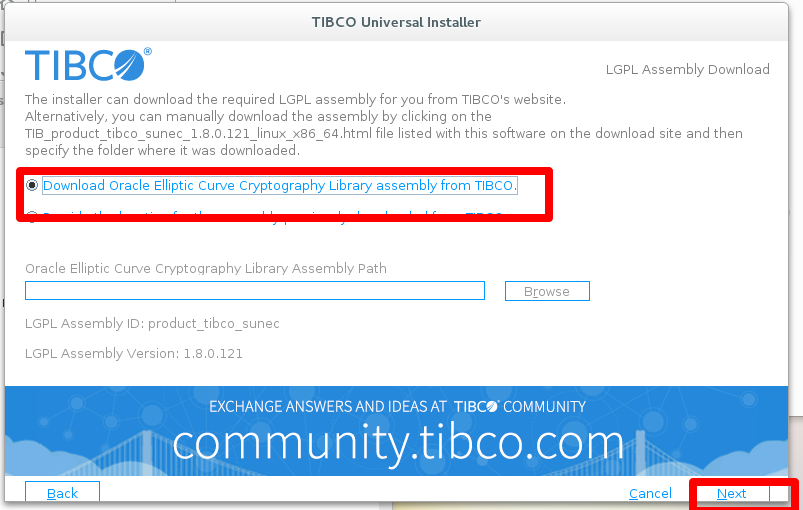
j) Select the ‘Download Oracle Elliptic Curve Crypto Librarary’ and click next.
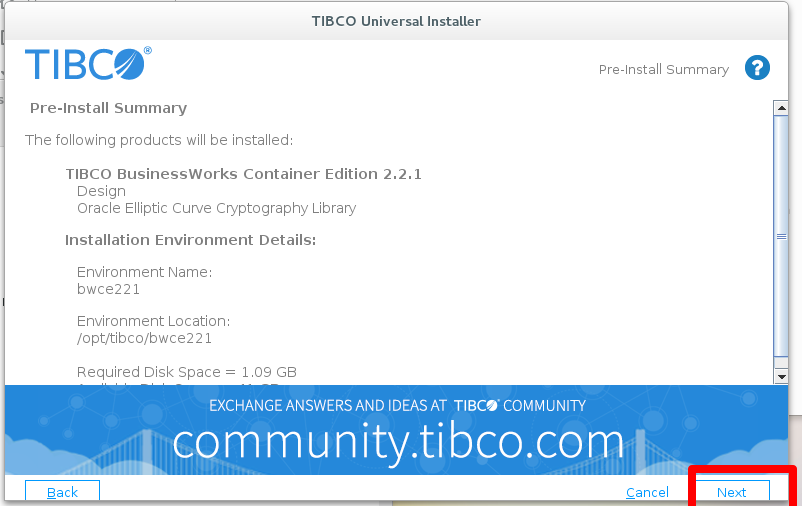
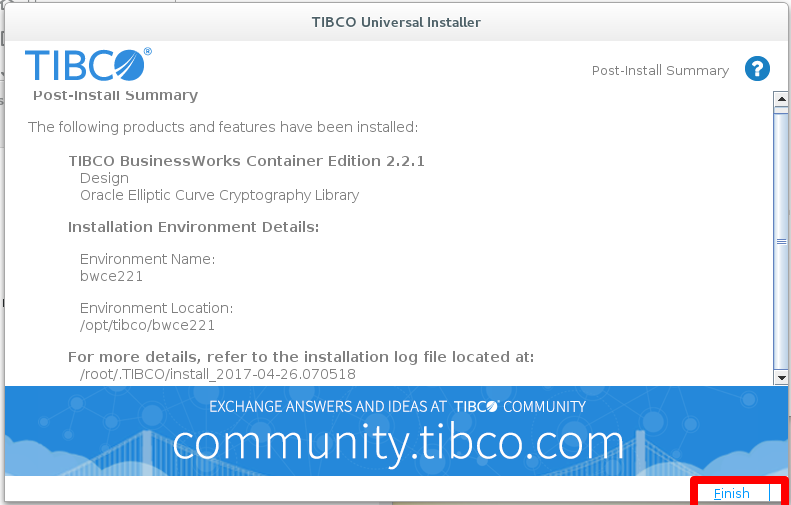
h) Review the summery and click next.
i) Click finish on the final installation screen.
Step 2) Create a base image for BWCE
TIBCO has available an image that is to be used to run BWCE application. This image must be setup first.
2a) Create a directory ~/mydocker/bwcebase
For BWCE 2.2.1:
b) Copy the directory <TIBCO HOME>/bwce/<version>/docker to ~/mydocker/bwcebase (TIBCO_HOME is probably /opt/tibco/bwce)
c)
For BWCE 2.2.1: Copy ~/software/bwce/runtimecontainer/bwce_cf.zip to ~/mydocker/bwcebase/docker/resources/bwce-runtime
For BWCE 2.3.2: Copy bwce-runtime-2.3.2.zip to ~/mydocker/bwcebase/docker/resources/bwce-runtime
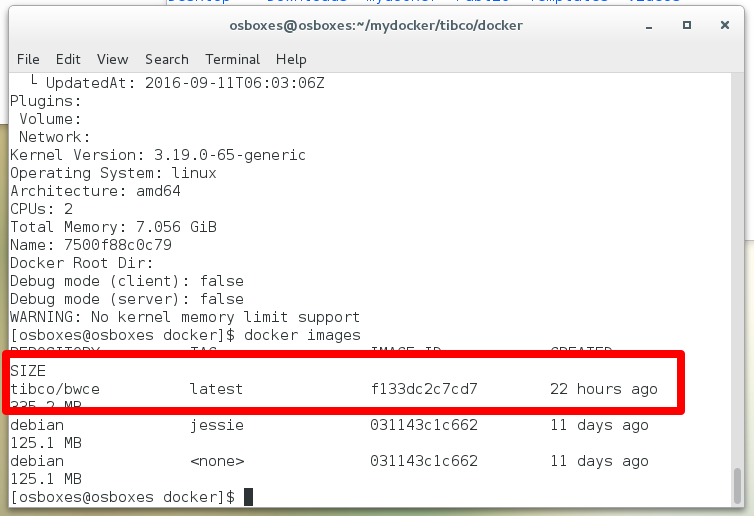
d) Goto ~/mydocker/bwcebase/docker run ‘docker build -t tibco/bwce:latest .’. The base bwce image will now be created.
e) Type ‘docker images’ to verify that the BWCE image was created successfully.
Exercise 2: Create a hello world application
In this exercise we will create, deploy a test a hello world BWCE application on docker. This restful application will take a name on the command line (http://localhost:8080/<yourname>). It will reply with ‘hello world <yourname>’.
While it is not the scope of this course to cover the creation of BW6 (BWCE) applications, the hello application is made available beforehand.
Step 1: Startup Business Studio and create a workspace for the hello world application
a) Go to the directory /opt/tibco/bwce/studio/4.0/eclipse and start TIBCOBusinessStudio (./TIBCOBusinessStudio)
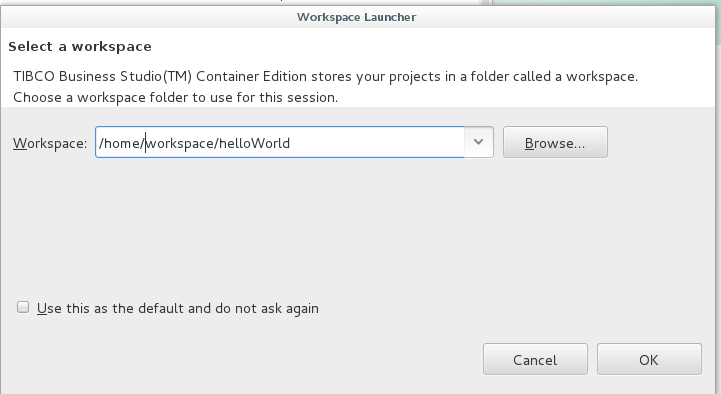
b) Open an new workspace in /home/workspace/helloWorld
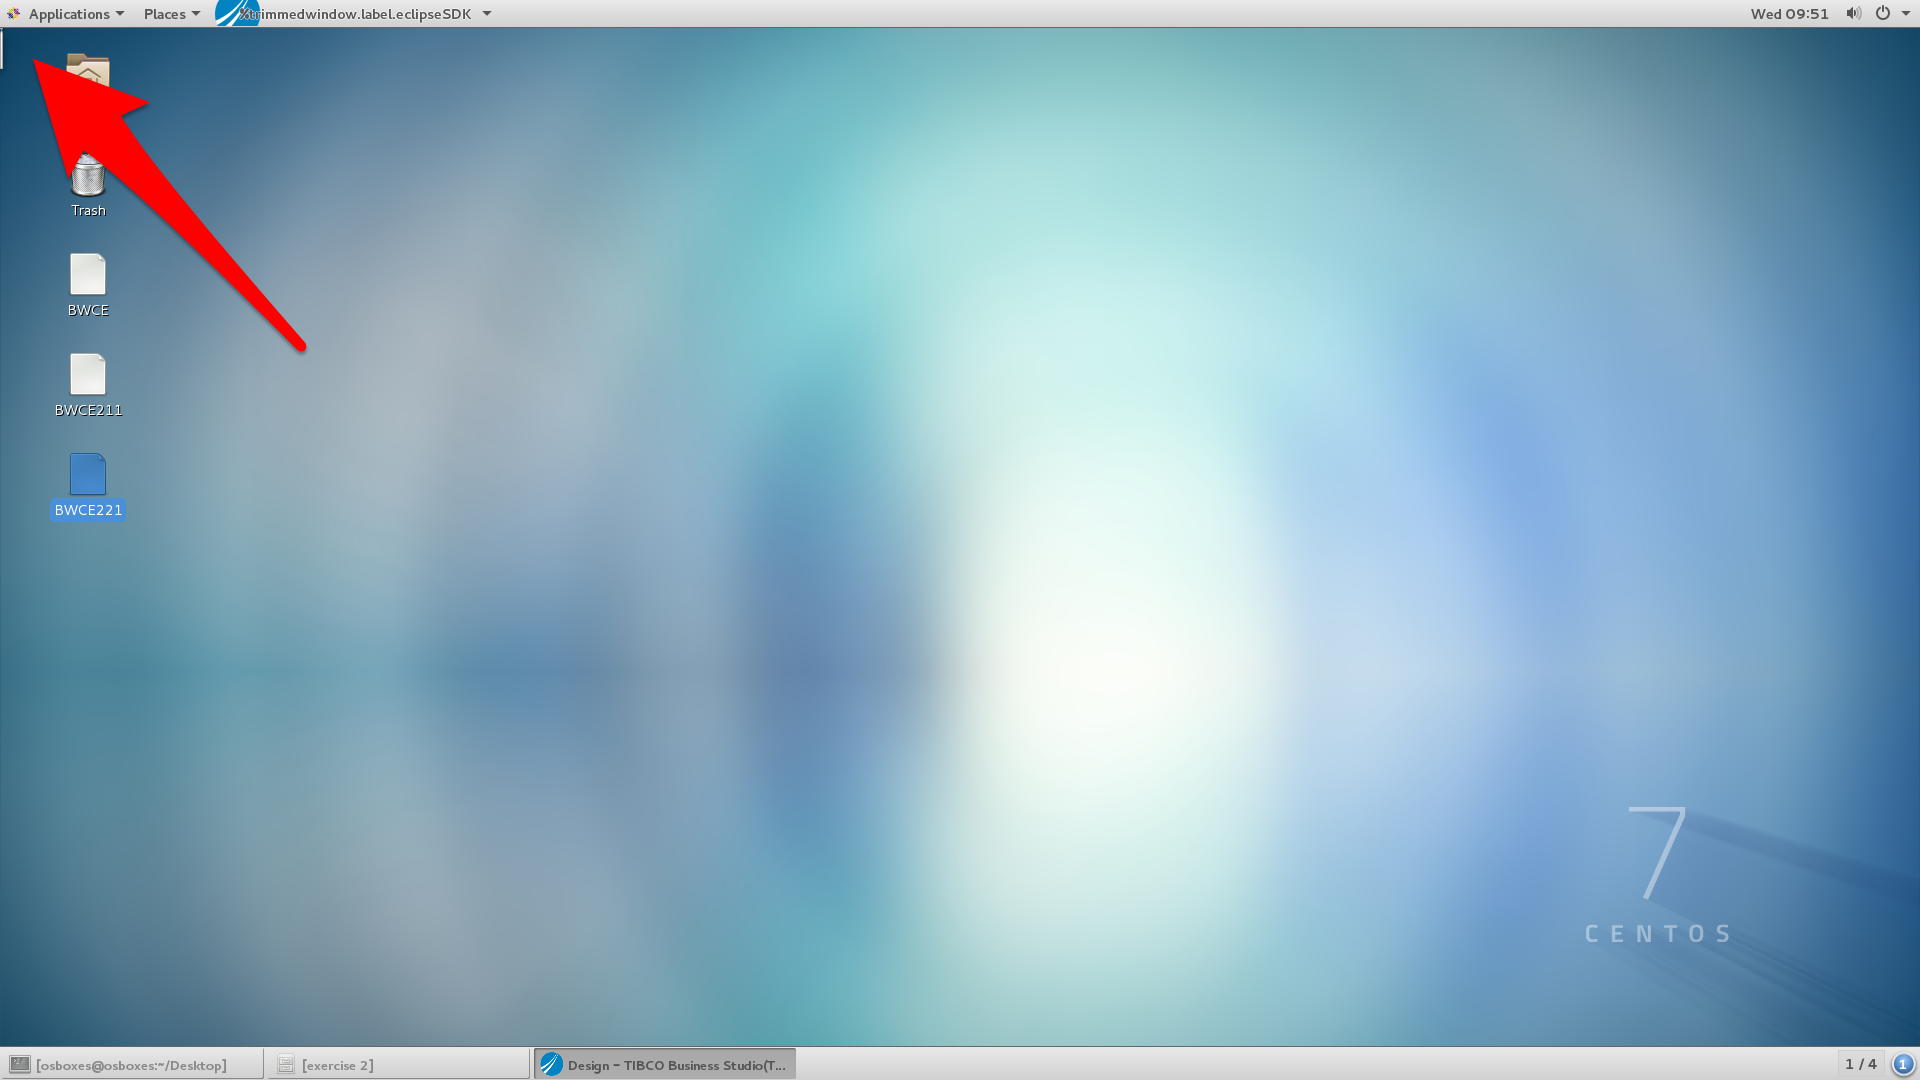
WARNING. You may get the impression that studio doesn’t startup. Please keep a close eye on the left upper corner of the desktop. When using CentOS rhe BWCE Studio window may show up there…… drag it down to use it.
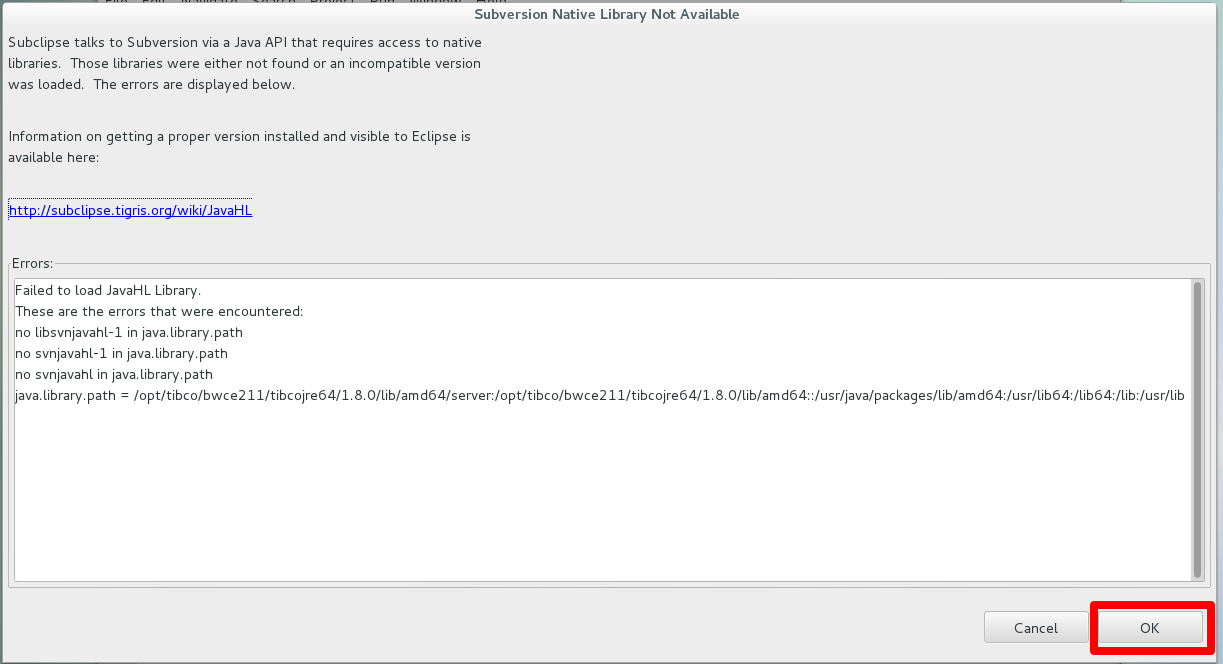
c) If you get the error ‘subversion Native Library Not Available’, ignore it by clicking ‘ok’.
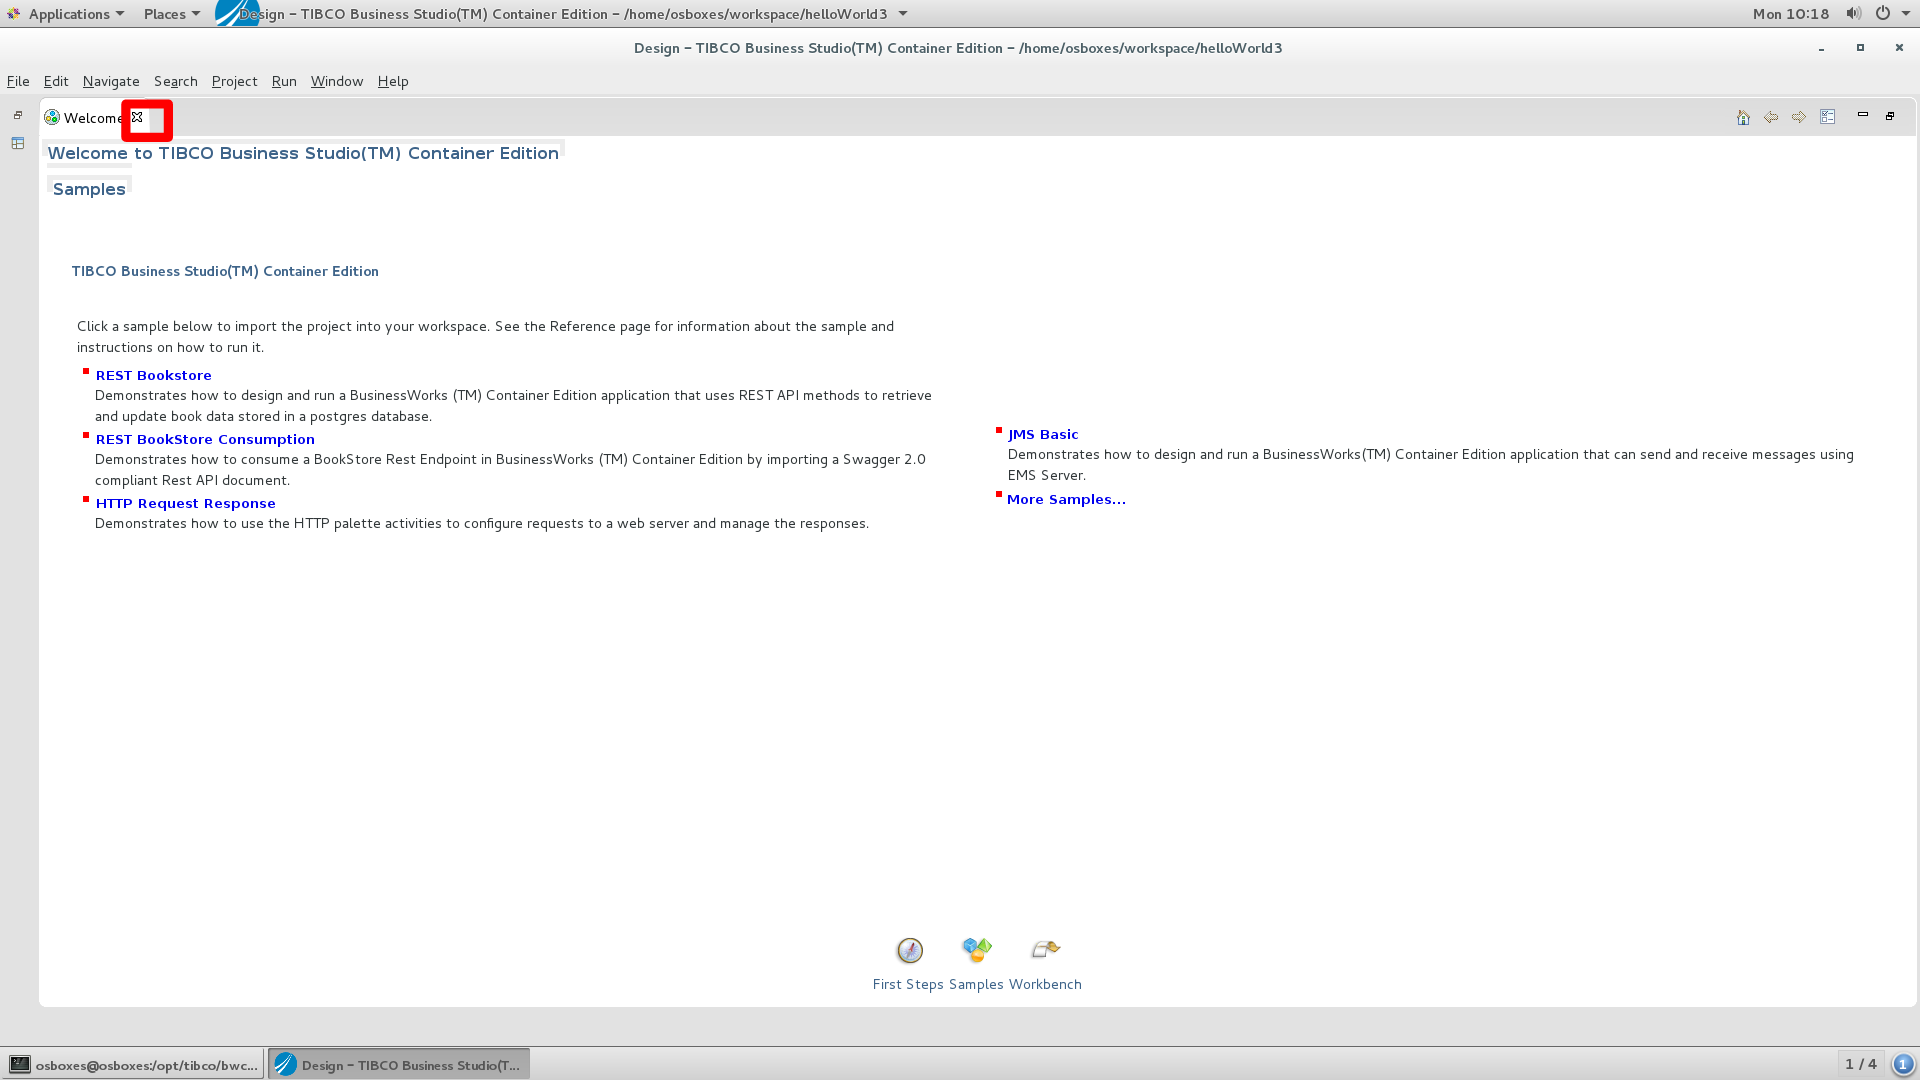
d) Close the welcome screen
Next we will import the helloWorld application. This BW6 application is stored in the Studio Project format.
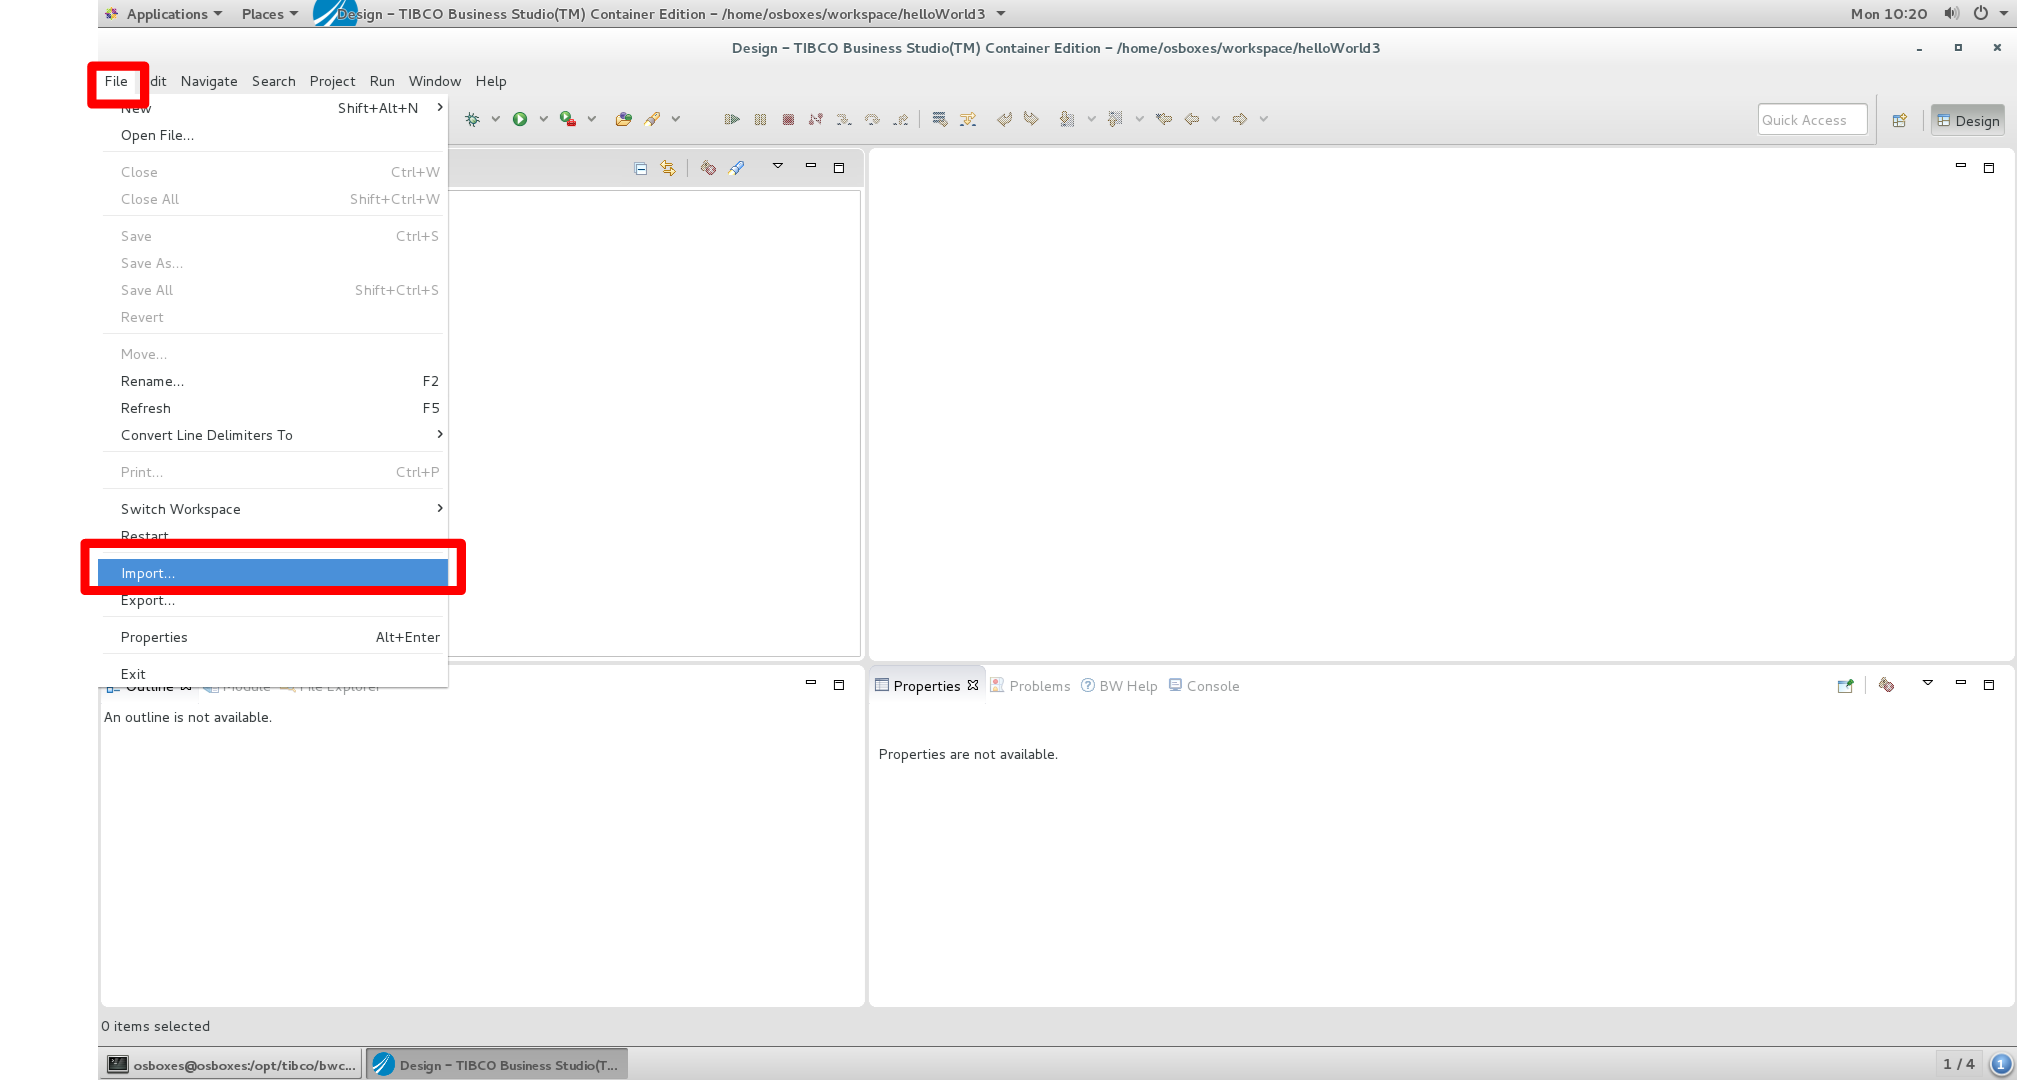
e) Click File –> Import
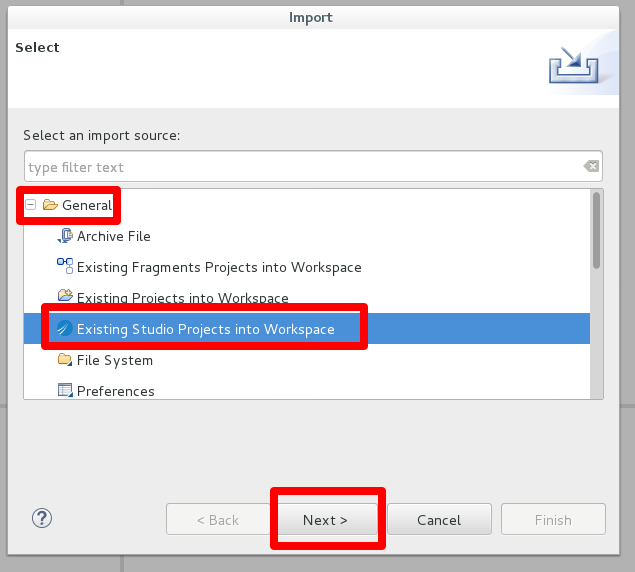
f) Select General –> Existing Studio Project into Workspace and click ‘next’
g) Click ‘Select archive file’
h) Click browse and select the helloWorld.zip file from the directory ~/courseFiles/BWCE/exercise 2/
i) Select both modules (helloWorld and helloWorld Module)
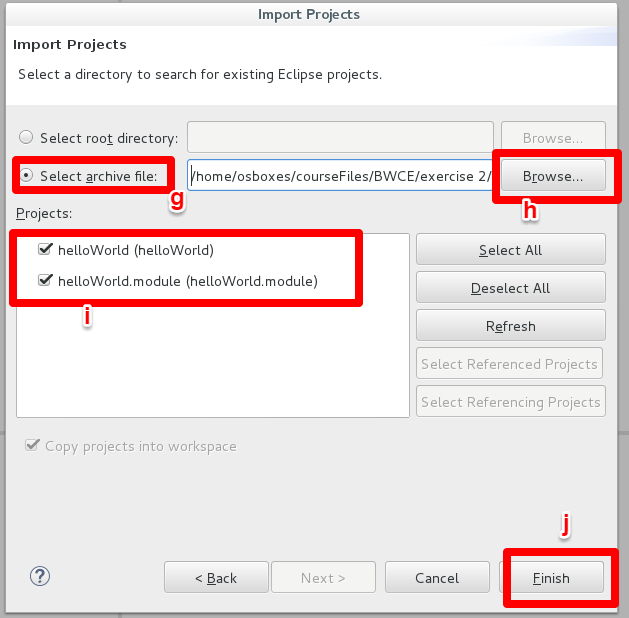
j) Click ‘Finish’.
Next we will inspect the application. If you are not interested in understanding the application, go to step 2.
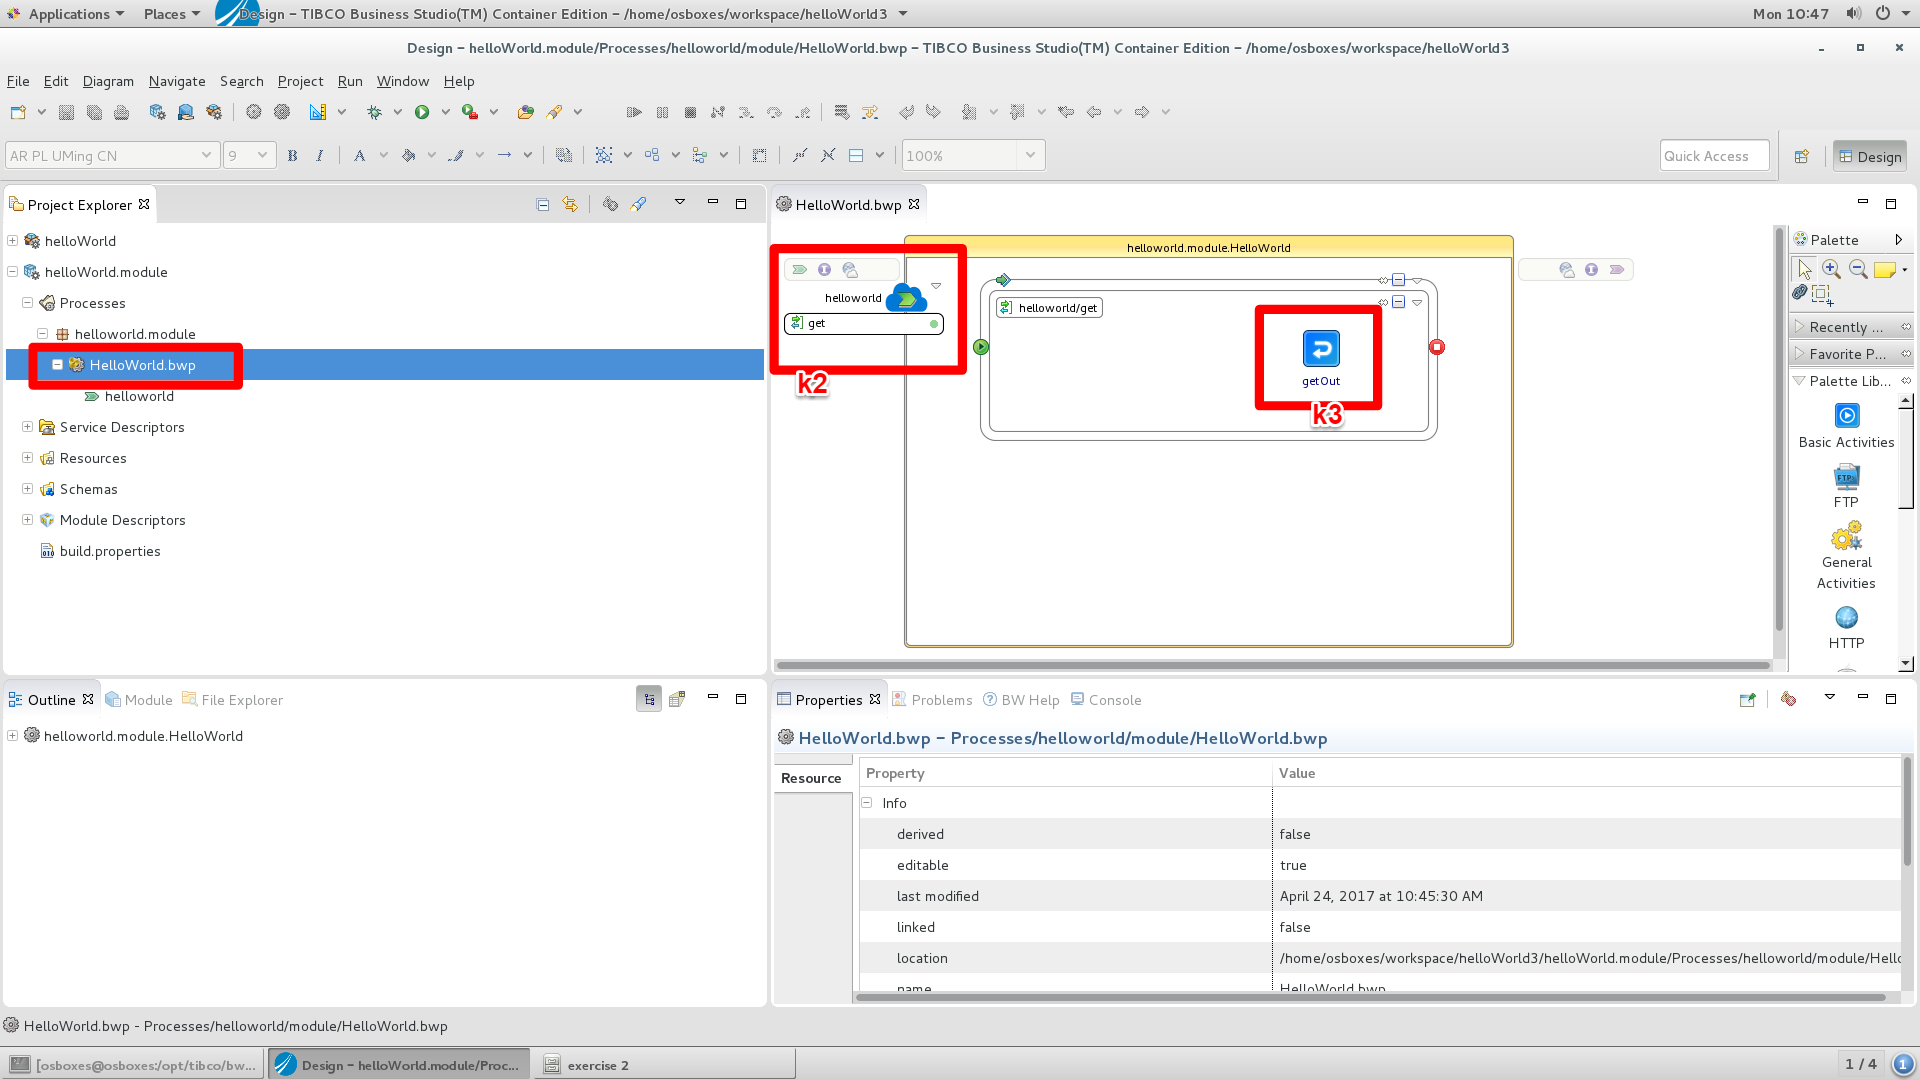
k) Open the ‘helloWorld’ process
k2) Please notice that this process exposes a ‘get’ operation.
k3) The logic of the flow is very simple, after invokation a return is done only.
l) Take a look at the input parameters for the restful service
i1) Expand Module Descriptions
i2) Double click on ‘overview’ to open it.
i3) Click on components
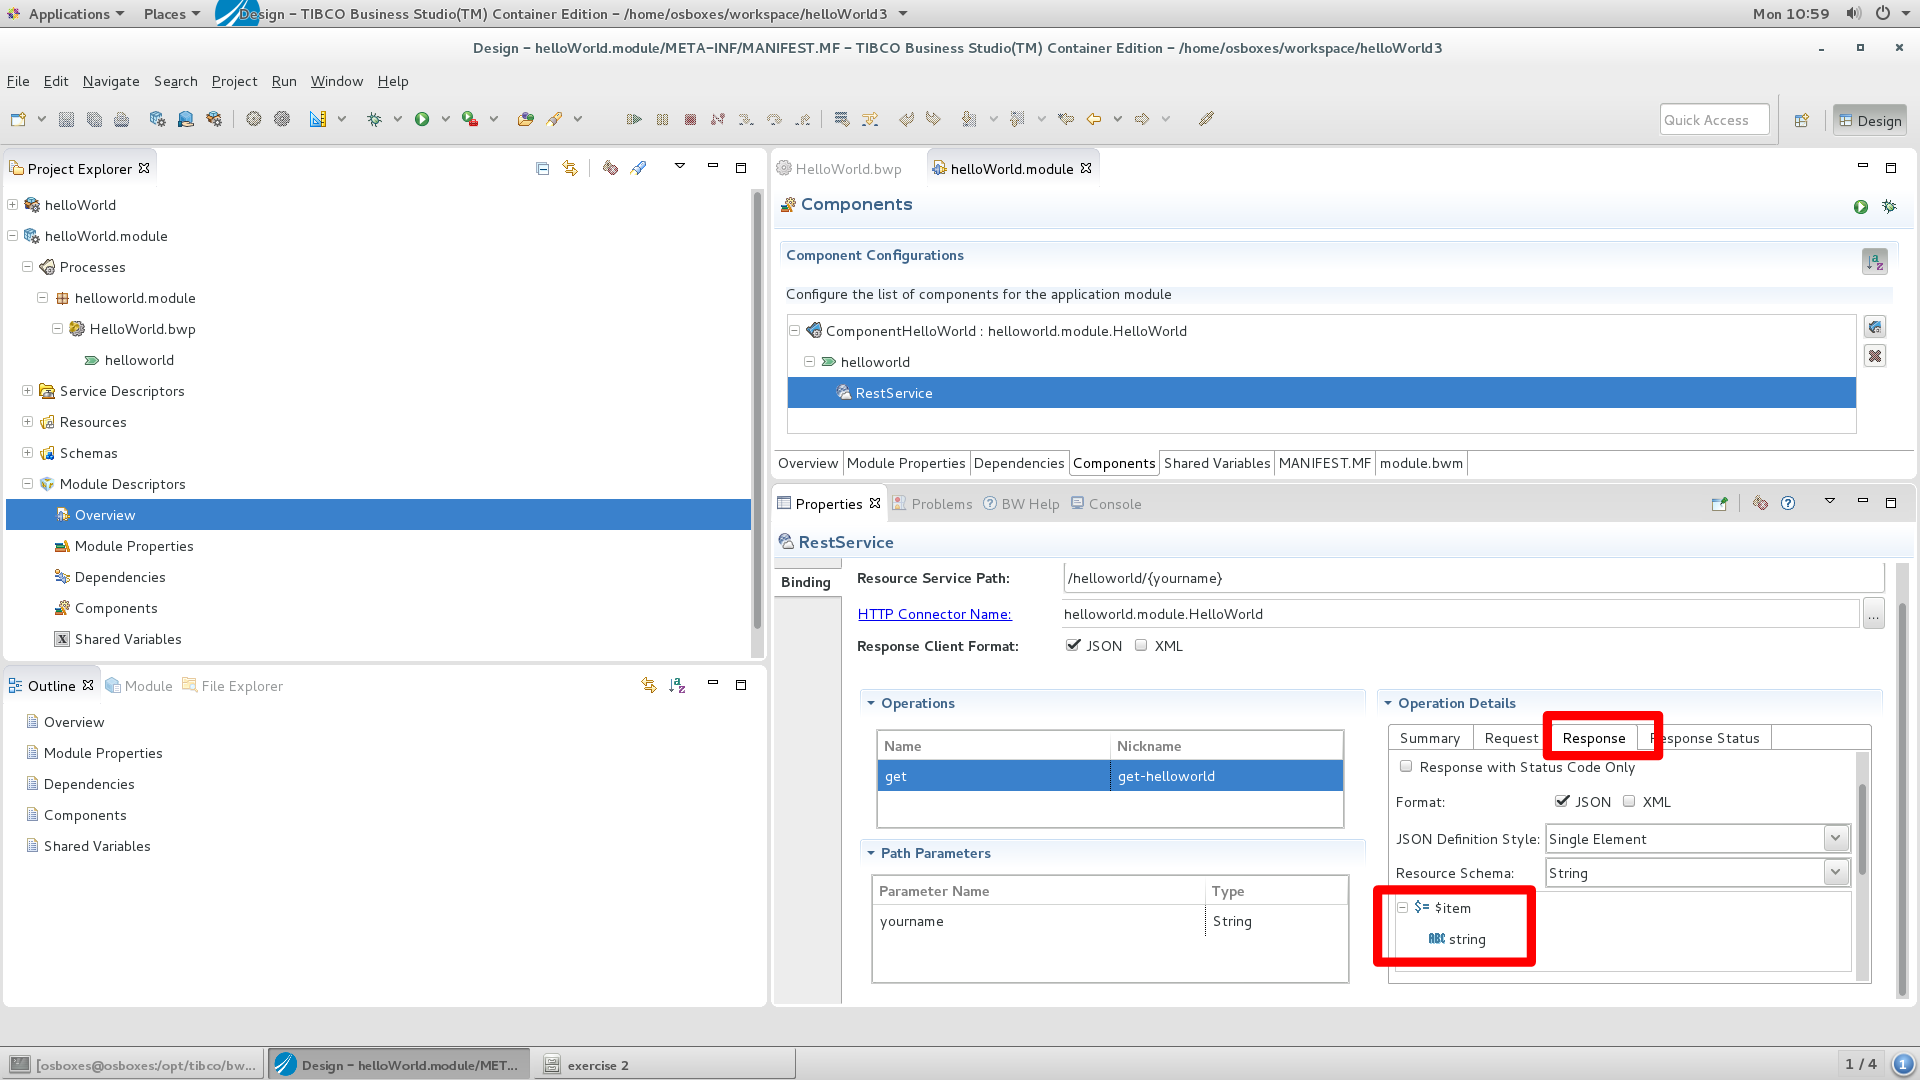
i4) Select ComponentHelloWorld –> helloworld –> RestService
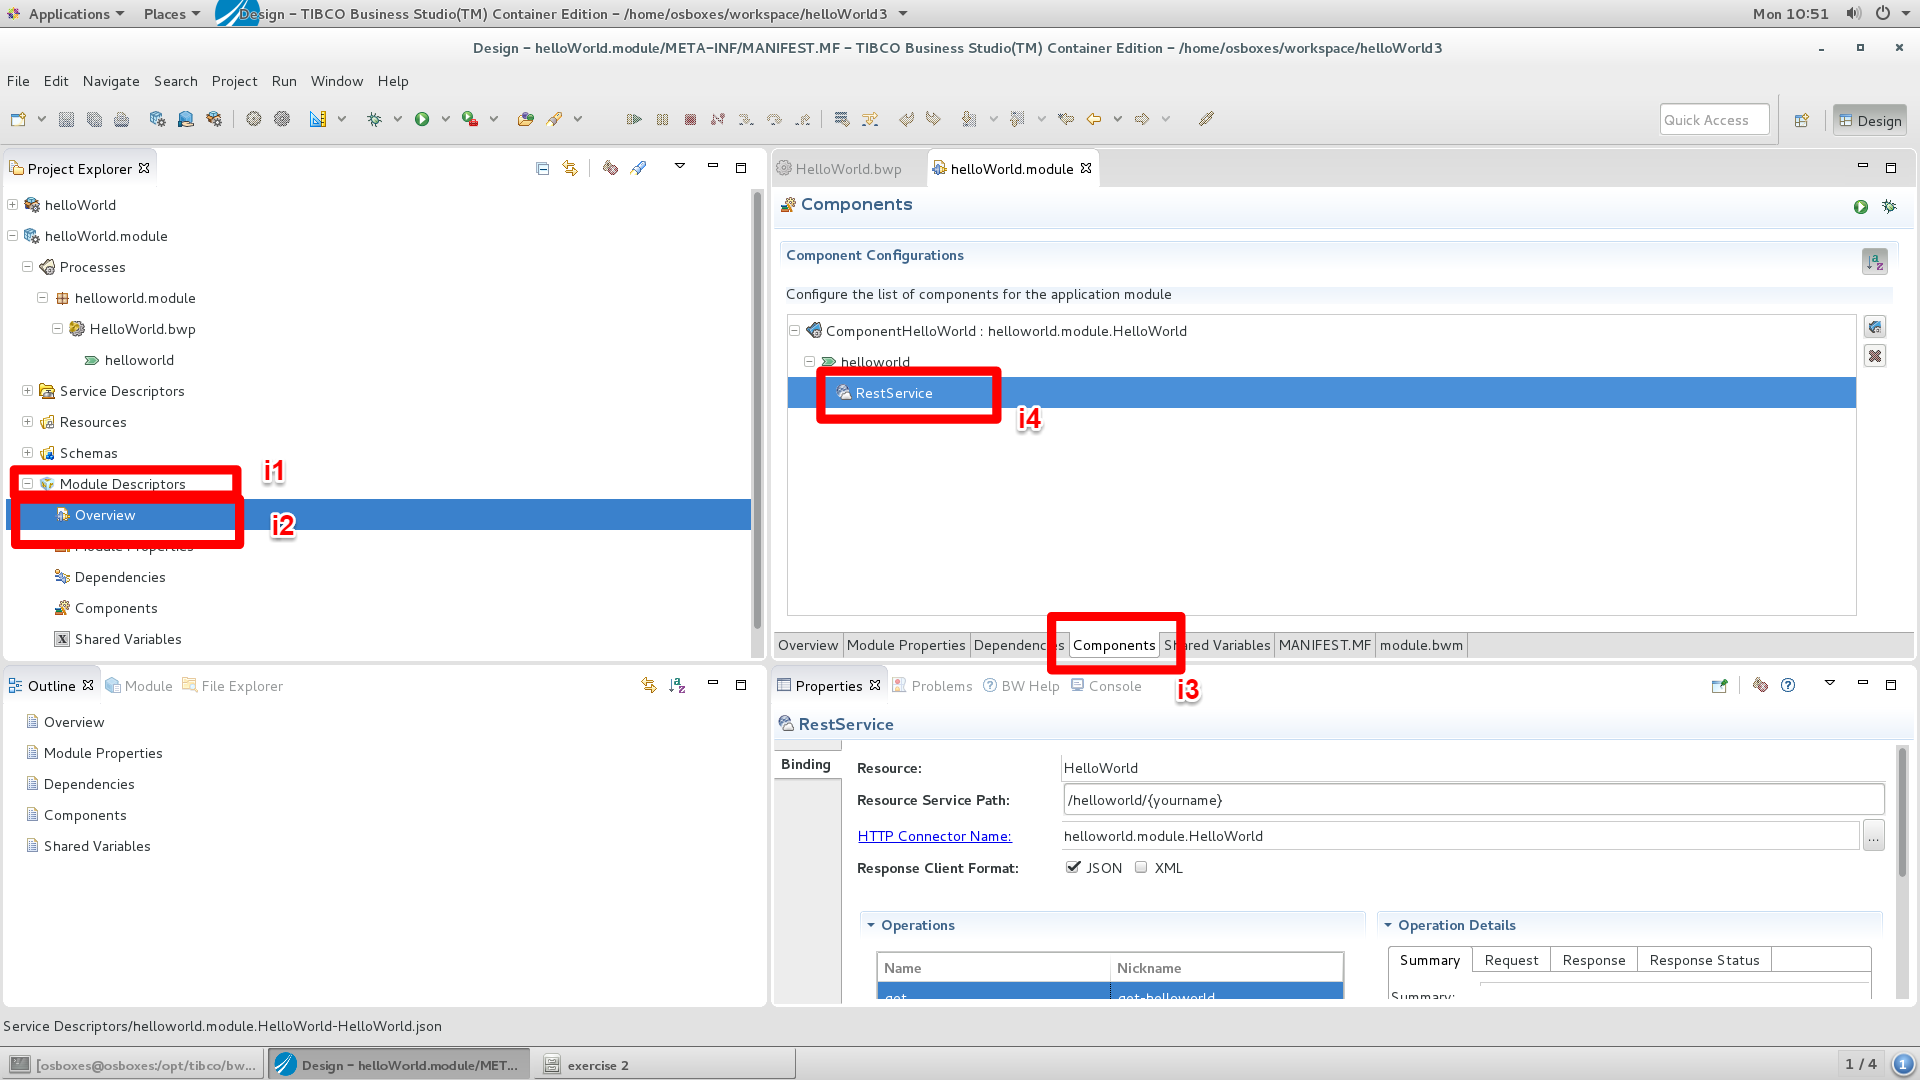
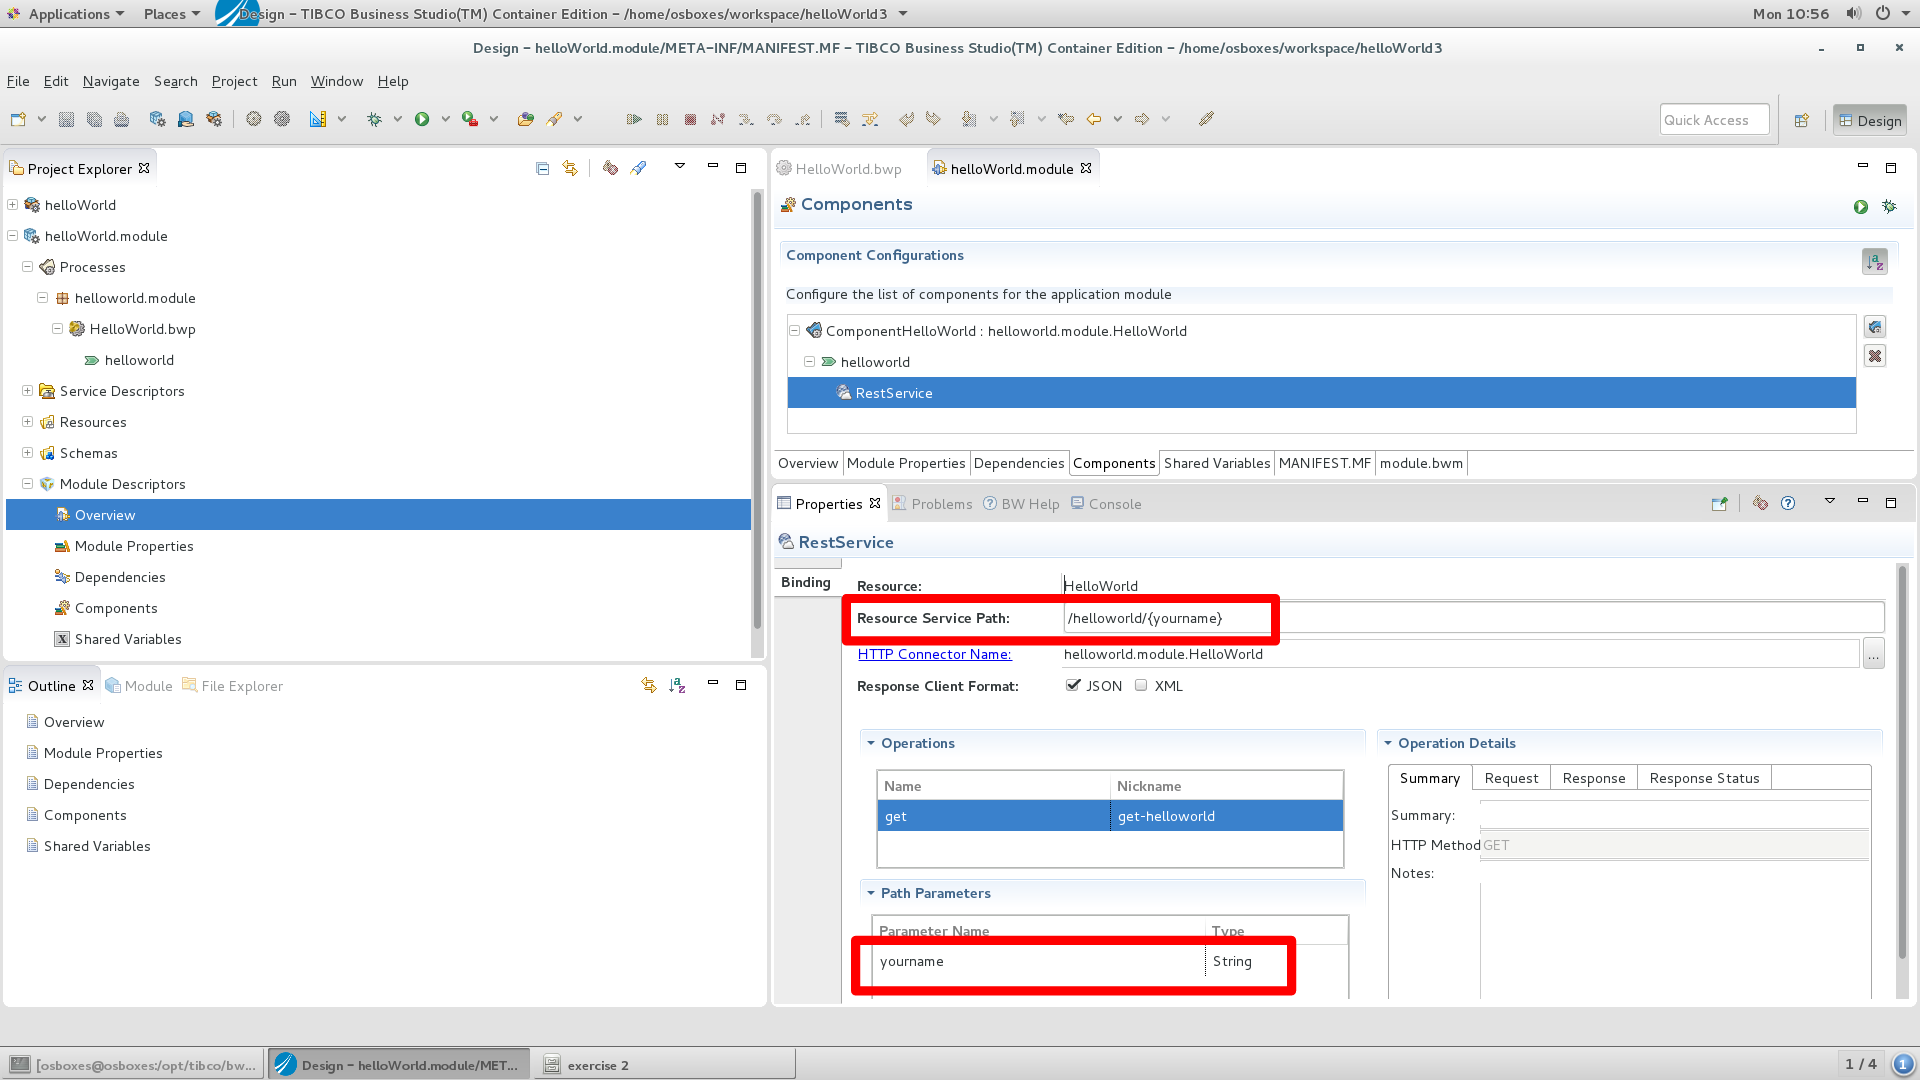
i5) Notice that the restful service exposes one resource ‘/helloworld/{yourname}
i6) yourname is defined as a string.
i7) Take a look at the output definition for this service
Click on the tab ‘Response’ and see that the restful resource will return the json field ‘result’ (as a string).
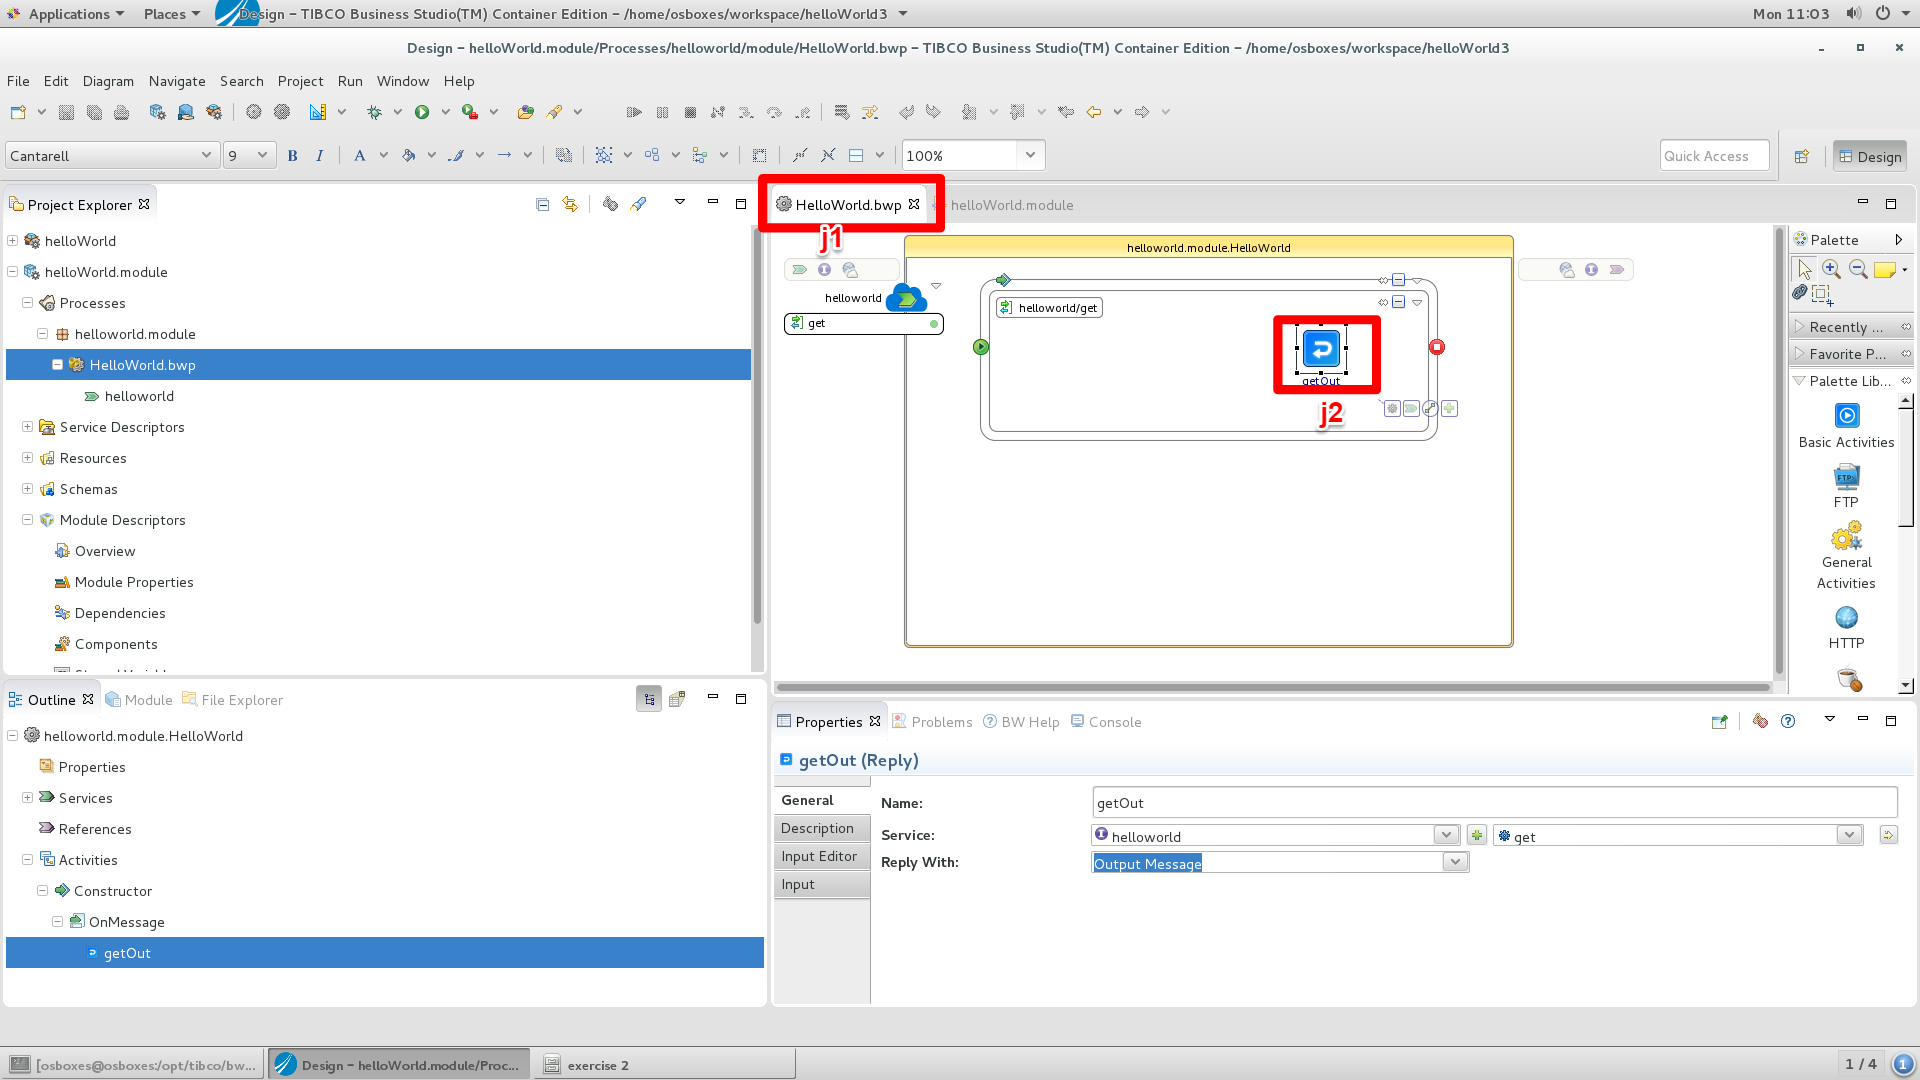
j) Inspect the output of the restful service.
j1) Select the helloworld flow
j2) And select the getOut activity. This activity implements the return.
k) See what is returned on invocation of the resource
k1) Click ‘Properties’
k2) Select ‘input’
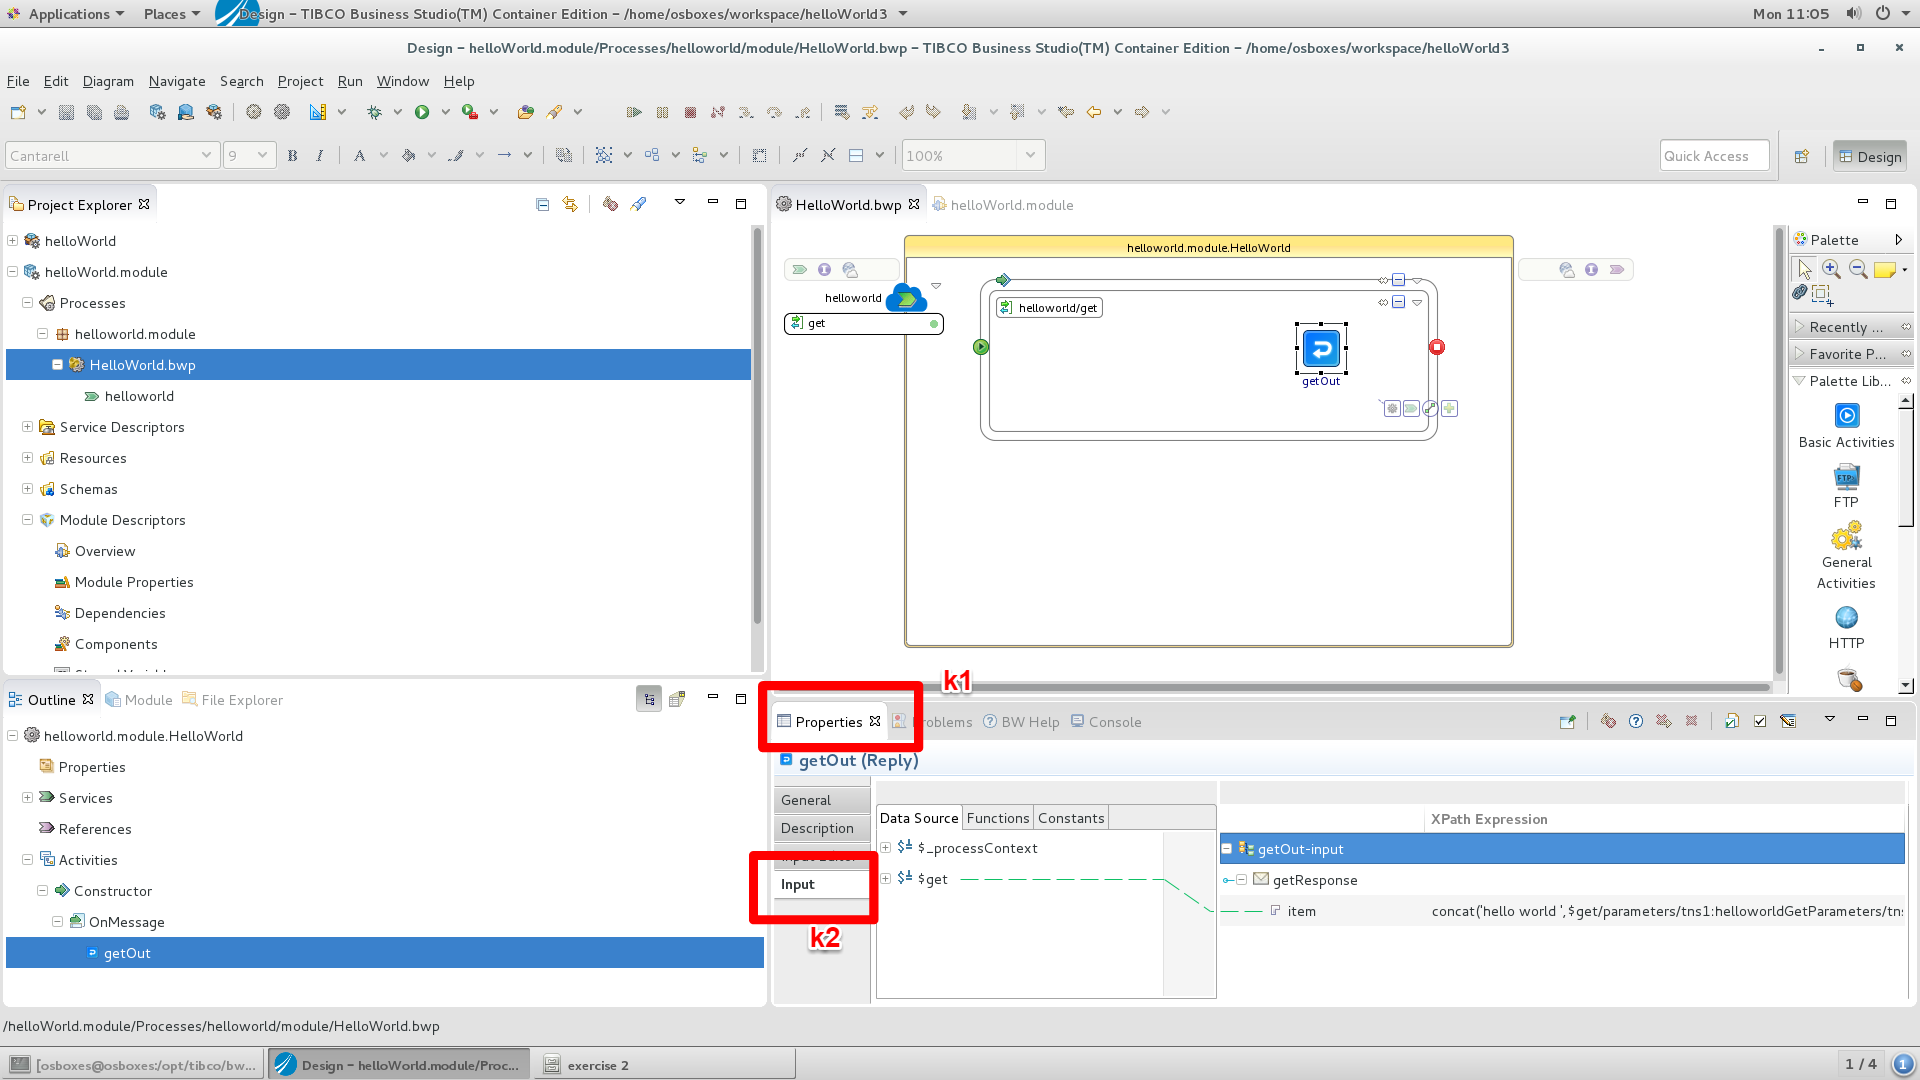
l) As you can see the string ‘hello world ‘+yournName is returned using the following xpath statement: (concat(‘hello world ‘,$get/parameters/tns1:helloworldGetParameters/tns1:yourname)
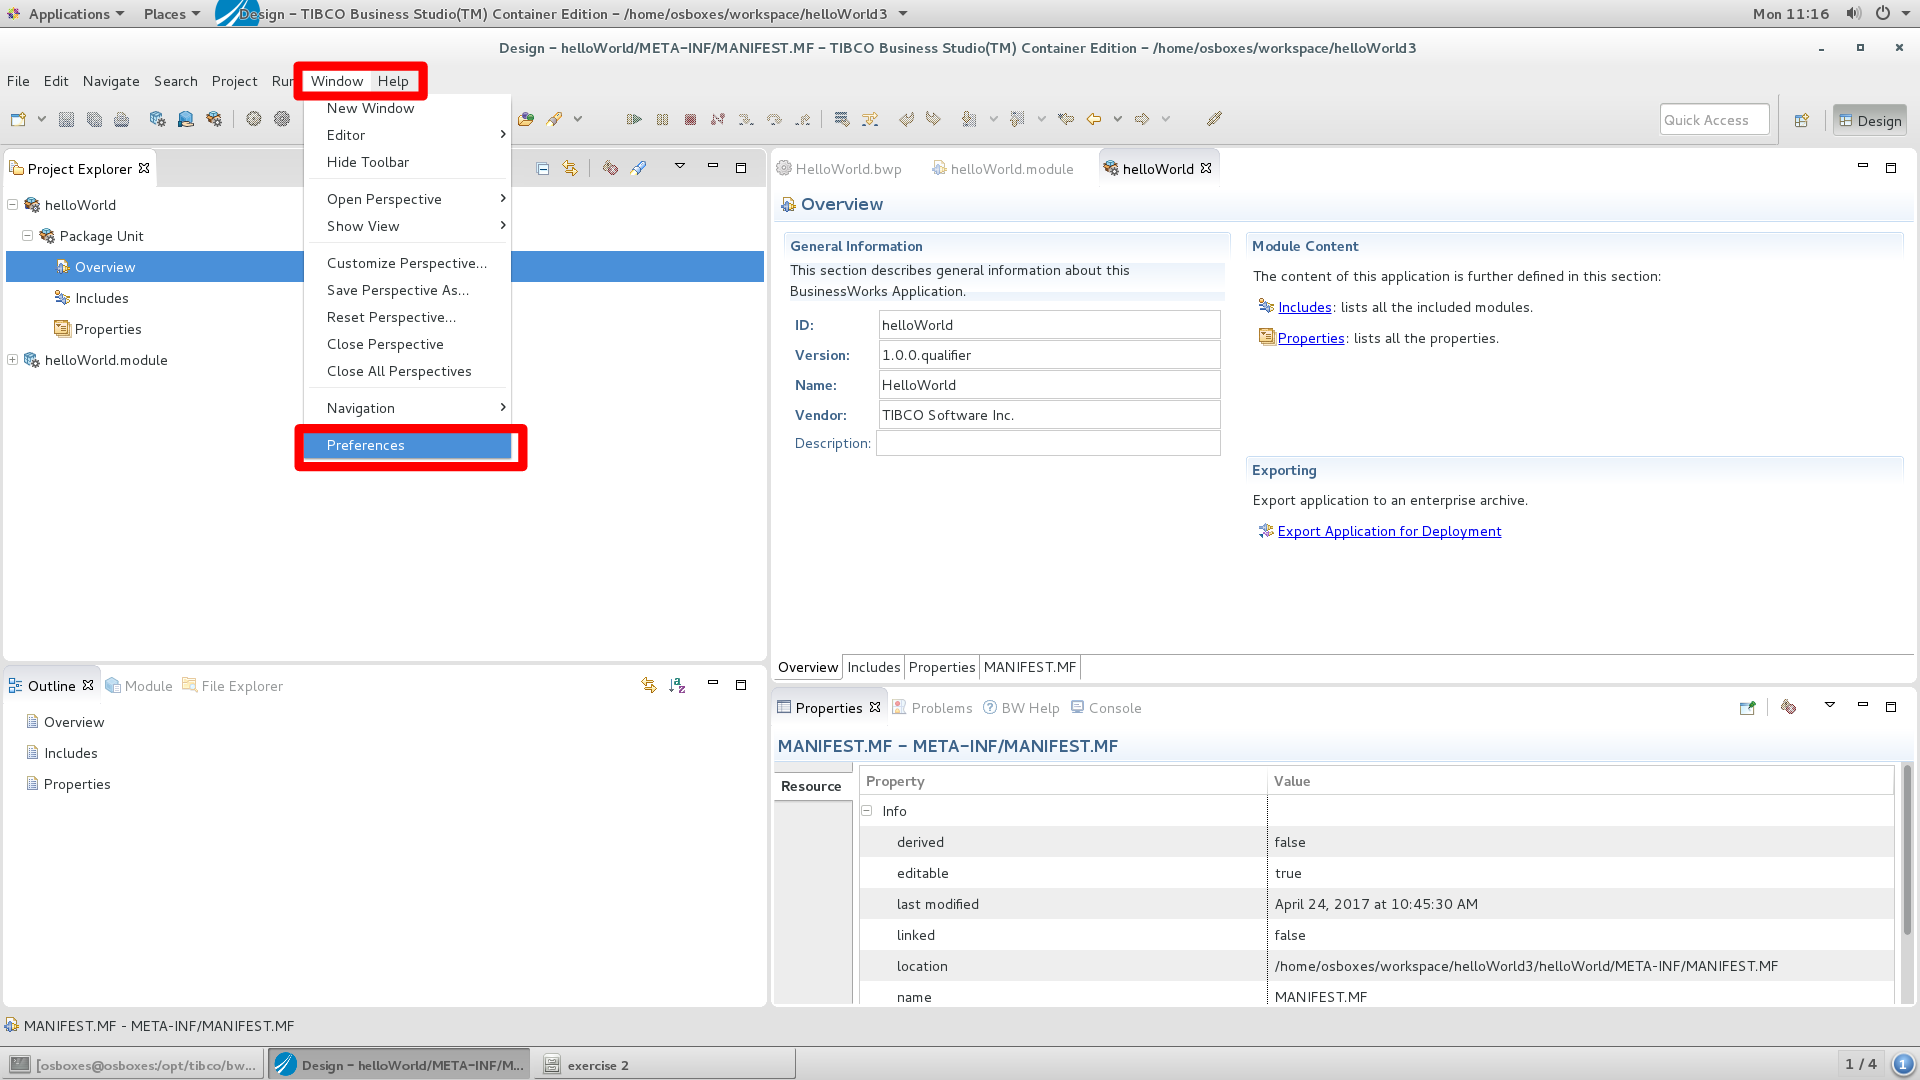
Step 2) Configure Docker as the target environment for the application.
TIBCO BusinessWorks Container Edition supports both Docker and CloudFoundry. We have to set the target environment for this application to ‘Docker’
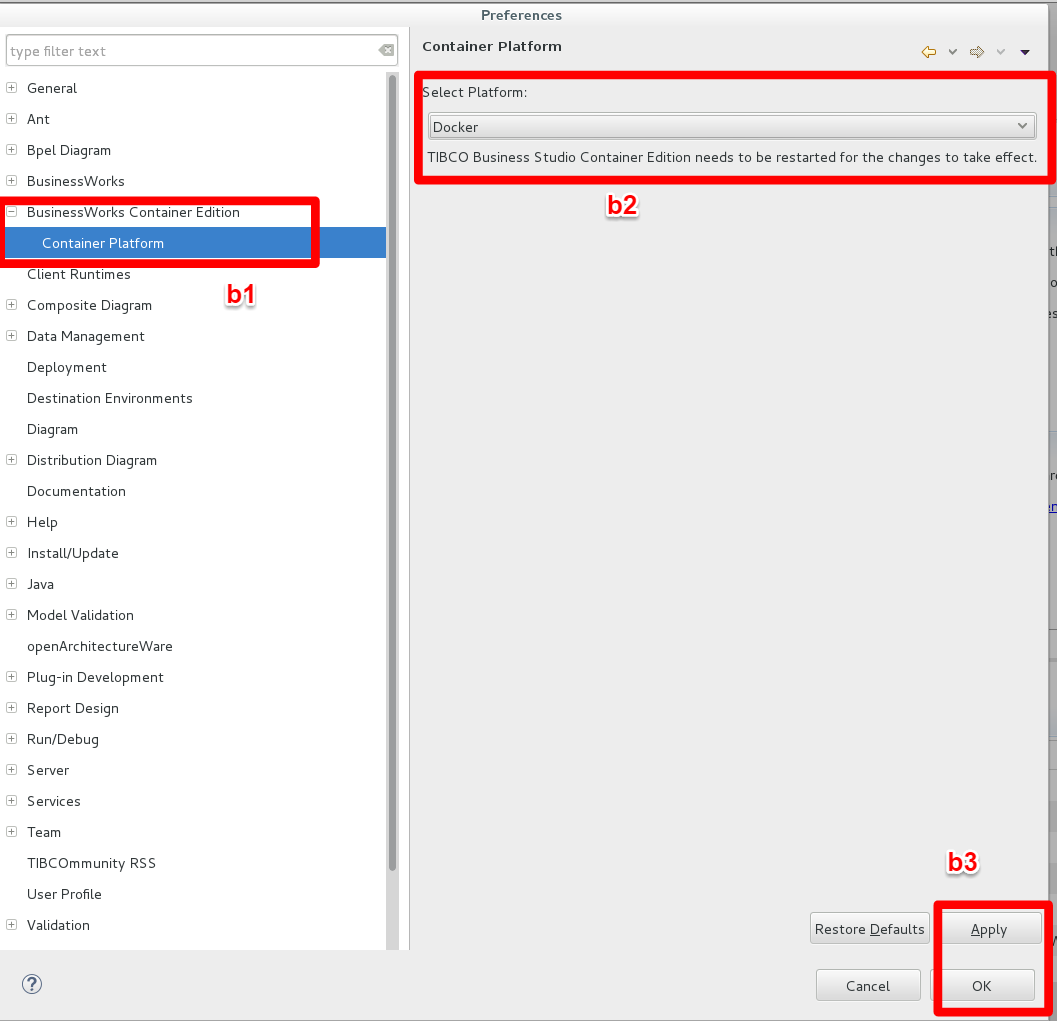
a) Click Window –> Preferences
b1) Select BusinessWorks Container Edition –> Container Platform
b2) Select Docker as the platform
b3) Click Apply and Ok
b4) Restart Studio
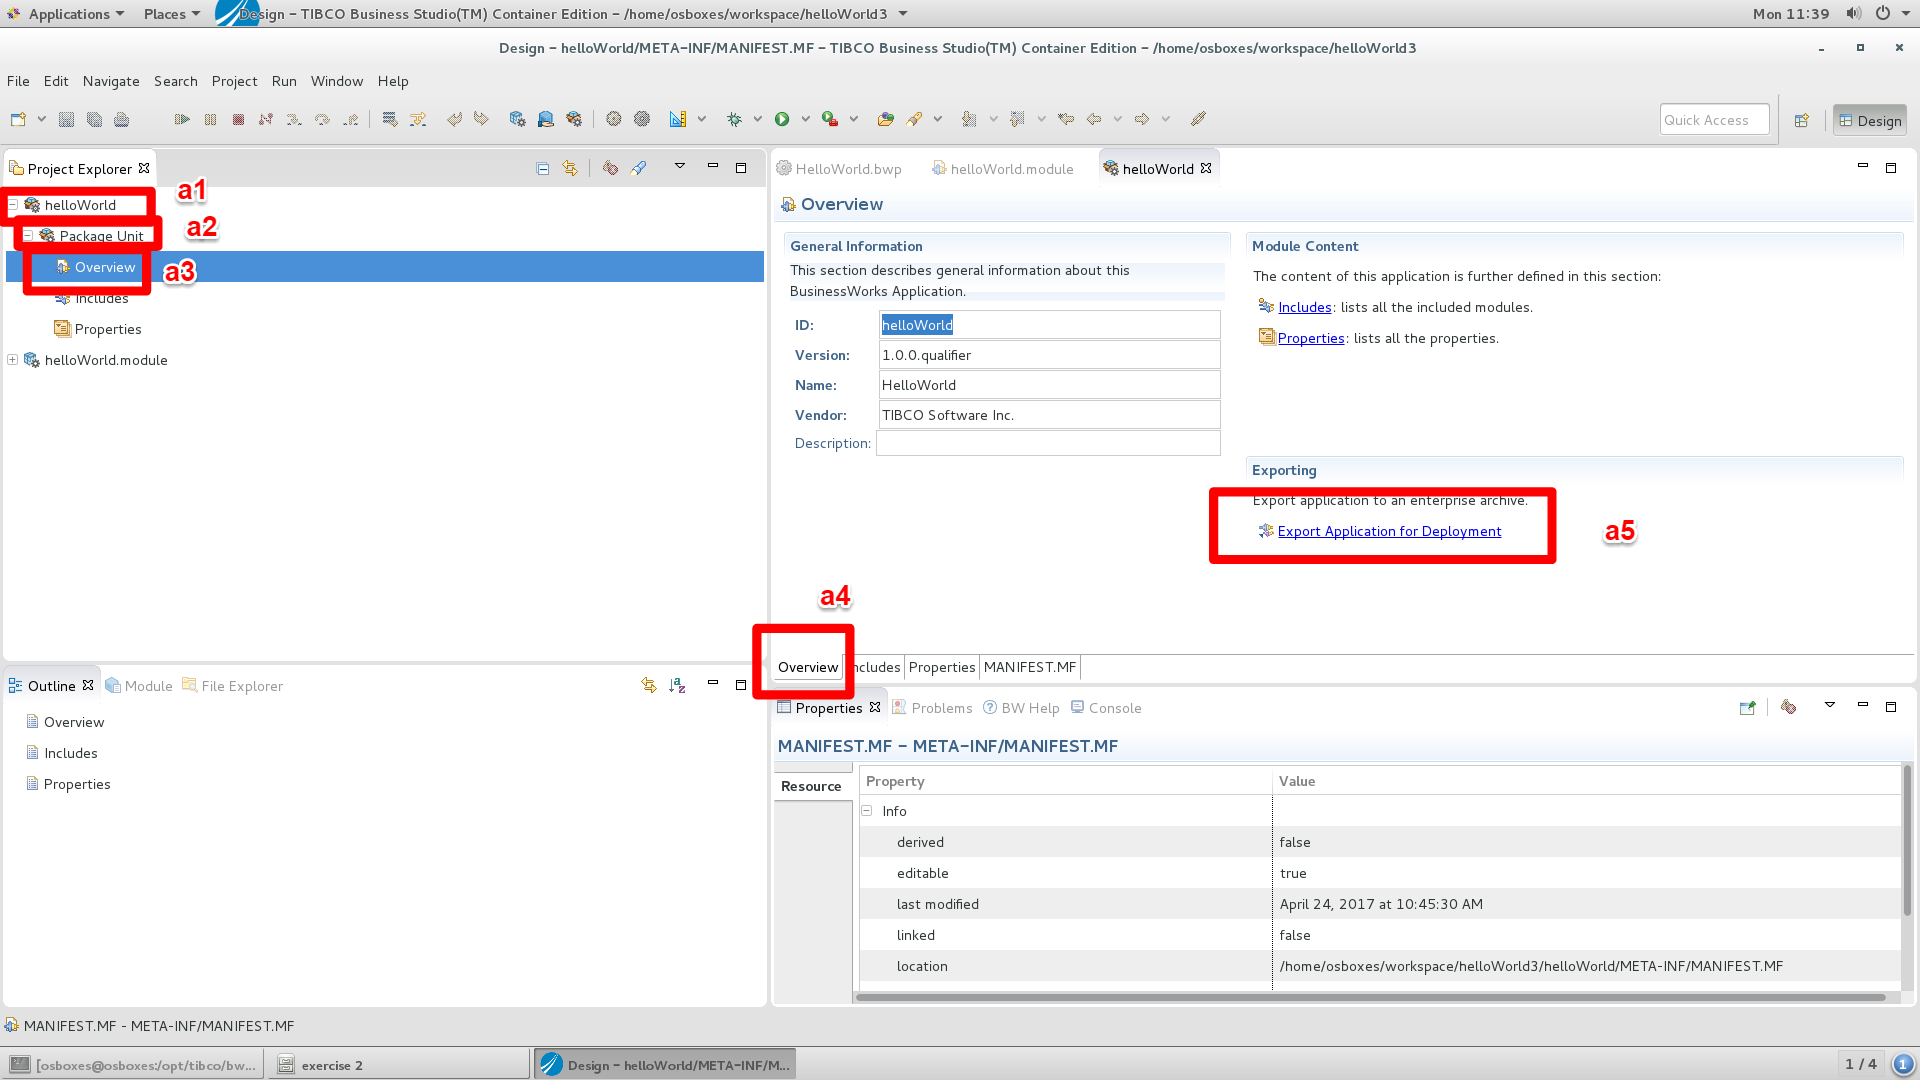
Step 3) Export an EAR file
a1) Select the helloworld Pakcage
a2) Select te Package Unit
a3) Open the Overview
a4) Select the overview tab
a5) Click on ‘Export application for deployment’
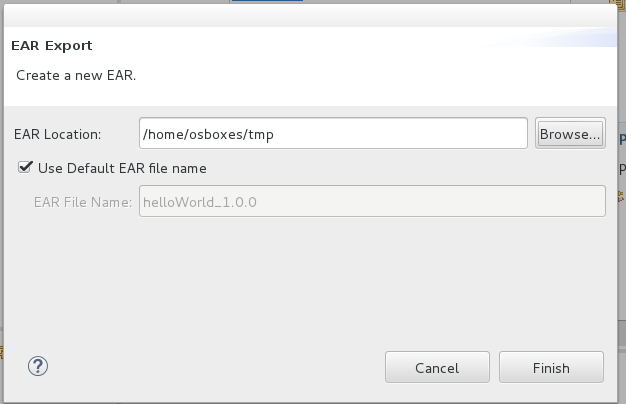
b) Select a destination for the ear file and click finish
Step 4) Build the application
In this step you will create a Dockerfile to build an image containing the application.
a) Goto your home directory (cd ~/mydocker) and create a directory named ‘helloWorldBWCE’ (mkdir helloWorldBWCE). Go into this directory (cd helloWorldBWCE).
b) Copy the ear file you created in step 3 to helloWorldBWCE (cp ~/tmp/helloWorld_1.0.0.ear .).
c) Create a Dockerfile (gedit Dockerfile) and paste the following content into it.
FROM tibco/bwce:latest
MAINTAINER tibco
ADD helloWorld_1.0.0.ear /
Dockerfile: Dockerfile (remark this file is also available in ~\courseFiles\BWCE\excercise2)
The Dockerfile will be used to create a new image (based on the tibco/bwce image) that contains the helloWorld application.
FROM tibco/bwce:latest <=== take the tibco/bwce image
MAINTAINER tibco
ADD helloWorld_1.0.0.ear / <== copy the helloWorld_1.0.0.ear file into the image.
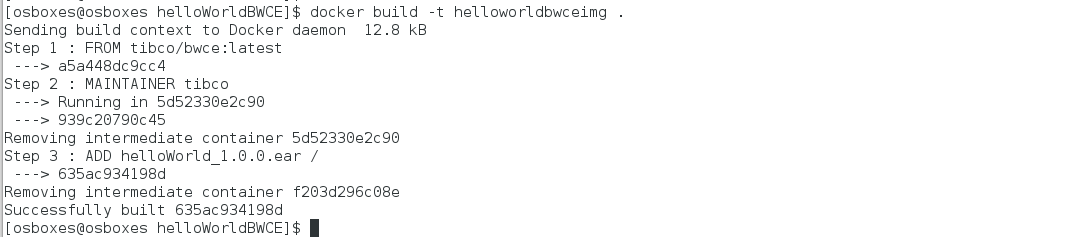
d) Build the image using the command ‘docker build -t helloworldbwceimg .’. This should result in the following output:
Step 5) Run the image and test it.
During this step you will run the image in container. You will test the result.
a) Run the image in a container using the following command: docker run –name “helloWorldBWCEContainer” -p 8080:8080 -d helloworldbwceimg <== please mind the double dash in front of name.
Using this command we startup the image ‘helloworldbwceimg’ in the container ‘helloWorldBWCEContainer’ and we map port 8080 (default port exposed by BWCE) onto port 8080 on the docker host.
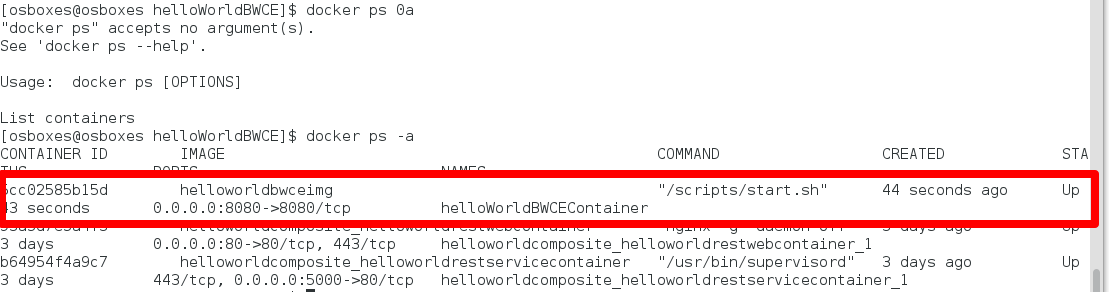
b) Run ‘docker ps -a’ and verify that the container is running.
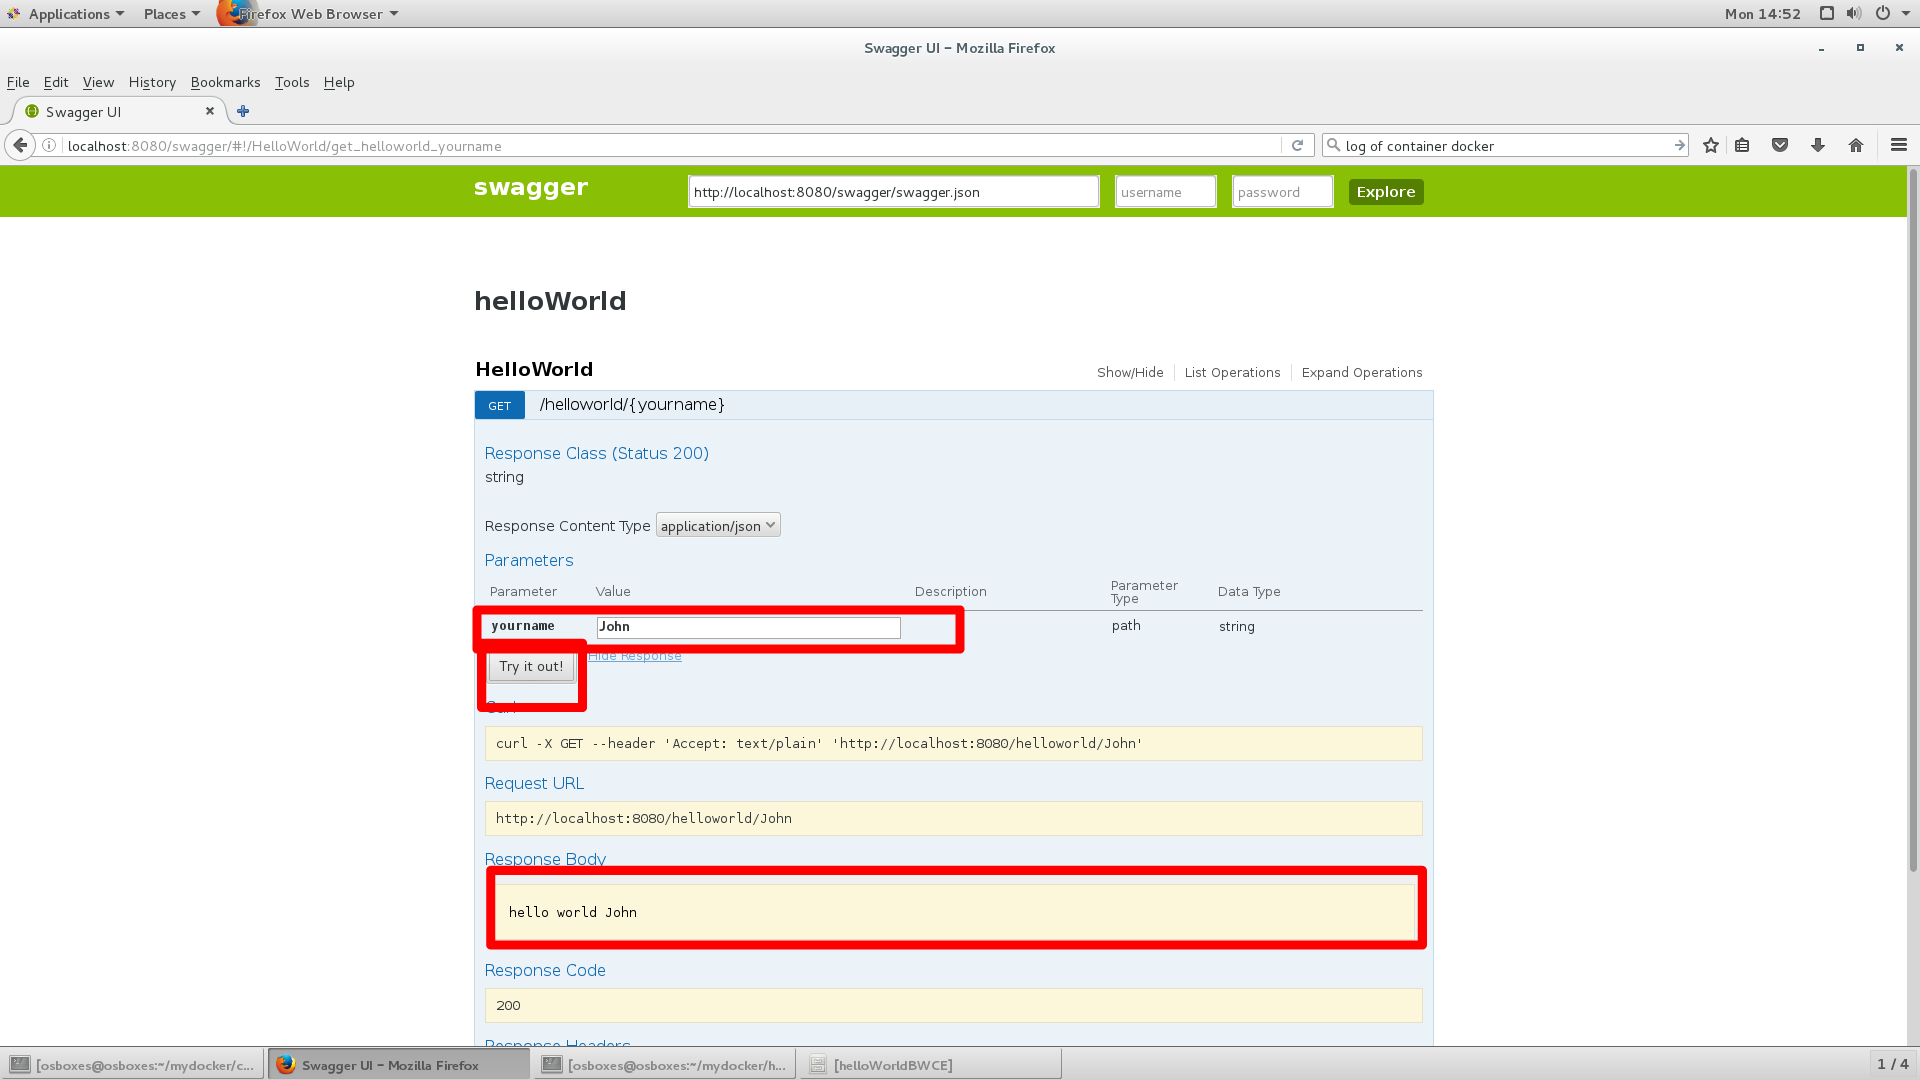
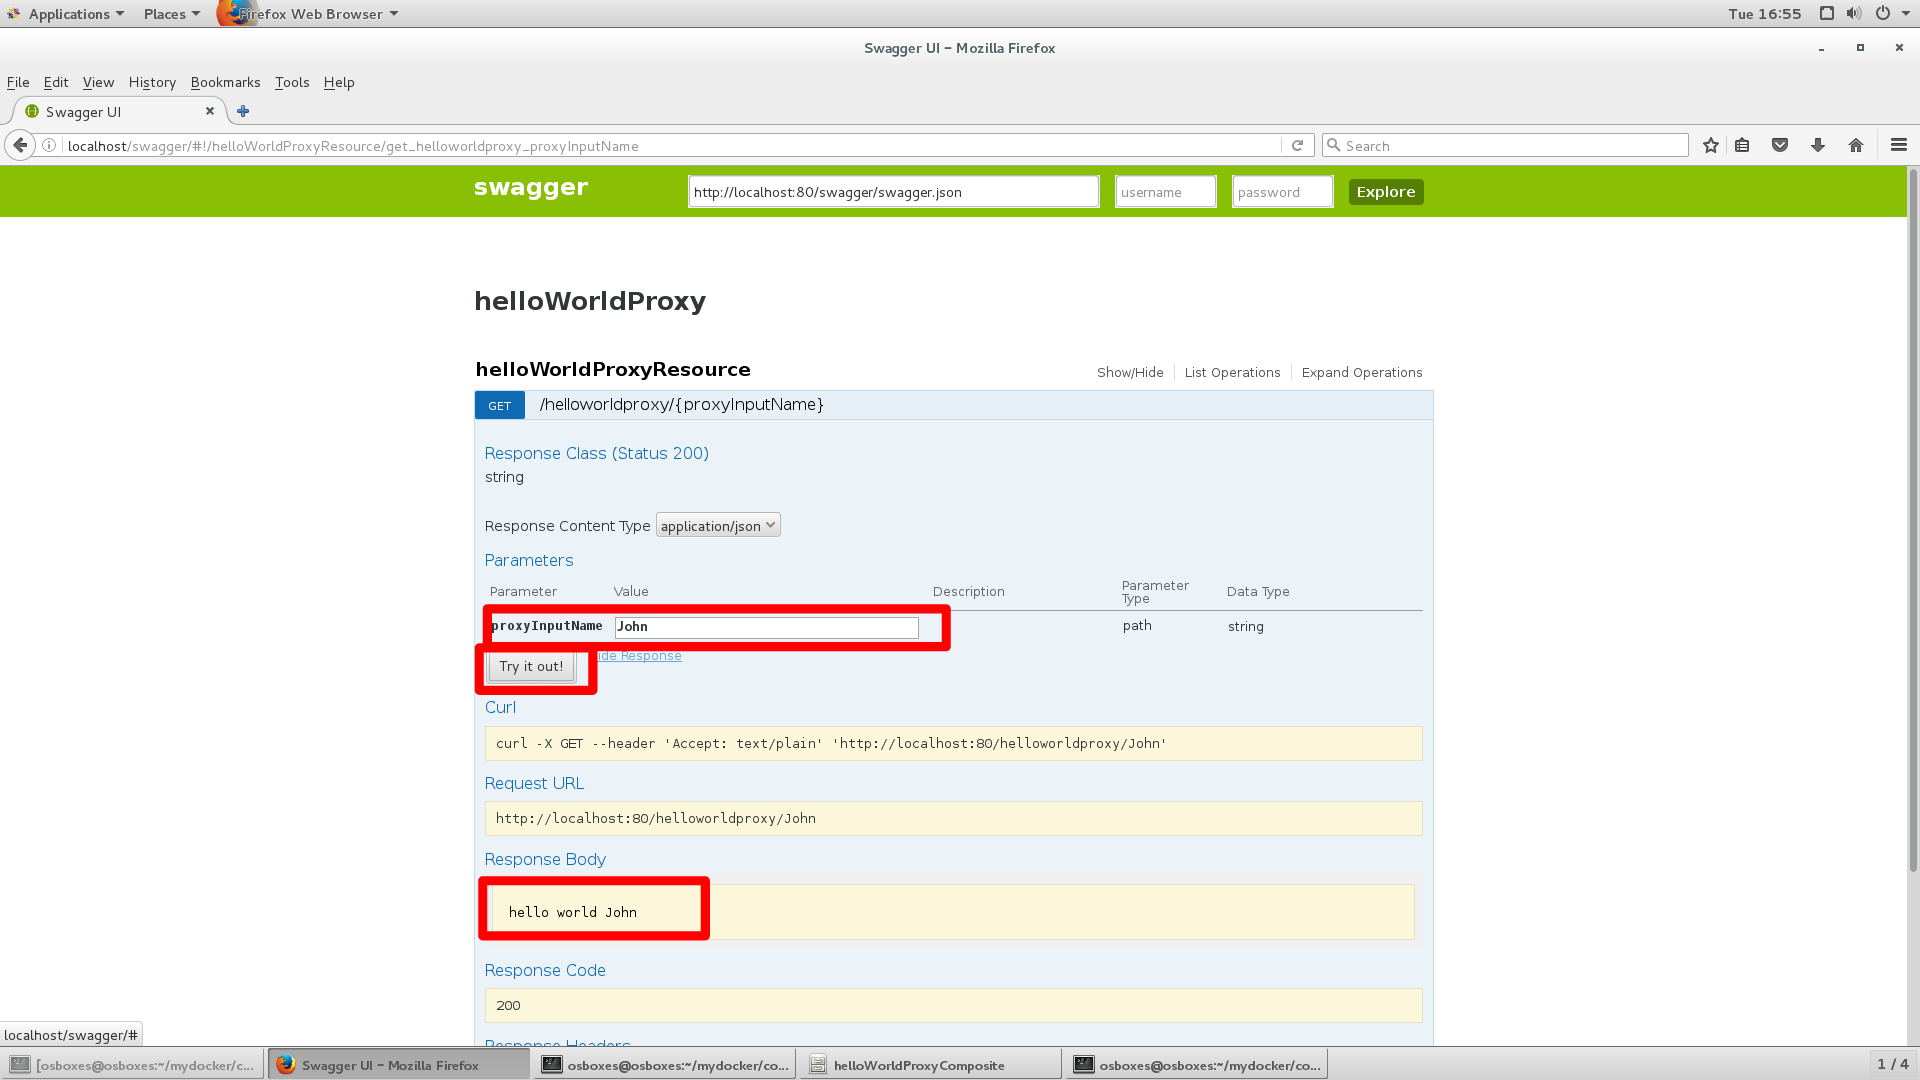
c) Open a browser and go to http://localhost:8080/swagger/
d) Use the Swagger interface to your name, click on ‘Try it out’ and verify the result (‘hello world John’).
e) Take a look at the log using the command ‘docker logs helloWorldBWCEContainer’. You should get the following output.
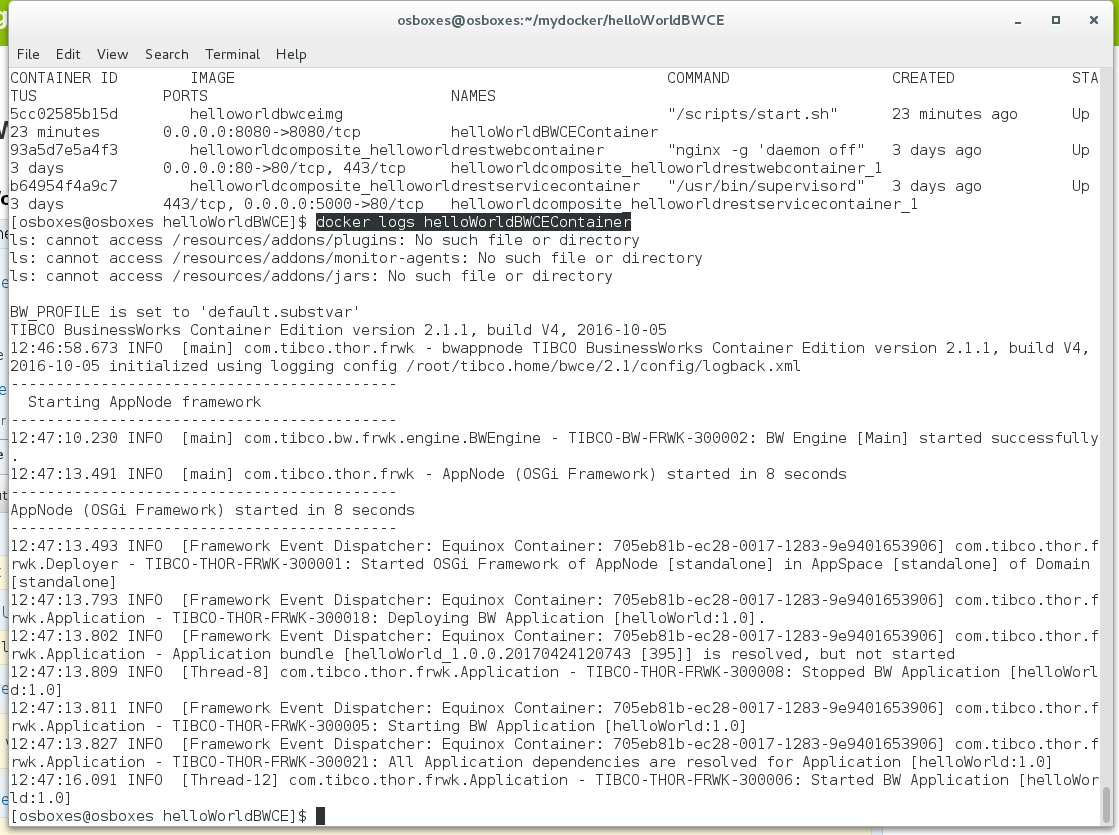
Please mind: Don’t be worried about the ls: cannot access /resources/addons/plugins: No such file or directory. BWCE offers the option to run plugins, monitor agents (hawk) and additional jars in a container. In this simple case we haven’t added any of these. This is just a warning.
f) Cleanup by running the following commands:
docker stop $(docker ps -a -q)
docker rm $(docker ps -a -q)
Exercise 3: Using environment variables with a BWCE application
BusinessWorks applications make use of properties. These enable you to set the behavior of an application on runtime. This is useful because some parameters may be different in each environment (production, acceptance test etc.). For example: if your service needs to call another service, you use the properties to set the URL and port of the target service. The target service will be available at a separate URL in each environment. By using the properties you can deploy the same ear file in each environment and set the URL of the target service to be invoked at run time.
In Linux (and Docker), a similar feature is used. Nevertheless for this environment variables are used. These environment variables can be set when a container is created. TIBCO BWCE offers the option to map properties on environment variables.
As part of this exercise we will create a composite application that consist of the following parts:
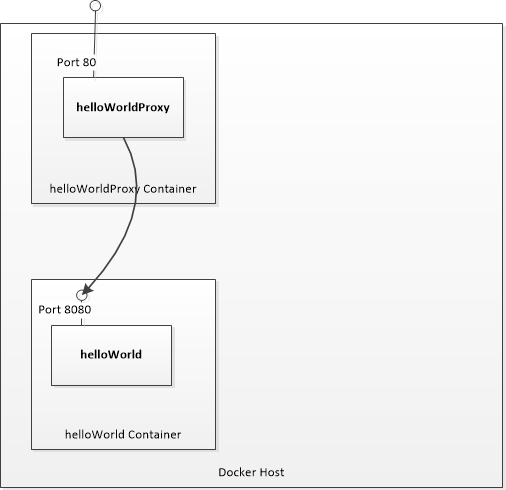
a) The helloWorld restful application we created in exercise 1. This application will run in it’s own container. It will expose port 8080 in that container only.
b) A new restful service helloWorldProxy (written in BWCE). This application will expose itself at port 80 on the docker host. This application doesn’t add any functionality, it only calls helloWorld and returns the string that is returns by the helloWorld service.
At run time we will provide environment variables that are used to define the hostname and the port that are used by helloWorldProxy to call helloWorld. All of this we will define in a docker compose configuration.
Step 1) Load the helloWorldProxy application
a) Open a new workspace (helloWorldProxy) in BusinessWorks Studio.
Open BusinessWorks studio and click file –> Switch Workspace –> other
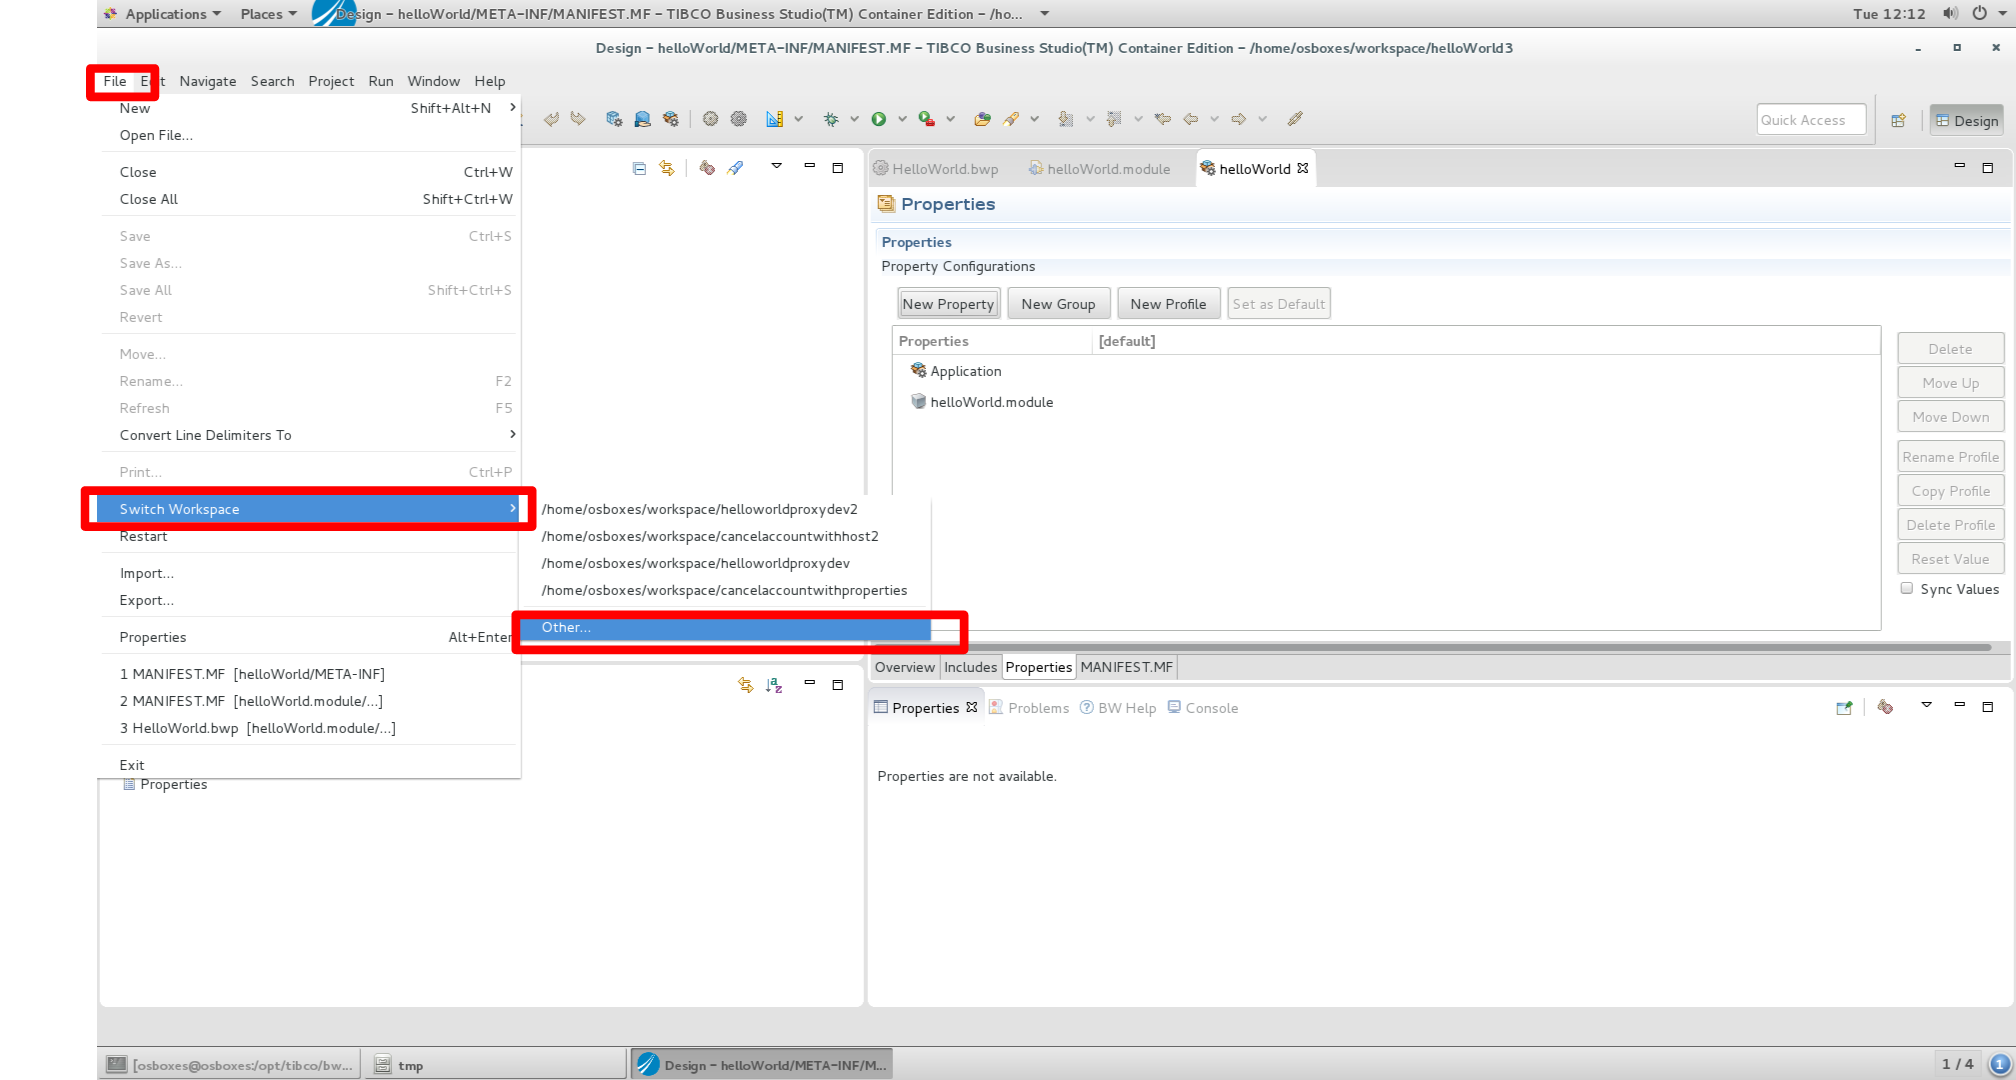
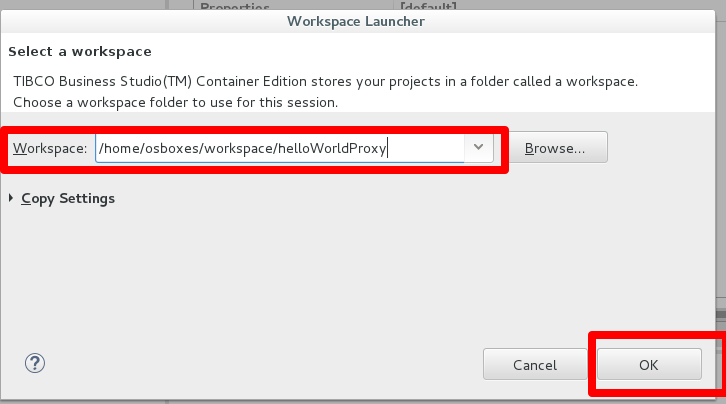
Create a new workspace named ‘helloWorldProxy’ and click ok.
WARNING. You may get the impression that studio doesn’t startup. Please keep a close eye on the left upper corner of the desktop. When using CentOS rhe BWCE Studio window may show up there…… drag it down to use it.
b) If you get the error ‘subversion Native Library Not Available’, ignore it by clicking ‘ok’.
c) Close the welcome screen
Step 2) Import the helloWorldProxy service (file helloWorldProxy.zip from ~/courseFiles/BWCE)
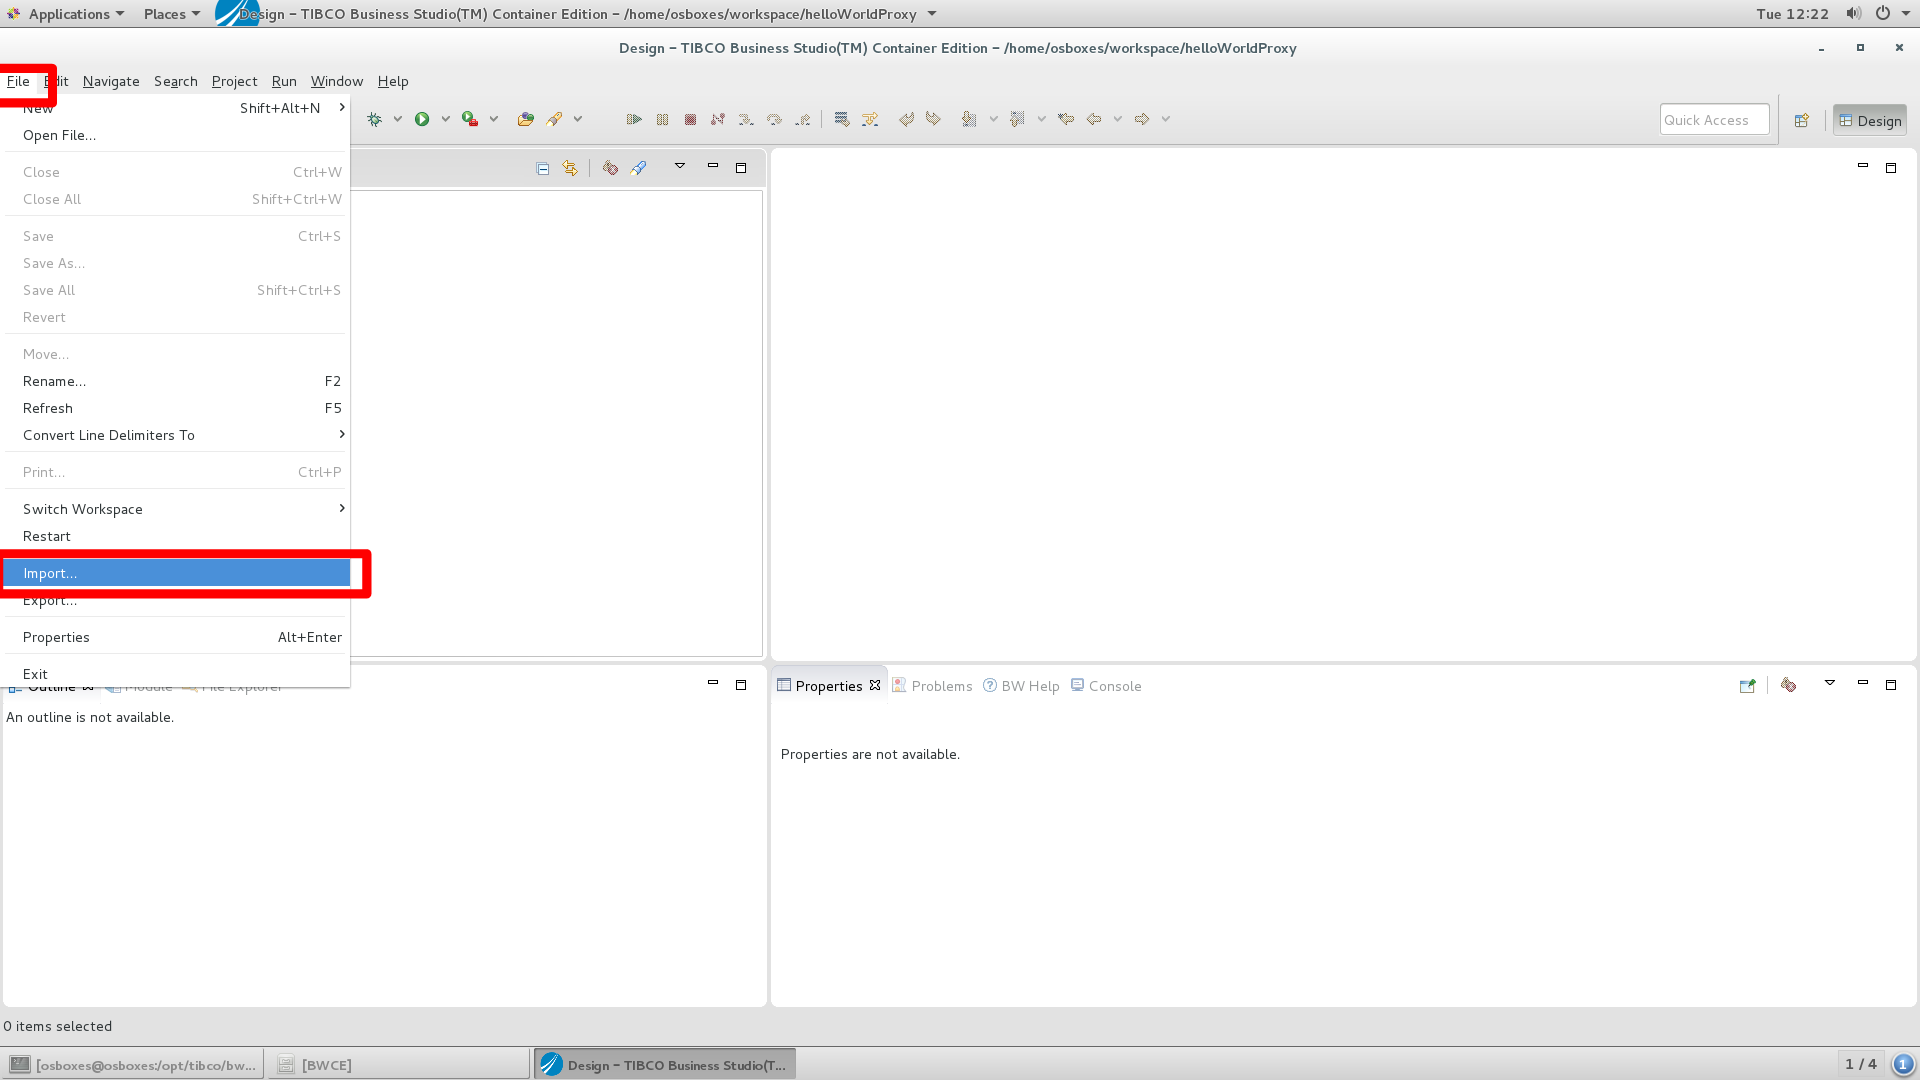
a) Click File–> import
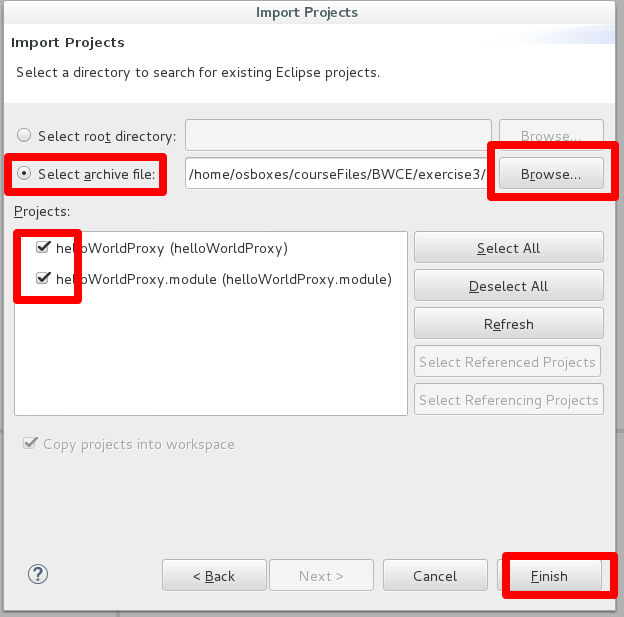
b) Select General –> Existing Studio Projects into Workspace and click ‘next’.

c1) Pick ‘Select archive file’, click on ‘browse’ and select the file helloWorldProxy.zip from ~/courseFiles/BWCE.
c2) Make sure both the helloWorldProxy (application) and the helloWorldProxy.module are selected.
c3) Click ‘Finish’.
Step 3) Inspect the project
If you are not interested in inspecting the project move to step 4.
a) Open the helloWorldProxyResource by clicking helloWordProxy.module –> processes –> helloworldproxy.module
b) Double click on helloWorldProxyResource.bwp
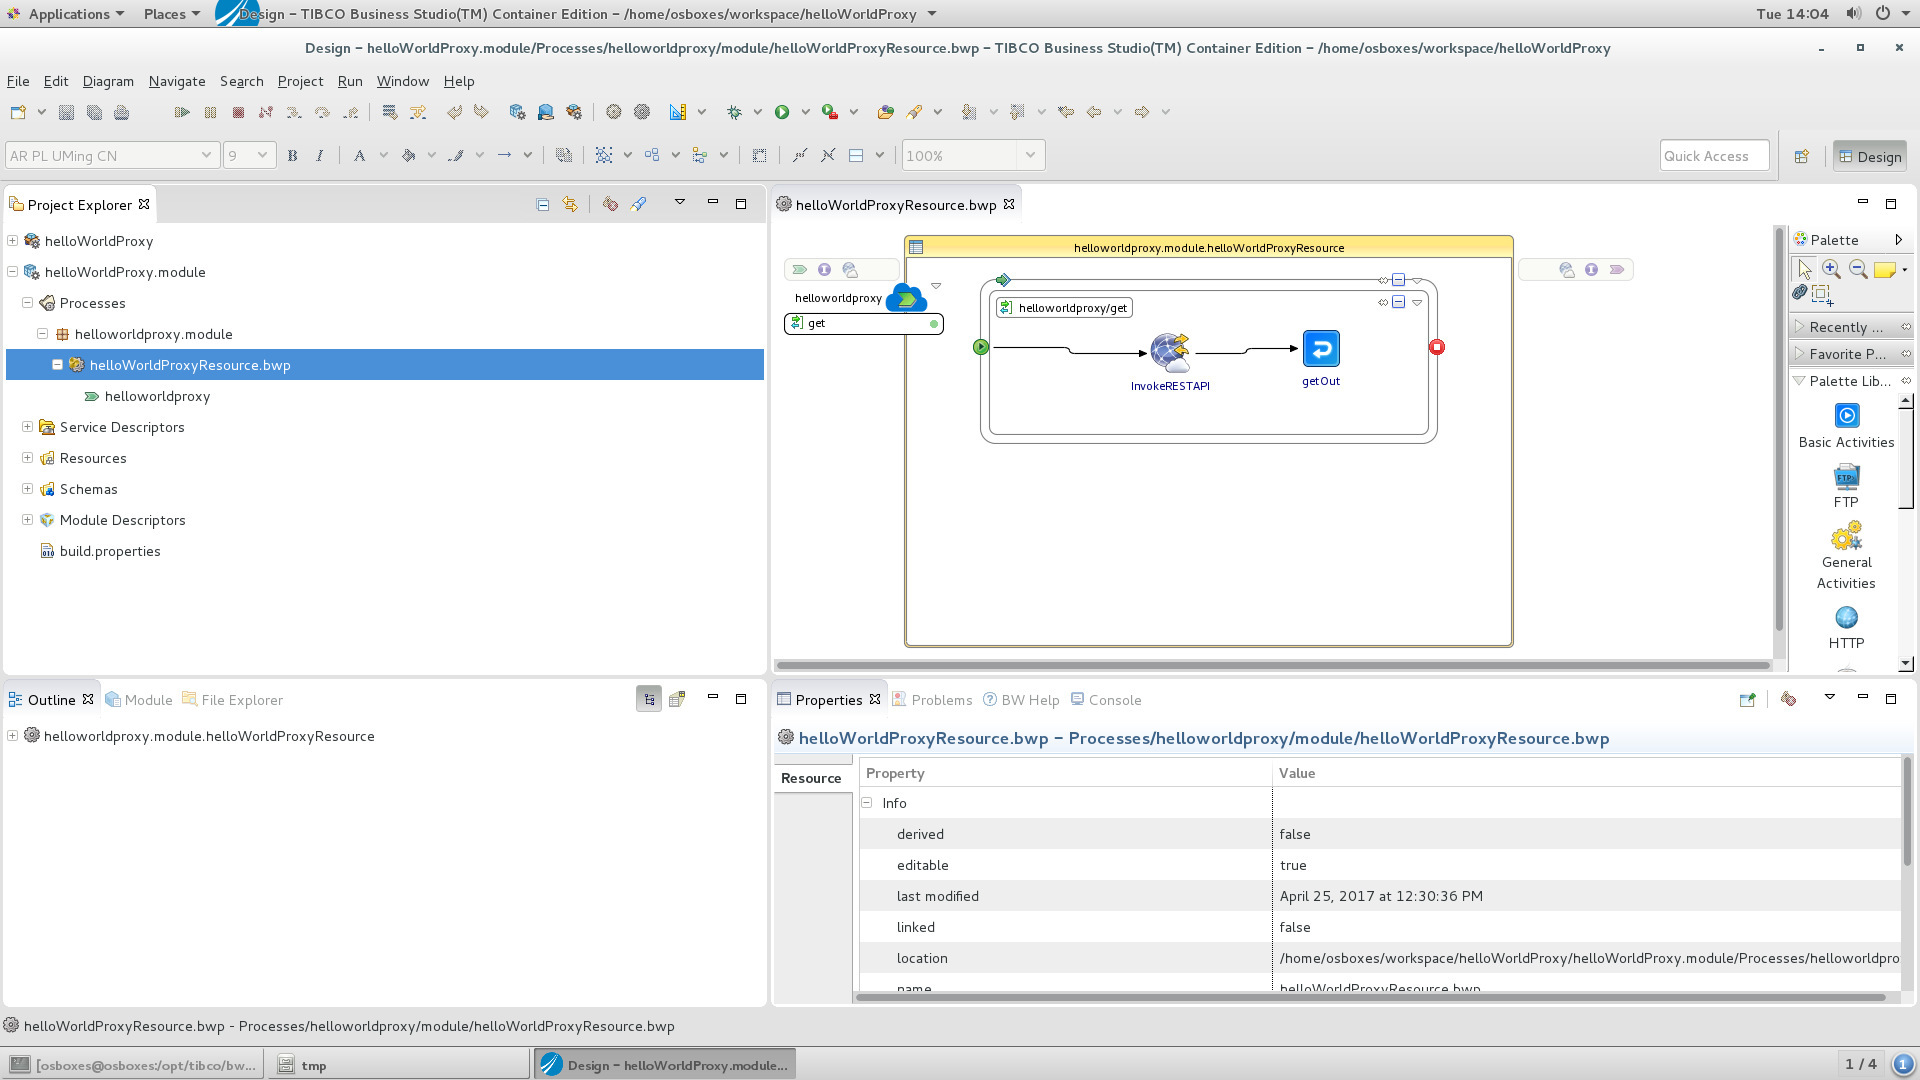
Inspect the resource using the following steps:
c1) Click Module Descriptors
c2) Double click Overview
c3) Select Components
c4) Select ComponenthelloWorldProxyResource –> helloworldproxy –> RestService
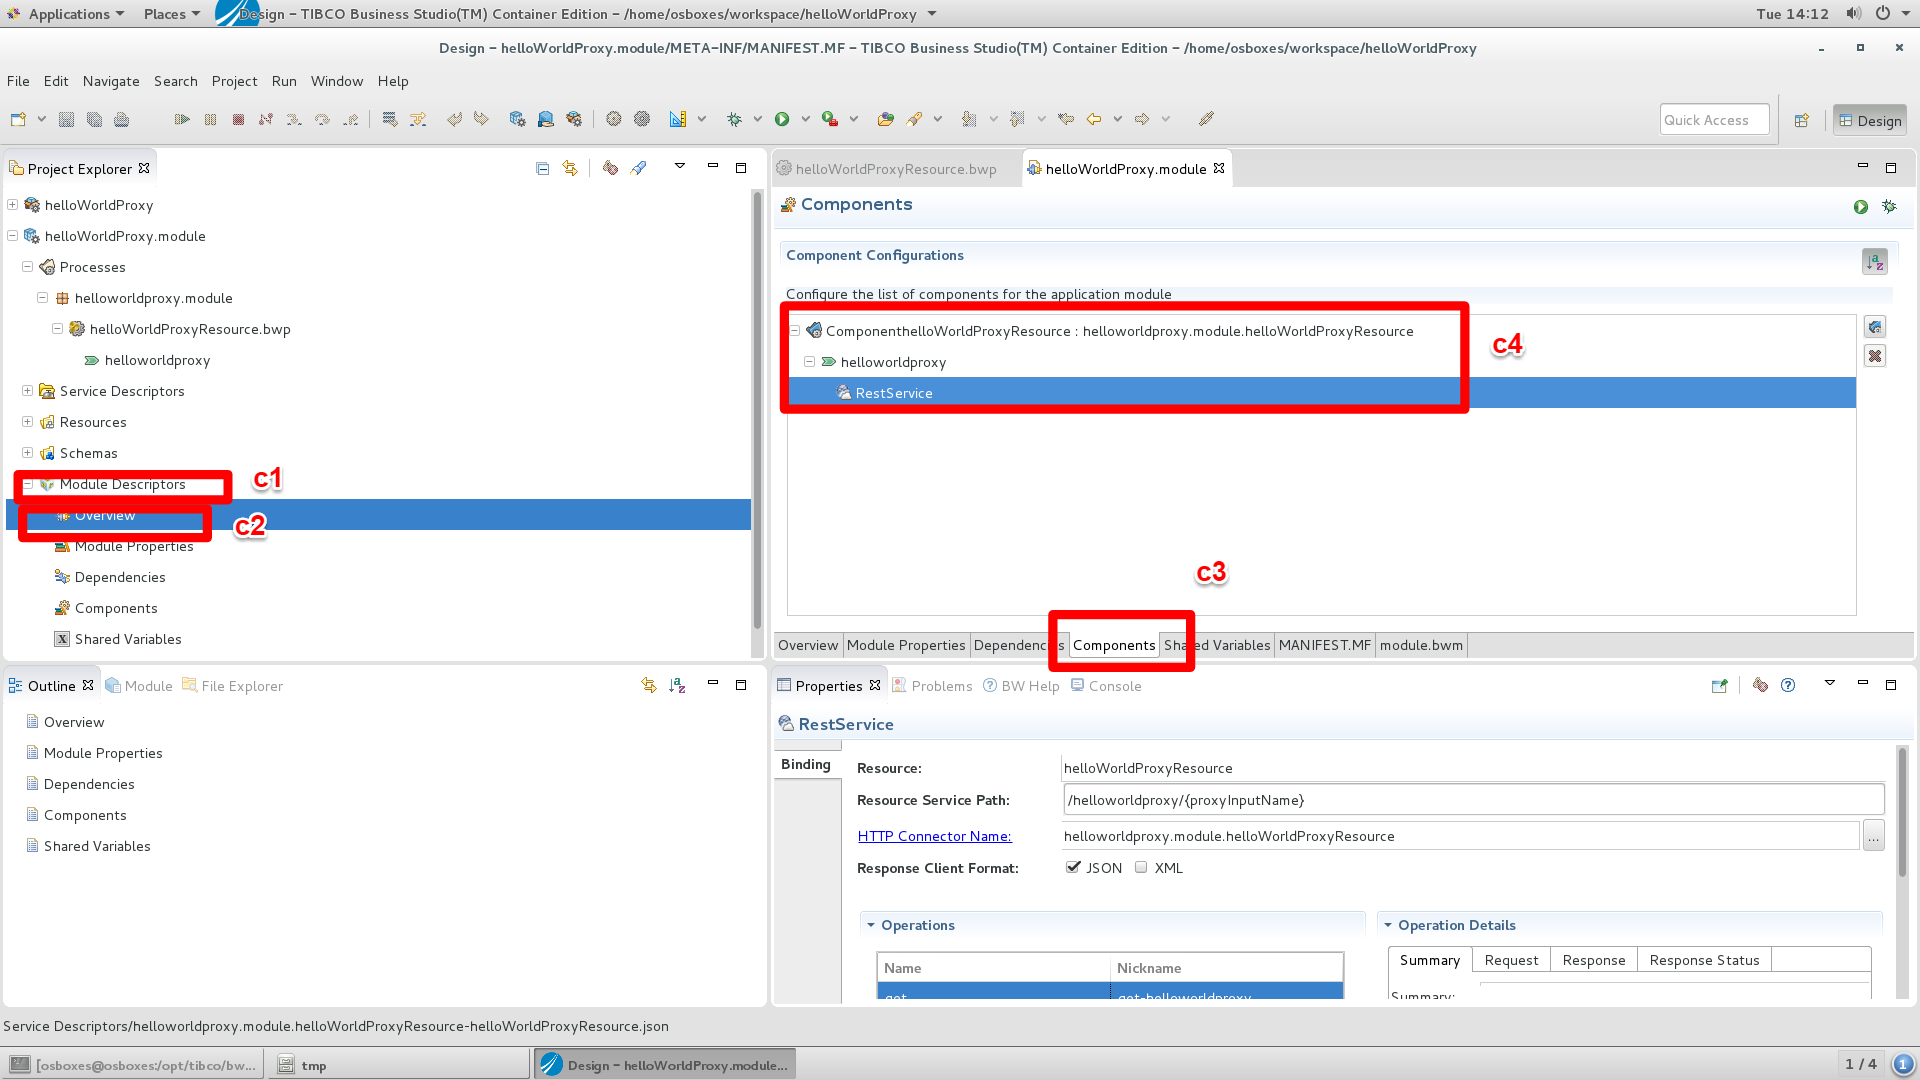
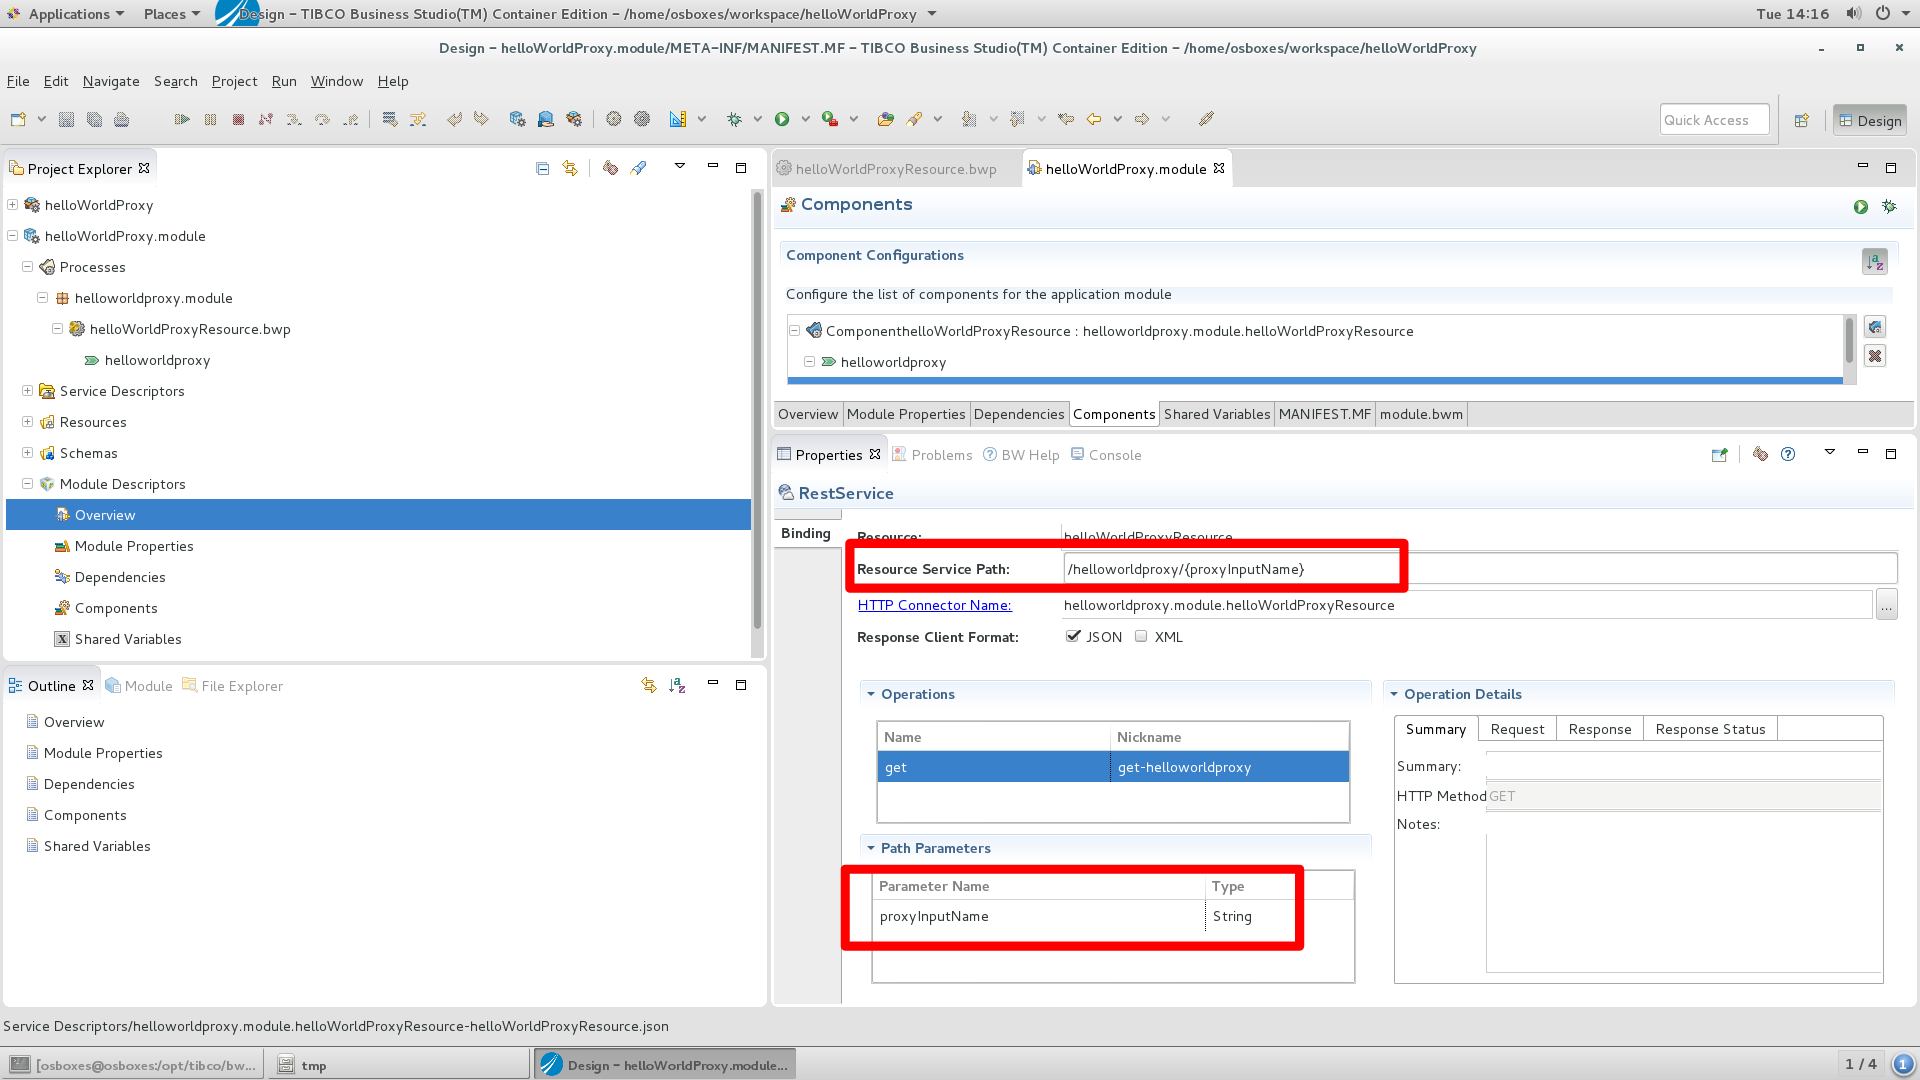
d) Scroll down to find out that the resource /helloworldproxy/{proxyInputName} is exposed as a string
e) Click on ‘response’ to see that rest service will return a string.

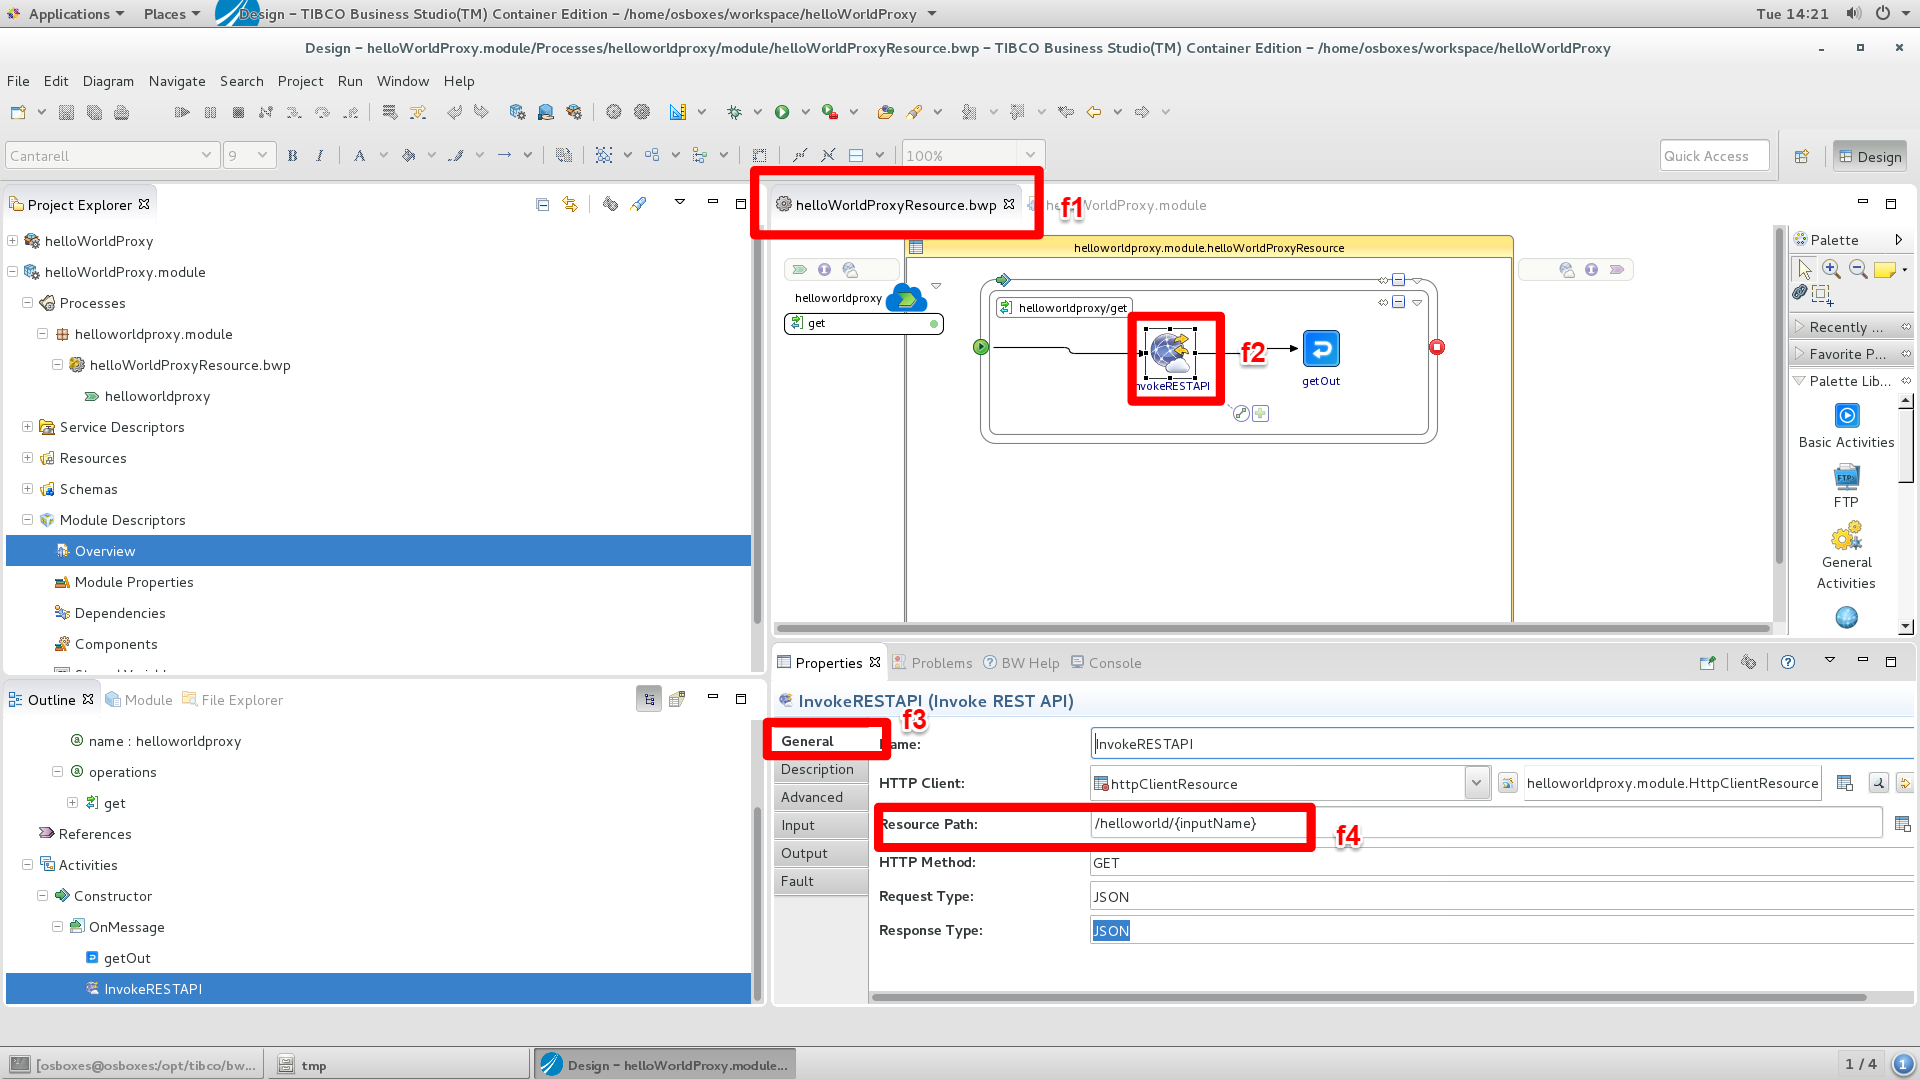
Take a look at the implemented process
f1) Click on the helloWorldProxyResource tab
f2) Click on the invokeRestAPI activity
f3) Select the general tab
f4) See that the resource /helloWorld/{inputName} is invoked
Select the helloWorldProxy process
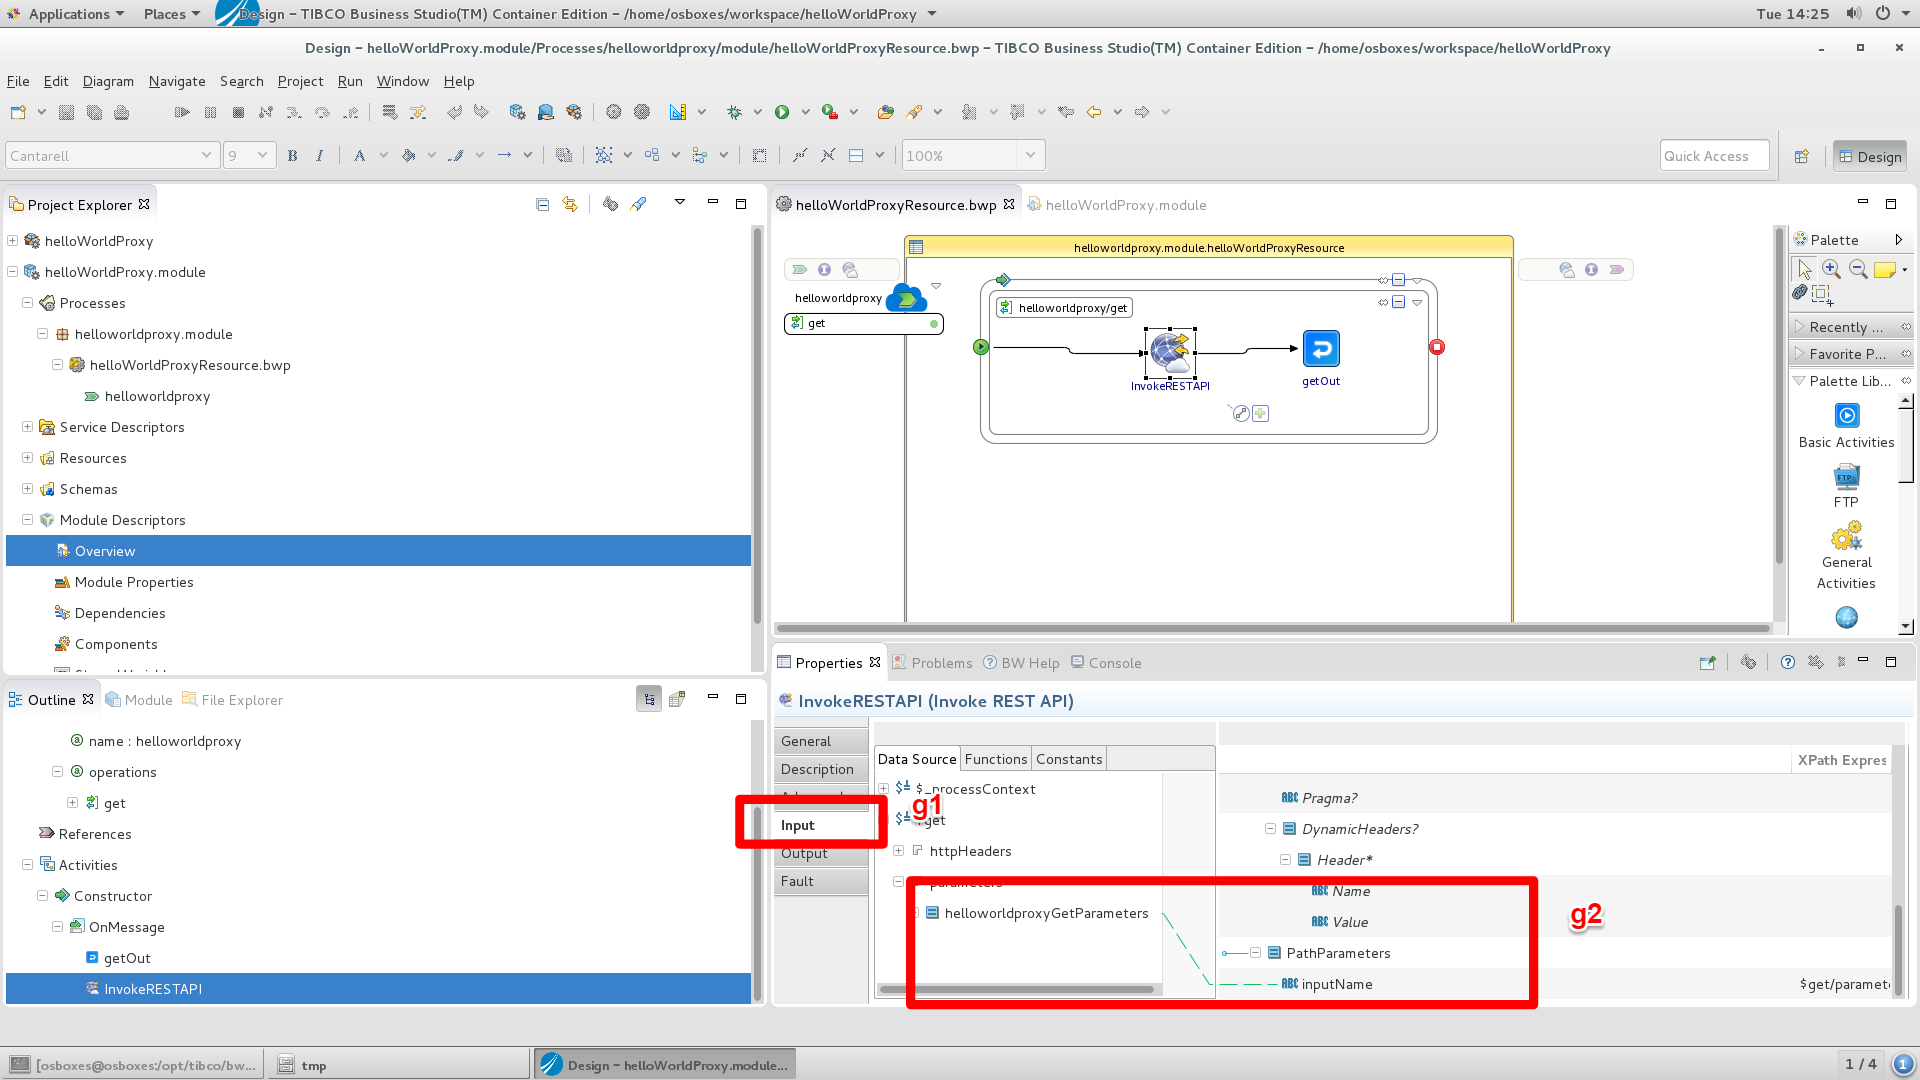
Check how ‘inputName’ is mapped:
g1) Click on the ‘input’ tab
g2) Check that the ‘inputName’ is mapped on the ‘proxyInputName’ (from the helloWorldProxy service)
Check the output of the helloWorldProxy service
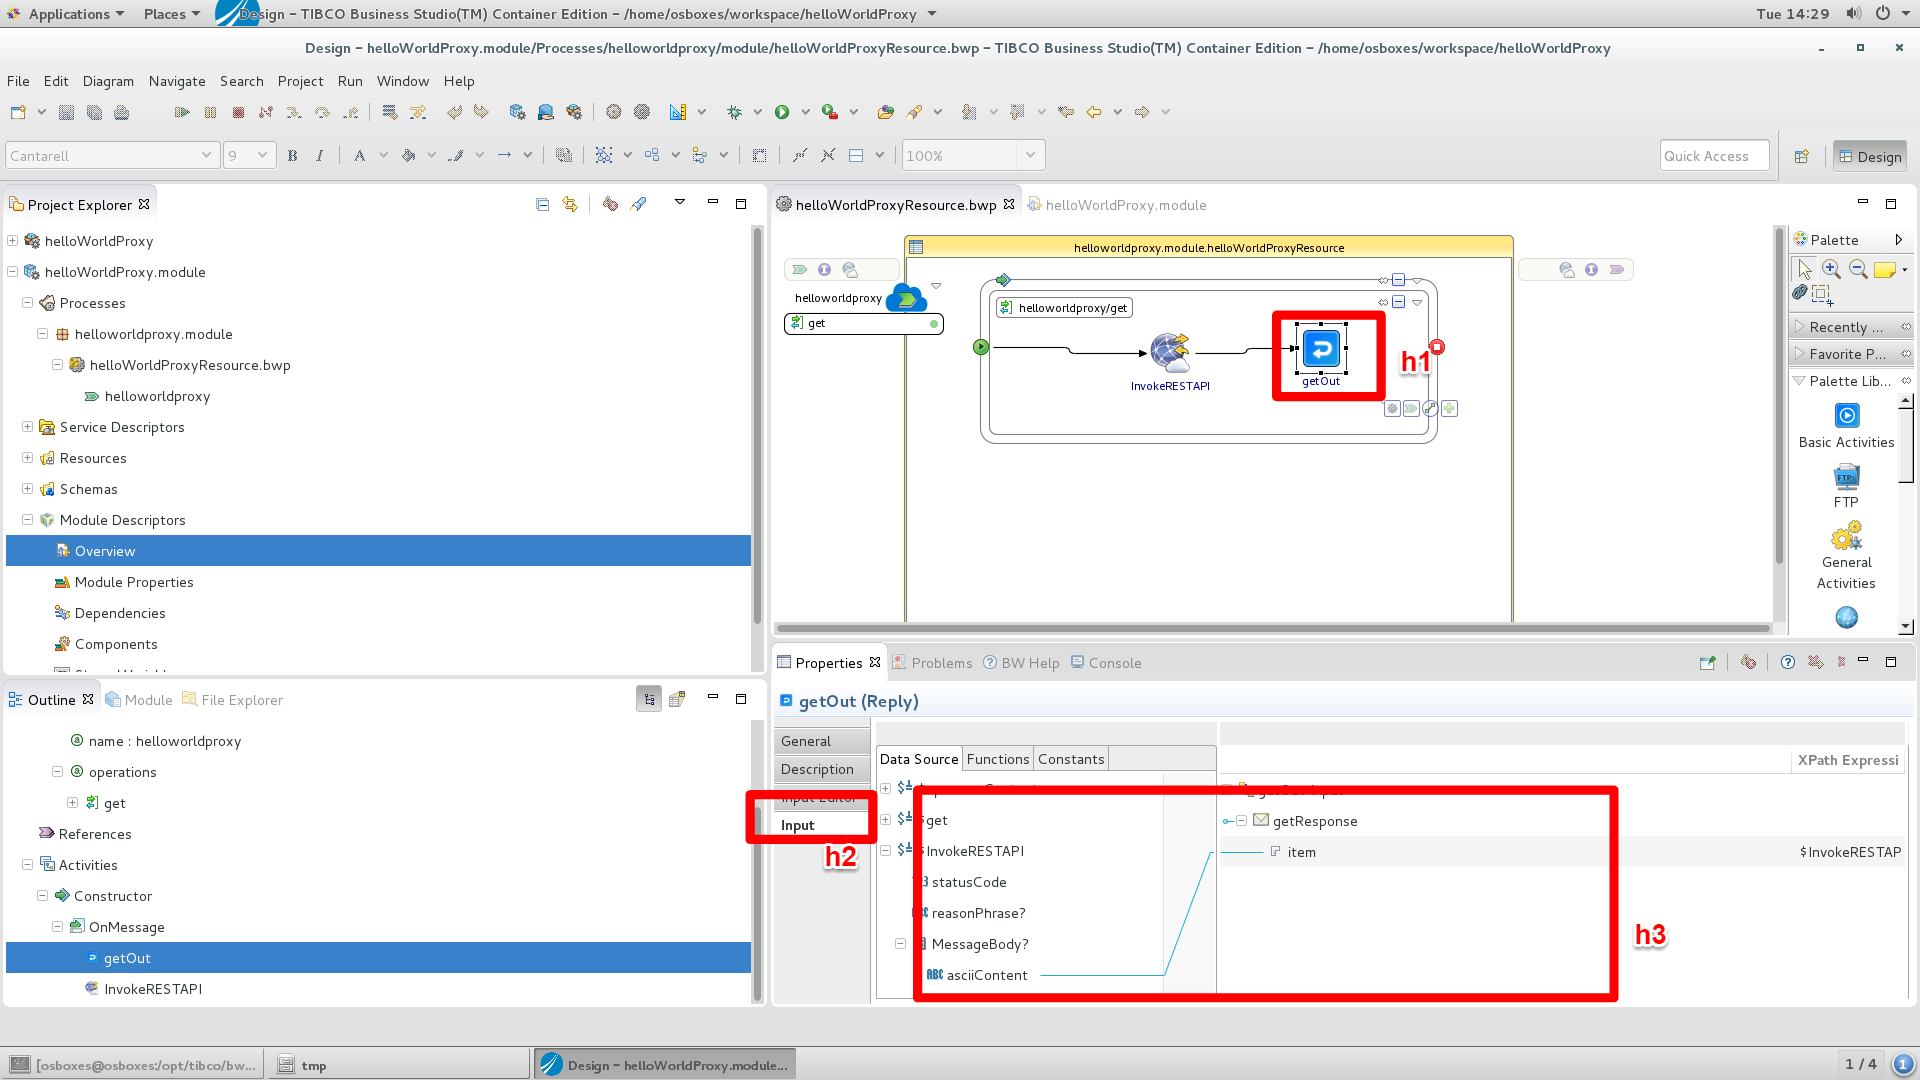
h1) Click on the ‘getOut’ activity
h2) Click on the ‘input’ tab
h3) Verify that the ascii output from the helloWorld resource is mapped as the output from the helloWorldProxy output.
Step 4) Inspect the properties defined for this service
For the invocation of the helloWorld service a HTTP apache client resource is defined. We will open it.
a1) Click helloWorldProxy.module
a2) Click Resources
a3) Clock helloWorldProxy.module
a4) Double click
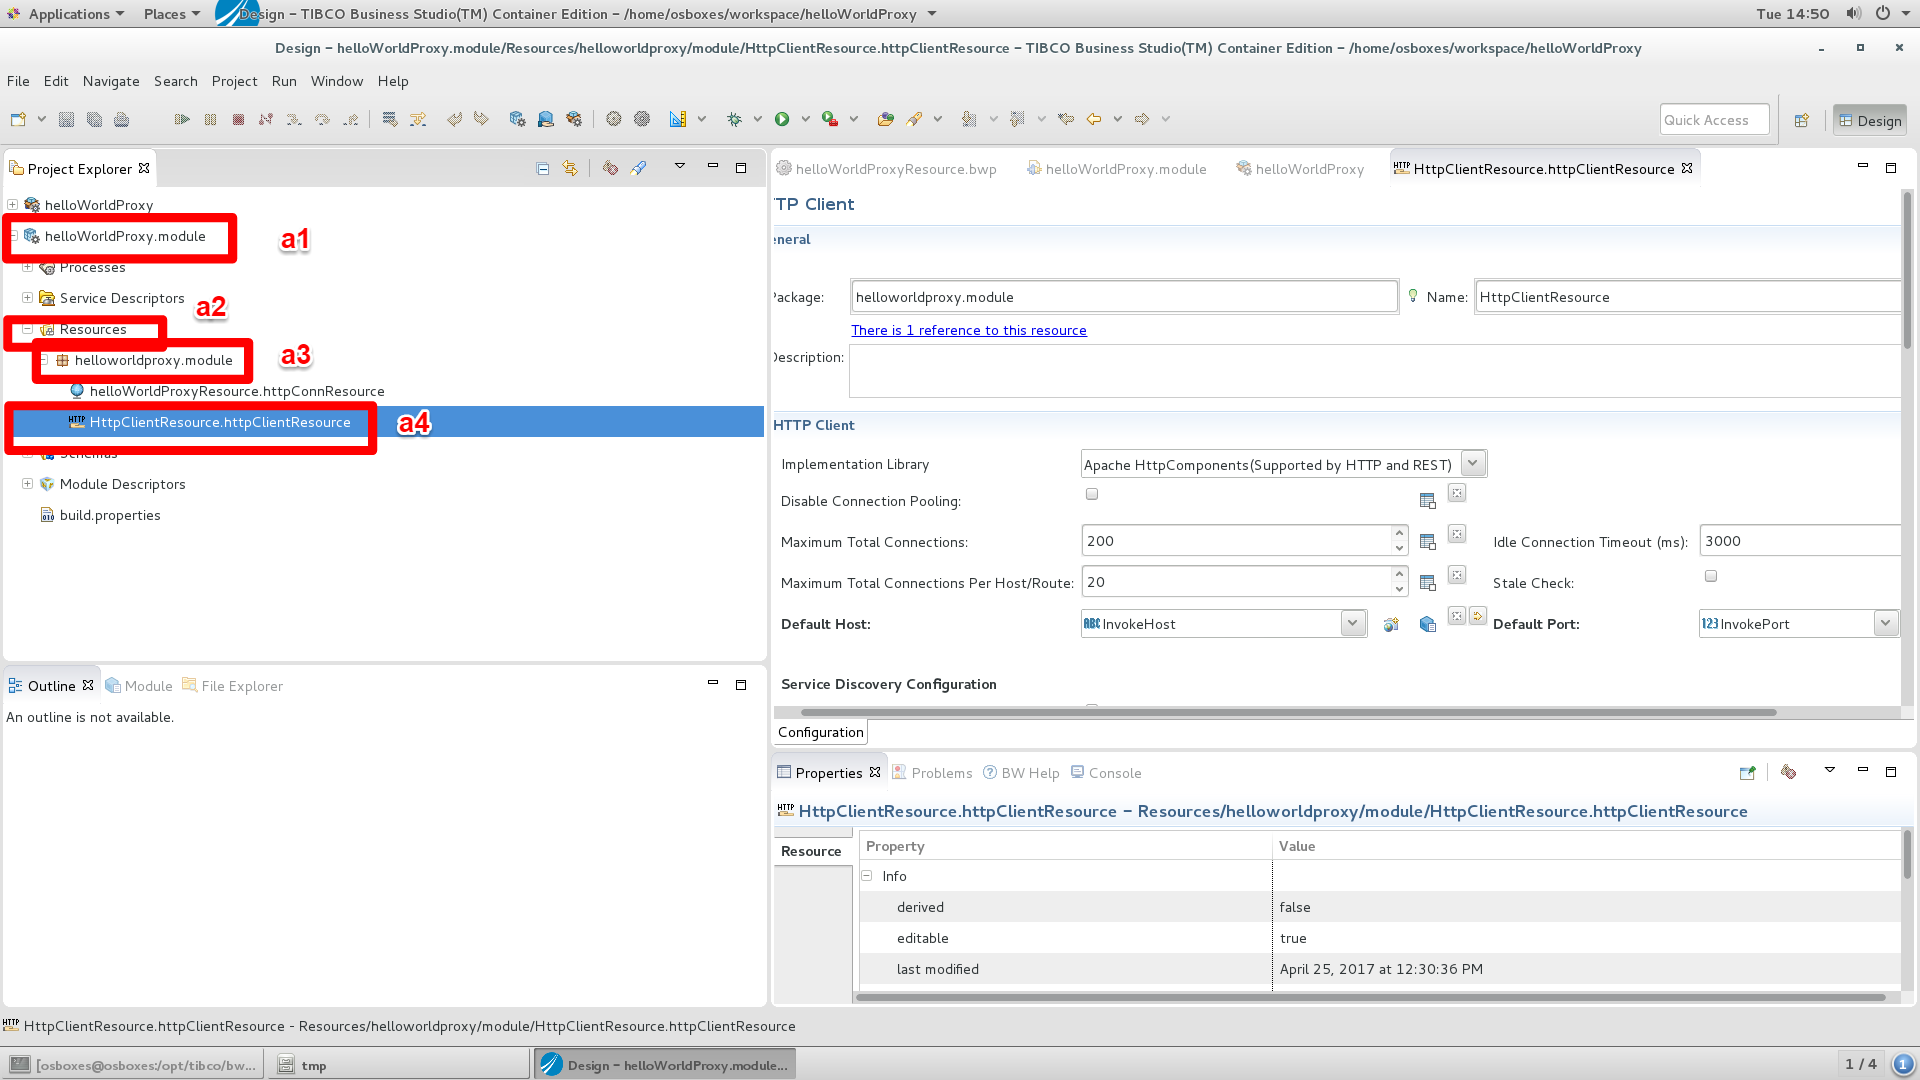
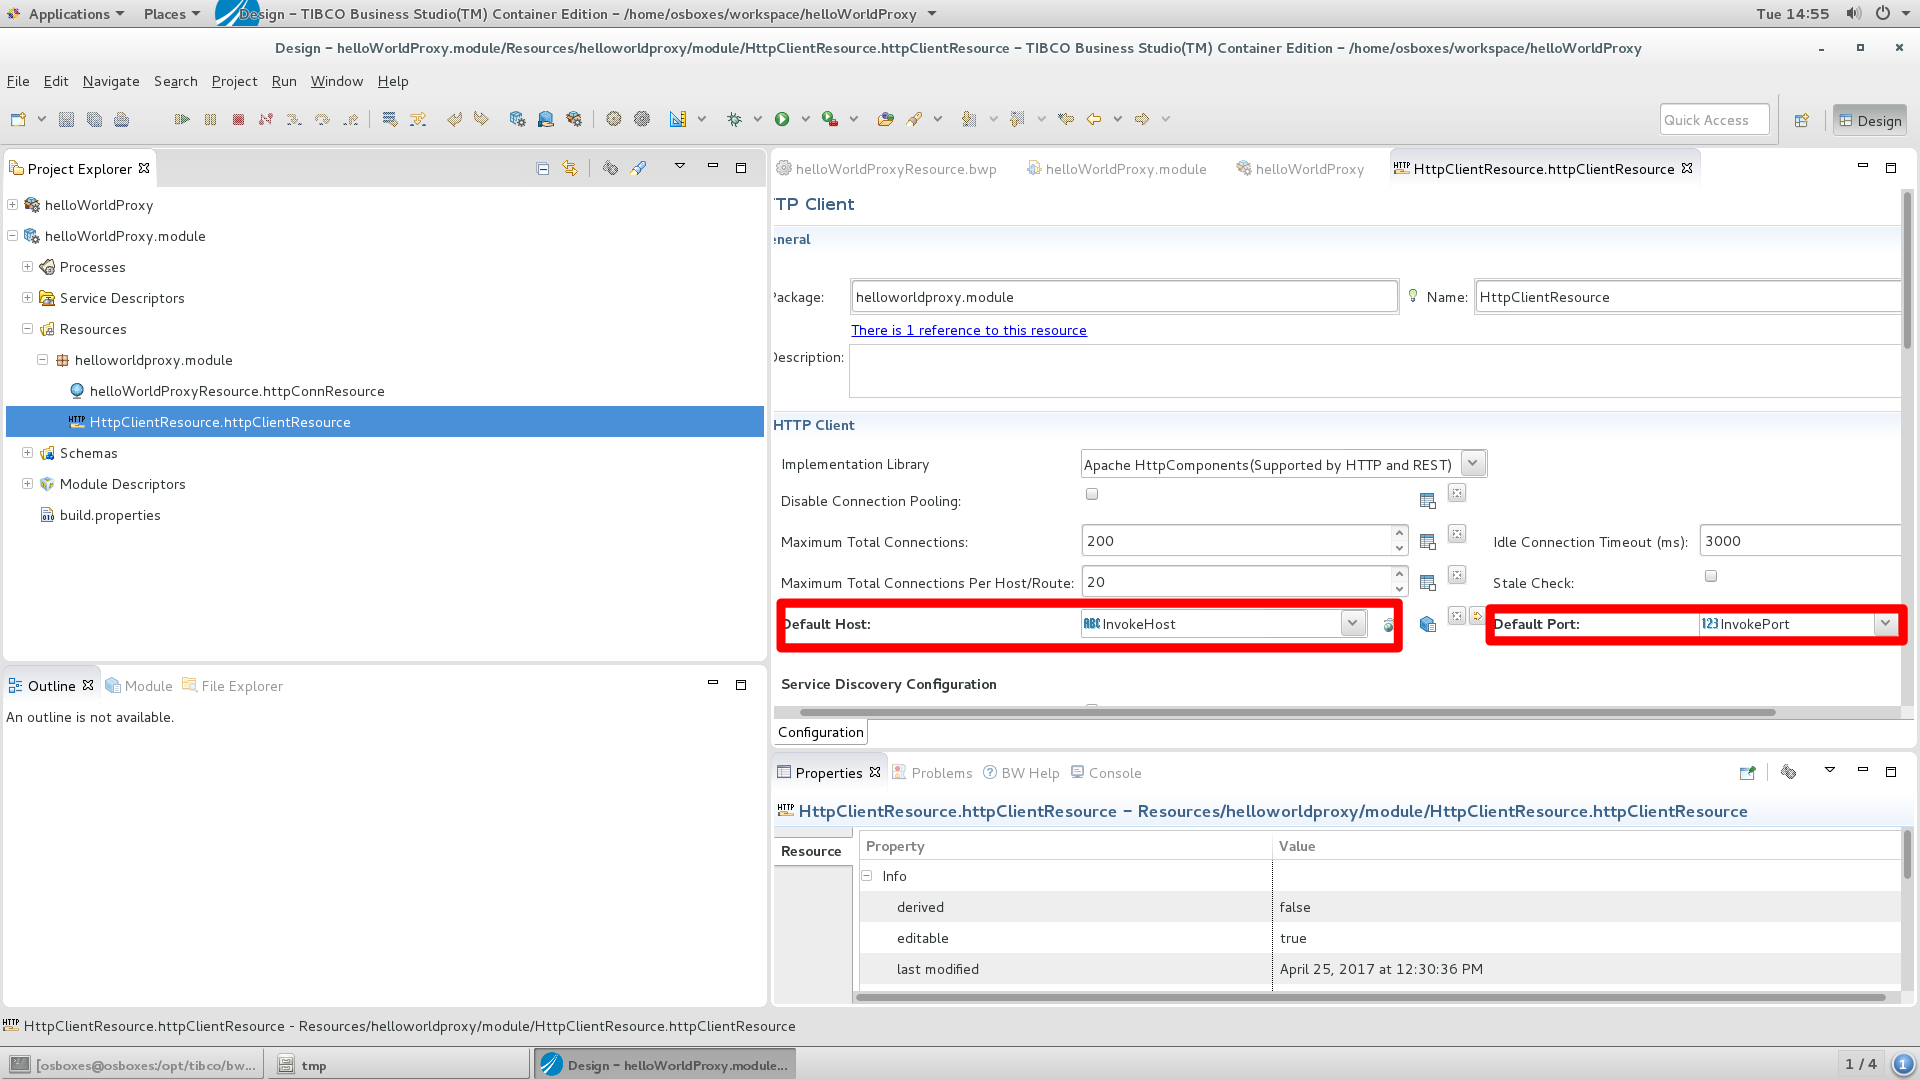
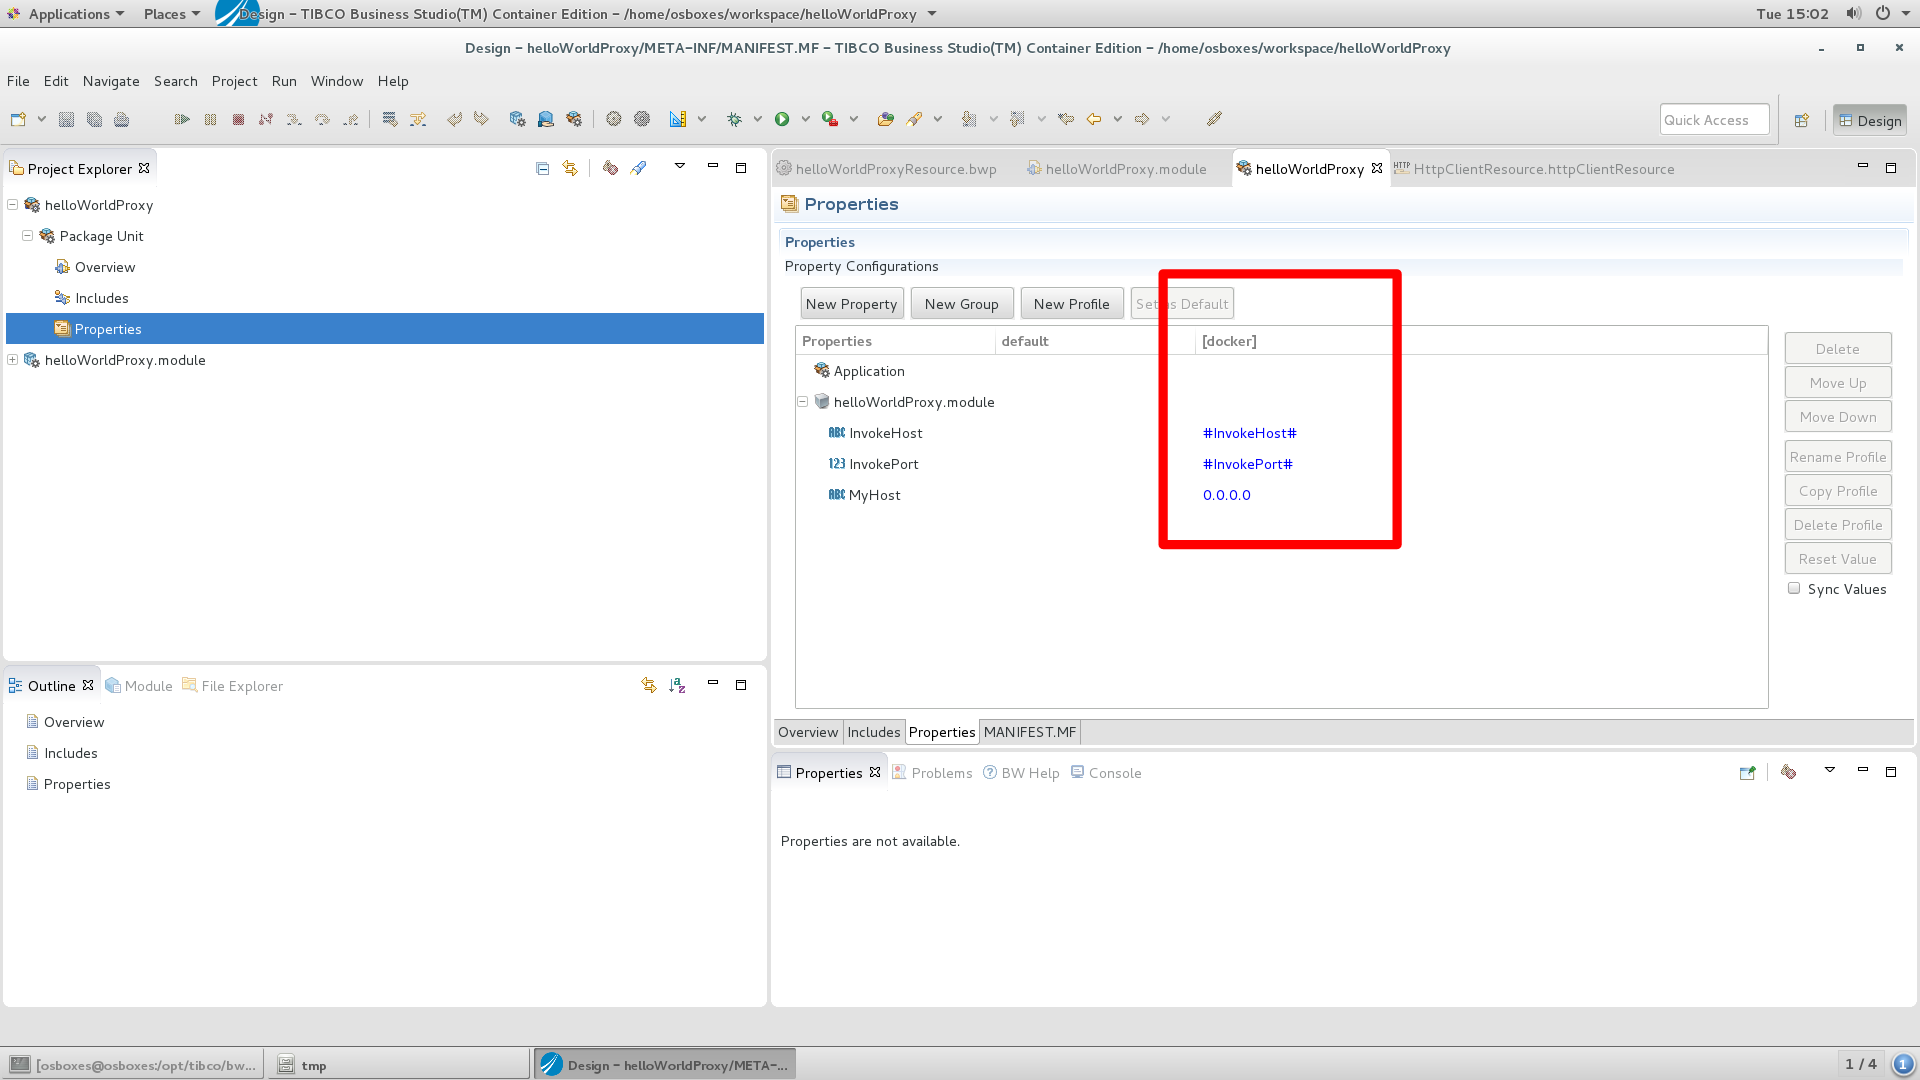
b) Check the properties defined for the host and the port. Please note that the BW property ‘InvokeHost’ is defined for the host to be invoked, the ‘InvokePort’ is defined for the port to be used.
Check the settings for the properties.
c1) Click helloWorldProxy
c2) Click Package Unit
c3) Double click ‘Properties’
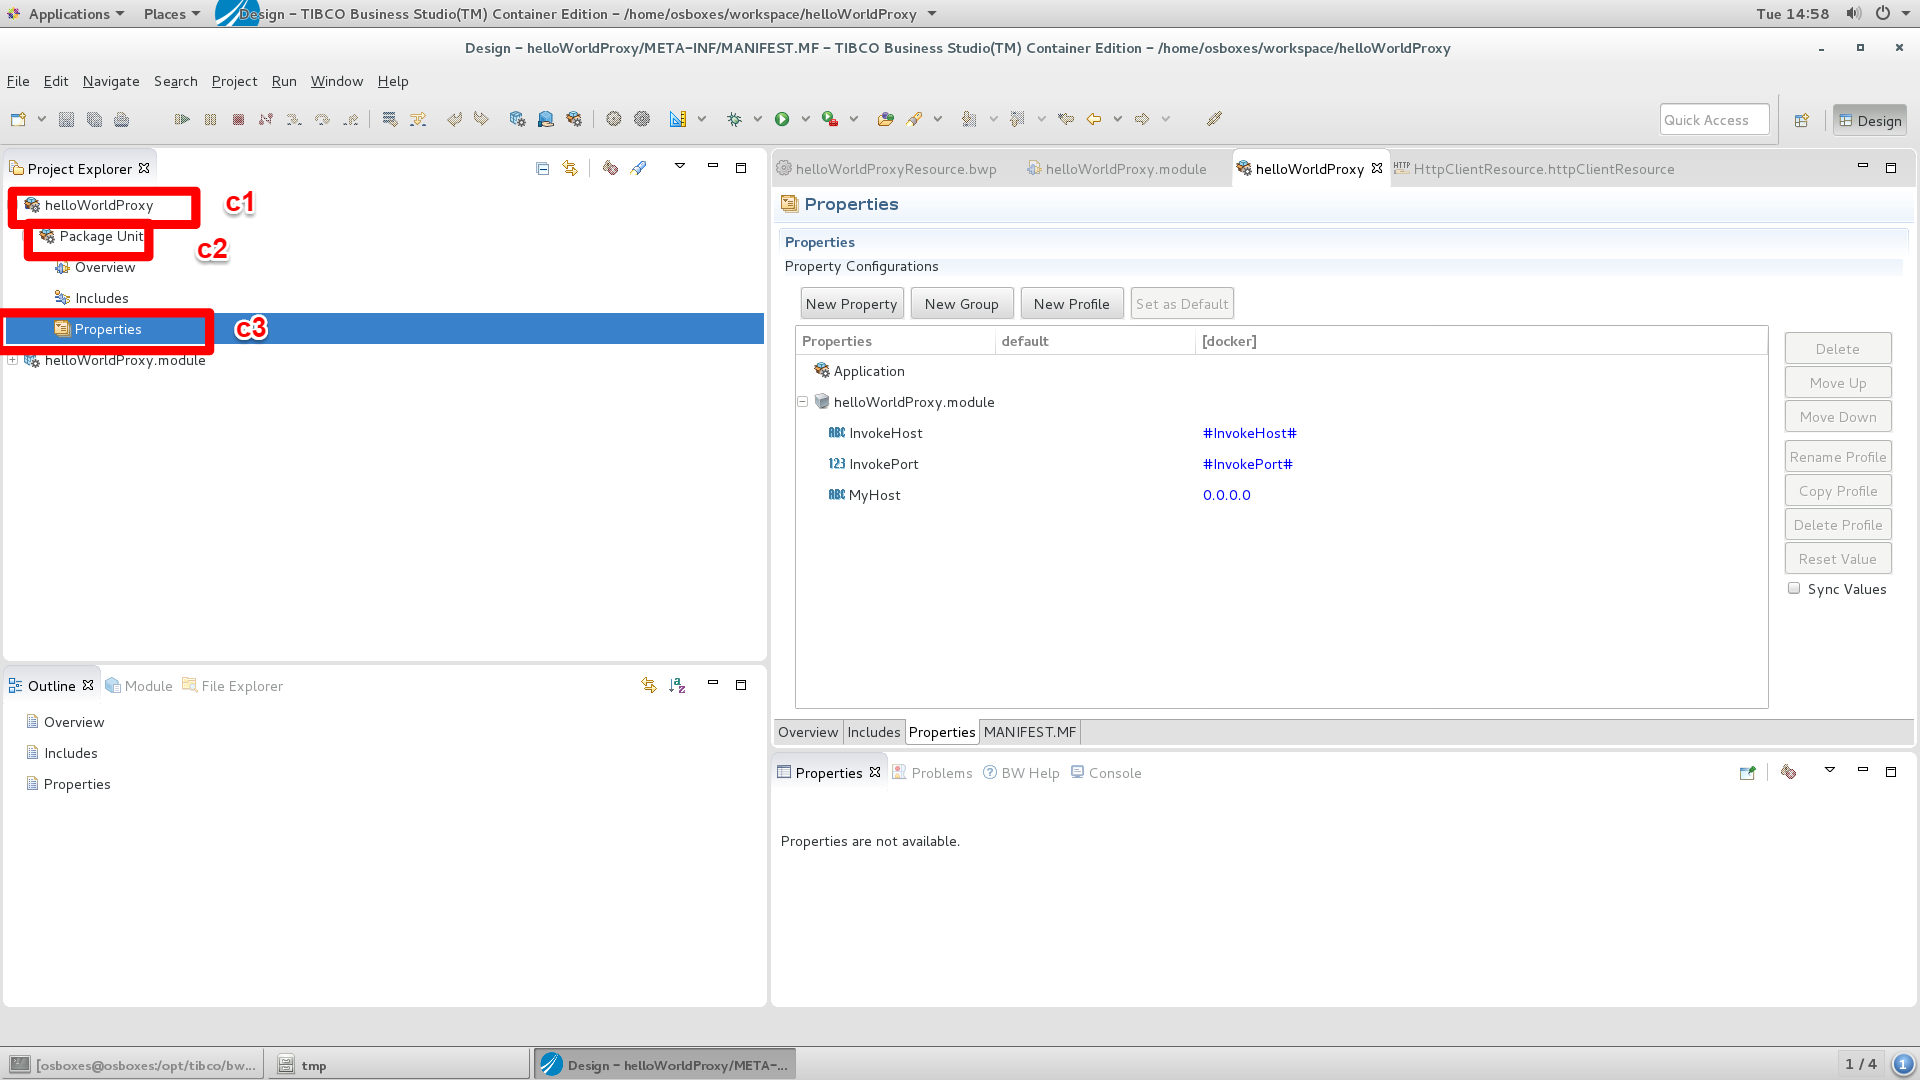
d) Notice the fact that new (default) profile named docker is created. Within this profile environment variables are defined (between ‘#’). These will be used in docker. In this particular case, the same names are used for the properties and environment variables. This is not a necessity.
Step 5) Prepare the application for use in an image
a) Create a directory named ‘helloWorldProxy’ in ~/mydocker (mkdir ~/mydocker/helloWorldProxy).
b) Export the application to ~/mydocker/helloWorldProxy
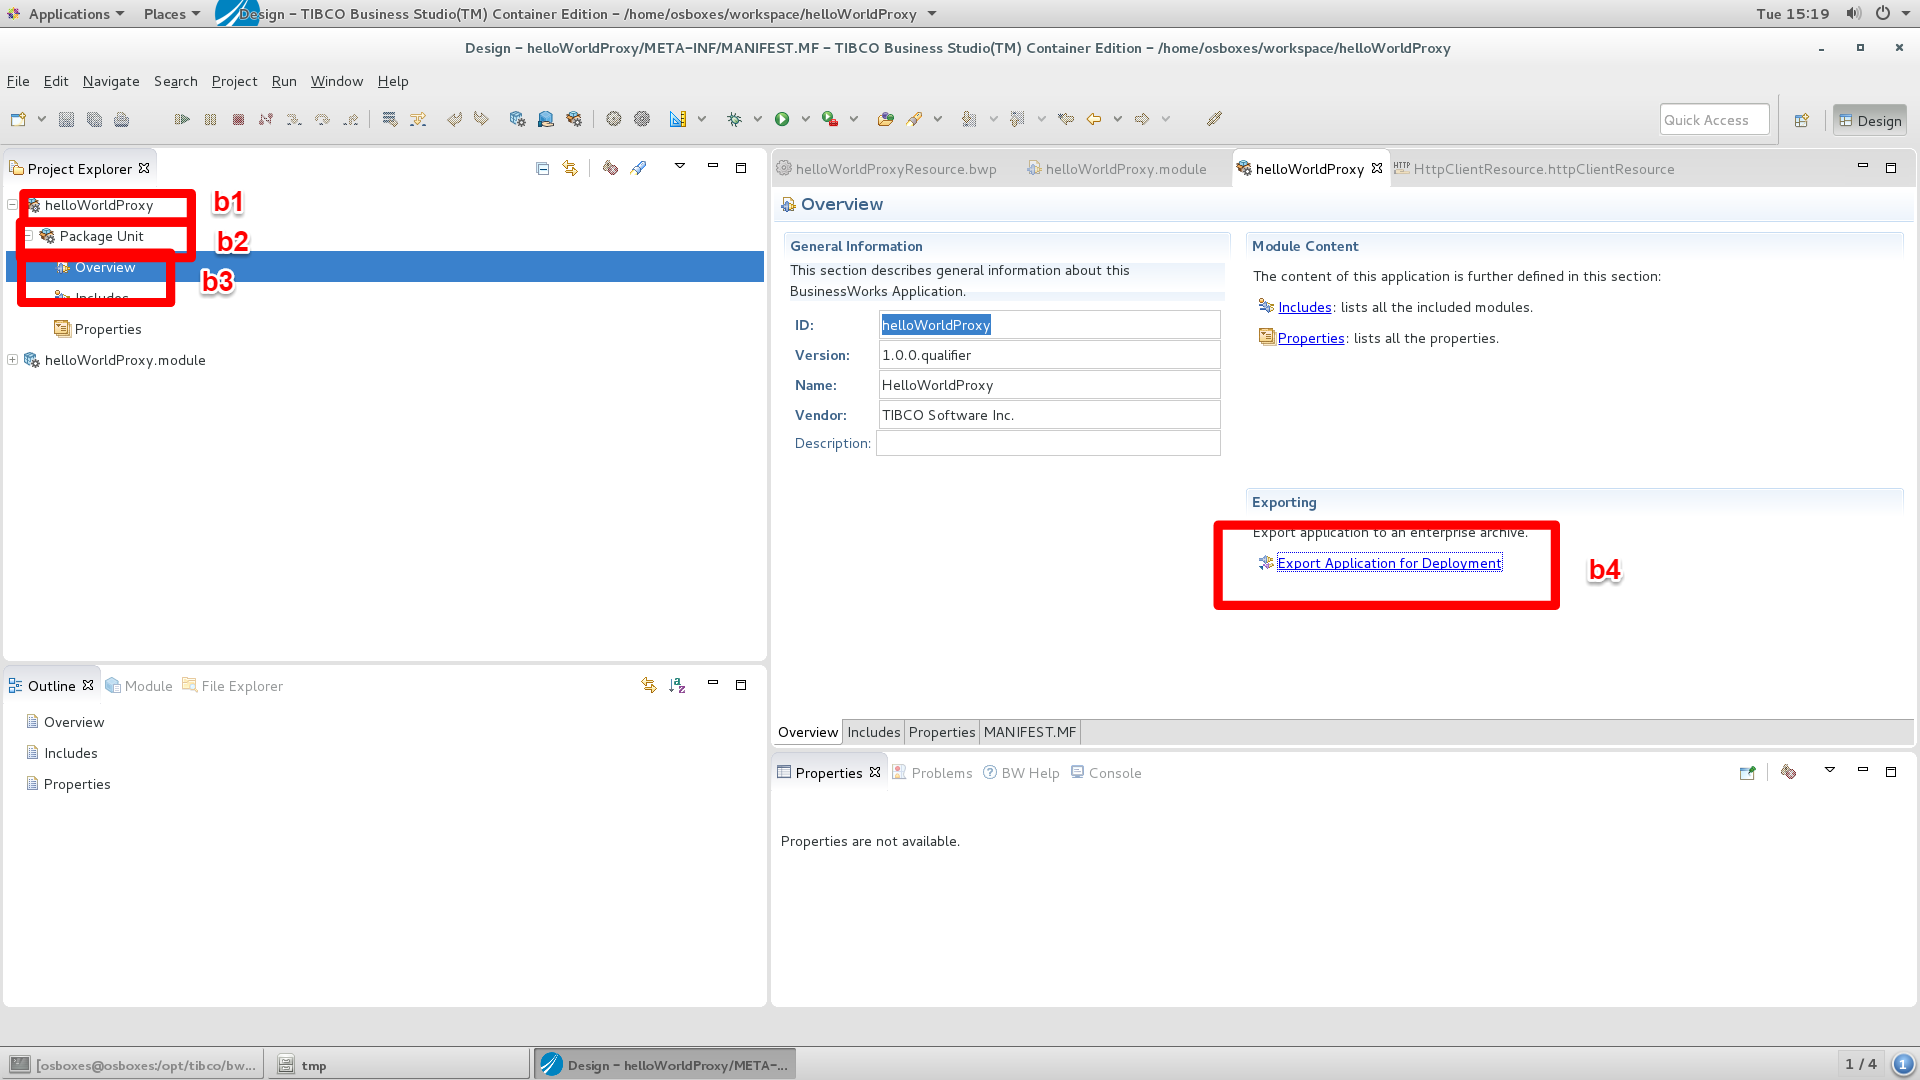
b1) Click helloWorldProxy
b2) Click PackageUnit
b3) double click overview
b4) select ‘export Application for deployment’
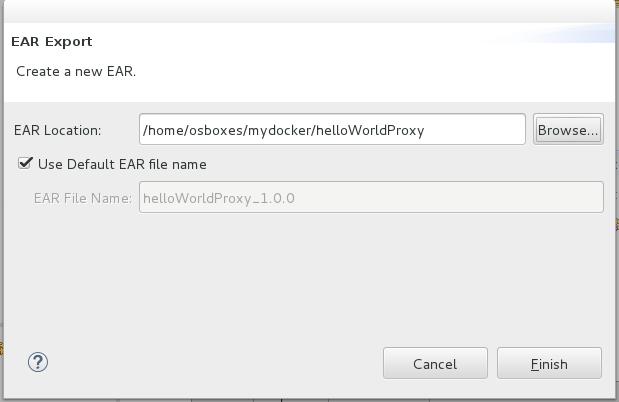
c) Save the ear in ~/mydocker/helloWorldProxy
d) Create a Dockerfile
d1) Go into ~mydocker/helloWorldProxy (cd ~mydocker/helloWorldProxy)
d2) Type gedit Dockerfile, paste the following content in this file:
FROM tibco/bwce:latest
MAINTAINER tibco
ADD helloWorldProxy_1.0.0.ear /
DockerFile:Dockerfile
The file is also available in courseFiles\BWCE\exercise3
Step 6) Create composite application that contains both helloWorld and helloWorldProxy
In this step we will create a docker-compose configuration that will launch the helloWorld application (from exercise 2) and the helloWorldProxy as an composite application.
a) Create the directory ~/mydocker/compose/helloWorldProxyComposite (mkdir ~/mydocker/compose/helloWorldProxyComposite).
b) Create a file named docker-compose.yml in this directory (cd ~/mydocker/compose/helloWorldProxyComposite and gedit docker-compose.yml). Paste the following content in the file:
version: ‘2’
services:
helloworldbwcecontainer:
build: ~/mydocker/helloWorldBWCE
expose:
– 8080
helloworldproxycontainer:
build: ~/mydocker/helloWorldProxy
environment:
– InvokeHost=helloworldbwcecontainer
– InvokePort=8080
depends_on:
– “helloworldbwcecontainer”
expose:
– 8080
ports:
– “80:8080”
docker-compose.yml: docker-compose.yml
The file is also available in courseFiles\BWCE\exercise3
Let’s take a look at the yml file:
version: ‘2’
services:
helloworldbwcecontainer: <== The helloWorld application (created in exercise 1) is launched (in a container)
build: ~/mydocker/helloWorldBWCE
expose:
– 8080 <== It exposes port 8080, but please mind: no port is exposed on the Docker host. Port 8080 is only exposed within the helloWorld container.
helloworldproxycontainer: <== another container is created for the helloWorldProxy
build: ~/mydocker/helloWorldProxy <== an image is created according to the definition in the Dockerfile in ~/mydocker/helloWorldProxy
environment: <== the following section defines the (Linux) environment variables (that will me mapped on the BW properties)
– InvokeHost=helloworldbwcecontainer <== ‘helloworldbwcontainer’ is used as the hostname for the invocation. Docker compose registers every container in a docker specific DNS with the it’s service name.
– InvokePort=8080 <== We will invoke the service at port 8080
depends_on:
– “helloworldbwcecontainer” <== the proxy should only start after the helloWorld application started, otherwise the DNS entry ‘helloworldbwcontainer’ may not yet exist.
expose:
– 8080 <== helloWorldProxy exposes port 8080 in its own container. While every container is isolated, this doesn’t lead to a conflict with the helloWorld application
ports:
– “80:8080” <== We do map port 8080 on port 80 on the docker host (in order to be able to test).
Step 7) Start the composite application
a) run ‘docker-compose up -d ‘ (from ~/mydocker/compose/helloWorldProxyComposite).
b) run ‘docker-compose logs’ and verify that both the helloWorld and the helloWorldProxy application started successfully.
Step 8) Test the application
a) Open a browser and open URL http://localhost/swagger
b) Fill out a name and verify that the composite application is running:
c) Cleanup
c1) Type ‘docker-compose down’