How so solve the well known chicken and the egg problem with a Raspberry Pi: you boot the device on a new network, you want to ssh to it, but you don’t know the IP address.
Introduction
Those that work with a Raspberry PI probably know the problem. You want to boot the device unattended. It will get assigned a IP address by the access point. Nevertheless without a keyboard and a display there is no way to get to know it. Which is unfortunate because with the IP address you will have hard time setting up a SSH connection.
Obviously there are multiple ways to overcome this problem. You could assign a fixed IP address, you could use Dynamic DNS or you could just guess that PI will get assigned the same IP address as it did last time…. especially when you are testing with the Raspberry and you use different access point (with different SSIDs) using these solutions may be cumbersome.
As an alternative you can create a little script that sends out the IP address of the Raspberry in a mail…. this document describes how to do this.
Requirements
You need a sender gmail account. This is the e-mail address that will send the mails. It MUST be a gmail account. It is highly recommended to create a new gmail account for this and not to use your regular gmail account. In order for this to work, you need to lower the security settings of the account. Rather not do this with your regular gmail account, I would suggest.
Apart from that you need a receiver email account. This is the account that is used to received the mail with IP address. This can be an account at any email provider.
Steps
Step 1) Change the security settings of your sender gmail account.
a) Goto https://myaccount.google.com/u/2/security and logon using the account that will send the mails.
b) Scroll down to the section ‘allow less secure apps’
c) Turn on ‘allow less secure apps’
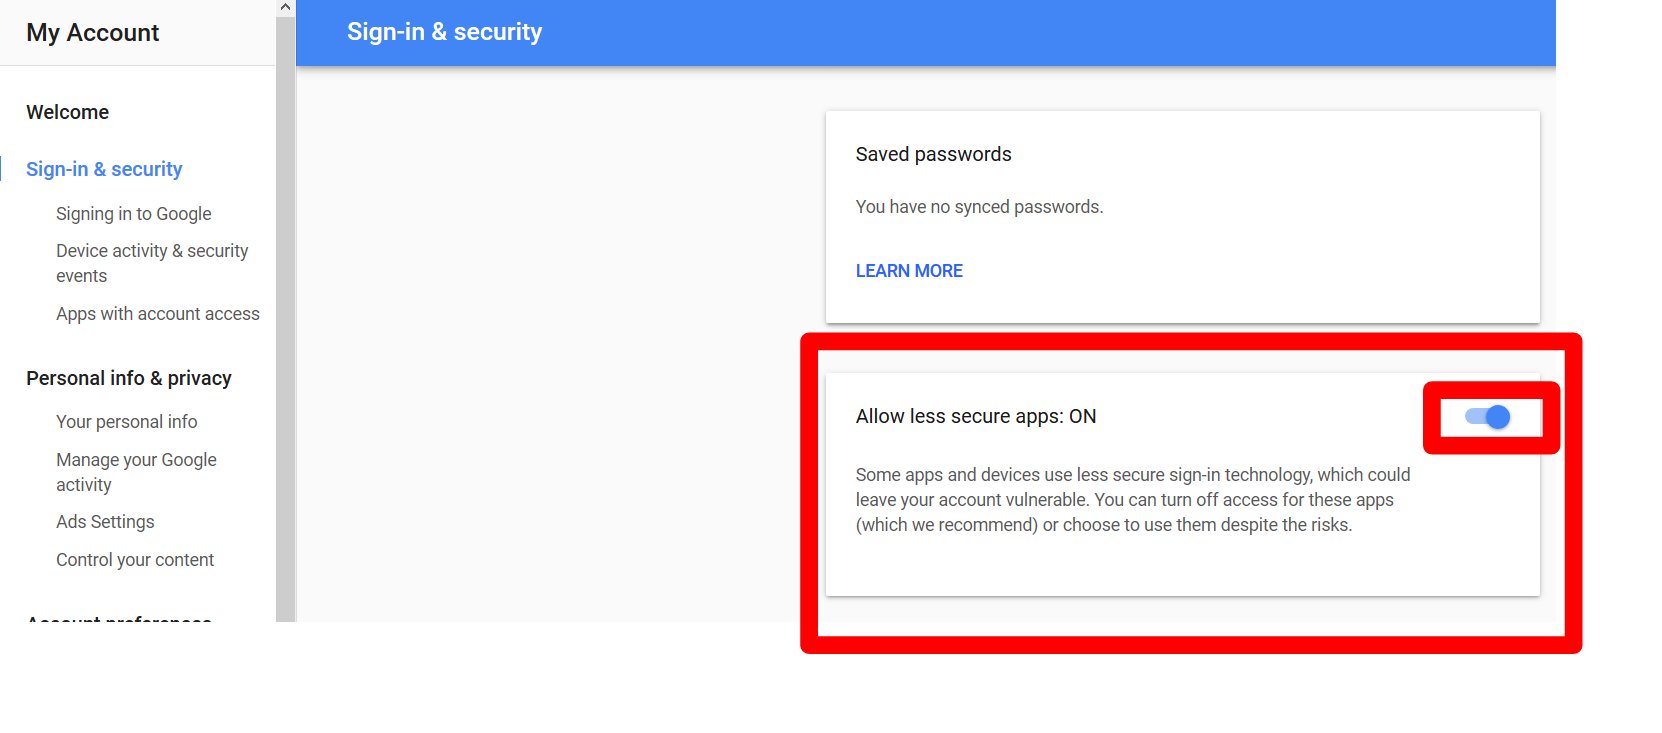
Please mind: because your lowering the security settings of your account, it is highly recommended to use a seperate account as the mail sender.
Step 2) Create the mail script
a) Login to the Raspberry using the root user (pi)
b) Create a script named startup_mailer.py in the directory /home/pi/script. Use your favorite editor to past the following code in startup_mailer.py or copy the following code:
|
import subprocess
import smtplib
import socket
from email.mime.text import MIMEText
import datetime
import time
# Change to your own account information
gmail_password = ‘yourpassword’
tries = 0
while True:
if (tries > 120):
exit()
try:
smtpserver.ehlo()
smtpserver.starttls()
smtpserver.ehlo
smtpserver.login(gmail_user, gmail_password)
today = datetime.date.today()
# Very Linux Specific
arg=’ip route list’
p=subprocess.Popen(arg,shell=True,stdout=subprocess.PIPE)
data = p.communicate()
split_data = data[0].split()
ipaddr = split_data[split_data.index(‘src’)+1]
my_ip = ‘Your ip is %s’ % ipaddr
msg = MIMEText(my_ip)
msg[‘Subject’] = ‘IP For RaspberryPi on %s’ % today.strftime(‘%b %d %Y’)
msg[‘From’] = gmail_user
msg[‘To’] = to
smtpserver.sendmail(gmail_user, [to], msg.as_string())
smtpserver.quit()
break
except Exception as e:
tries = tries + 1
time.sleep(1)
|
c) Set the following parameters in startup_mailer.py:
to ==> the e-mail address on which you want to receive the mail
gmail_user ==> the user that will send the mail (that you defined in step 1)
gmail_password ==> the password of the mail sender
d) Make the file executable: sudo chmod +x startup_mailer.py
3) Configure the script to be run at boot via crontab
a) start a terminal and run: crontab -e
c) add the following line to the crontab: @reboot python /home/pi/script/startup_mailer.py
4) reboot your Raspberry and check your mail.
Troubleshooting:
If things do not work, run the script manually first.
In order to find out what goes wrong add the following line to the script:
break
except Exception as e:
print e
tries = tries + 1
time.sleep(1)
Google automatically turns off the option ‘allow less secure apps’ after a number of failed login attempts. Check this option if things do not work.
Resources: