In some cases, there is a need to (temporary) change the logging logging level of a BWCE application. This document contains instructions on how to do that.
The easy way
The most simple way to generate additional logging is by using the the BW_LOGLEVEL environmental variable. This variable can be set to the following values:
- DEBUG
- INFO
- WARN
- ERROR
The easiest way to set an environmental variable is by using the -e switch for the docker run command. Example: docker run –name “helloworldContainer” -e BW_LOGLEVEL=’DEBUG’ -p 8080:8080 -p 7777:7777 -d helloworldimg
By default the logging is only written to the standard log file of the container. This log file can be shown using the command: docker logs <containerName>. Example: docker logs helloworldContainer
Fine grained logging
The disadvantage of using the BW_LOGLEVEL variable is that you may be ‘flooded’ with information. The switch causes all kind of logging to be set to a certain level in one go. As a result a lot of (unnecessarily) logging may be created in one go. There is nevertheless a way to enable more fine grained logging by using a logback configuration. A logback configuration is a xml file (based on the logback standard) that defines which type of logging is to be generated and how this information is to be shown. In order to create a logback configuration use the following steps:
Prerequisites:
Linux VM with:
- BWCE installed.
- Docker installed.
- Access to docker runtime file (bwce-runtime-<version>.zip).
This document was written for BWCE 2.4.5. It is known that the procedure described in this document doesn’t work for version before 2.4.0.
Step 1: Create a custom logback.xml file based on the template included below.
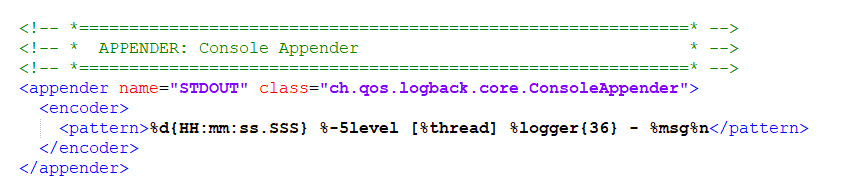
The file contains a so called appender. The appender defines the way in which log messages show up in the log and the location of the log file. Normally speaking there is no need to change the standard BWCE appender. Nevertheless there may be a reason to (temporary) create a custom appender with an alternative pattern and or locations for a certain category of logging. For more information on how to create an appender, see the documentation regarding the logback standard.
Please mind: it is possible to store logging information in a log file instead of or next to sending it to the console. Nevertheless, while we are dealing with docker, please be aware that any log files will disappear as soon as a container stops.
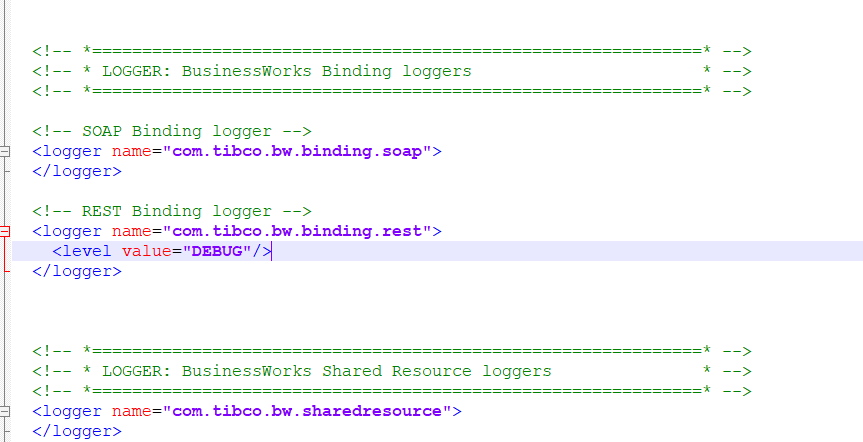
The default logback.xml file contains a number of specific logging sections, that allow you to change the logging level for specific categories of logging information.
Example: Let’s assume you are interested in the logging information for REST calls (only). In that case add a custom logging level for REST Binding logger as show below.
The following logging levels can be used.
- TRACE: Records fine-grained informational events.
- DEBUG: Records fine-grained informational events that help in debugging. Useful for diagnostics.
- INFO: Records informational messages that highlight the progress of the application. Useful for production mode.
- WARN: Records potentially harmful situations.
- ERROR: Records error events that are harmful enough to prevent the application from running.
Step 2: Create a new BWCE base image that includes the logback.xml file.
Please mind: it is only possible to use a custom logback configuration if you first create a new BWCE base image. It is not possible to inject the logback configuration on top of a ‘regular’ BWCE image that you use to run a BWCE application.
All BWCE containers are derived from a base BWCE image. The TIBCO documentation provides instructions on how to create a base BWCE image. As part of the instructions you have to copy the bwce-runtime-<version>.zip file to the TIBCO_HOME/bwce/<version>/docker/resources/bwce-runtime folder. In order to use the logback configuration you have to carry out the following step:
copy the modified logback.xml file to TIBCO_HOME/bwce/<version>/docker/resources/addons/custom-logback directory. Please mind: the custom-logback doesn’t exist (by default). You have to create it first.
Step 3: Build a NEW BWCE base image.
It is now time to create a new (temporary) image that contains the backlog.xml settings. DON’T overwrite your existing base image.
Example: Let’s assume you want to use the name ‘bwcewithlog’ for your new (temporary) image, you would build the image with the command: docker build -t tibco/bwcewithlog:latest .
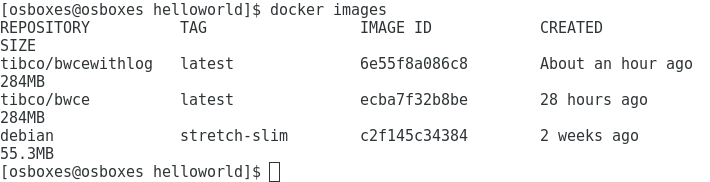
Step 4: Check to make sure the new base image is created with the command: ‘docker images’. You should see the newly created image in the output:
Step 5: Create an image for the BWCE application you want to test.
If you want to test your application with the newly created logback configuration you have to make sure to use the image you created in step 2 (instead of the standard BWCE image).
a) Create a copy of the directory you used to build the existing BWCE+application image. This directory would typically contain at least a Docker file and the ear of the application.
b) Modify the FROM line in the Docker file and use the bwcewithlog image (you created in step 2) as a base:
FROM tibco/bwcewithlog:latest
MAINTAINER tibco
ADD HelloWorldAPI.application_1.0.0.ear /
c) Create a new image for the BWCE application (from the directory you created in step 5b) by using the command: docker build -t <image name> .
Example: docker build -t helloworldwithlogimg .
Remark: it is probably wise to use an image name that is derived from the original image name (in the example above the post fix ‘withlog’ was added the the original name.
d) Run the application.
In order run the application, use the following command: docker run –name “<containername>” -e CUSTOM_LOGBACK=’true’ -p 8080:8080 -p 7777:7777 -d <image name>.
Example: docker run –name “helloworldwithlogContainer” -e CUSTOM_LOGBACK=’true’ -p 8080:8080 -p 7777:7777 -d helloworldwithlogimg
Remark: in the above example the ports 8080 (application) and 7777 (swagger) are mapped. You may have to use other mappings if other ports are enabled.
e) Use the command ‘docker logs <container name>’ to view to logging information. Example: docker logs helloworldContainer.